Floorplan Importer Troubleshooting
Successful Floorplan Import
The examples below display what the CAD plan and what Serraview look like following the floorplan import when the mapping matches. Also, an Excel report will be generated after the import completes and this will indicate there are no warnings to action.
|
|
|
Import Results in Warnings or Errors
After you have uploaded the AutoCAD file(s) using either the Floorplan Importer, Floorplan Importer Tool, or the File Upload, you will receive the Import Results. This identifies whether your file was successful or if you had and warnings or errors that cause your file to unsuccessfully load.
Below are list of common errors and warnings.
Warnings
Any warnings will identify any minor issues with the drawing of a space. The AutoCAD file will be successfully uploaded but may contain incorrect mapping, refer to CAD Issues below.
It is important that you review and correct any warnings in the AutoCAD file and then re-upload the file to ensure a successfully upload without warnings.
Errors
Any errors identify major issues with the drawing and the AutoCAD file will not be upload.
It is important that the errors be corrected in the AutoCAD file and then re-upload the file.
Error Example 1
The following error displays.
Error Occurred: No name found in polyline (XXX)
Resolution
- Open your AutoCAD.
- In the command line, enter the command to delete a complaining object:
(entdel (handent "INSERT ID HERE AS PER IMPORT RESULT"))
For example:
(entdel (handent "1101DCD"))
Alternatively, you can highlight the object before deleting:
(redraw(handent "ID")3)
For example:
(redraw(handent "1101DCD")3)
Error Example 2
Error Occurred: Proposed plotting dimensions 22672x7985px are too large! Cannot plot larger than 16385px.
Resolution
The floorplan is too large to upload and you can use the spreadsheet PlotDimensionsCalculator.xlsx to calculate if a floorplan will fit at a given scale. If a floorplan does not fit at a given scale then the scale can be increased to reduce the amount of pixels.
Floorplan Dimensions Information
There is an upper limit on a single dimension of 65,535 pixels. At the standard scale of 0.015 this comes out to about 982500 millimetres (982.5 metres). Which means neither width, nor height can be larger than this. But due to the other limit, you can't have both be even close to this at the same time.
There is a limit on how much memory can be used at once for a single image (essentially, this is a limit on the total area of the image, but it is a bit more complicated due to some tiling/padding issues). It must be less than 2GB worth of pixels. Increasing the width decreases the maximum allowed size of the height and vice versa. Both of these are pixel limits, so they depend on the scale.
Error Example 3
Error Occurred: Error while saving - Invalid space/team mapping.
Contact the Serraview Support team.
CAD Issues
Issues can be the result of mapping errors in the CAD plan which prevents Serraview from mapping the floorplans accurately. An issue arises when a floorplan does not successfully meet the required criteria and action needs to be taken to correct this.
For example, we can see in the floorplan below this workstation looks like it has not been mapped.
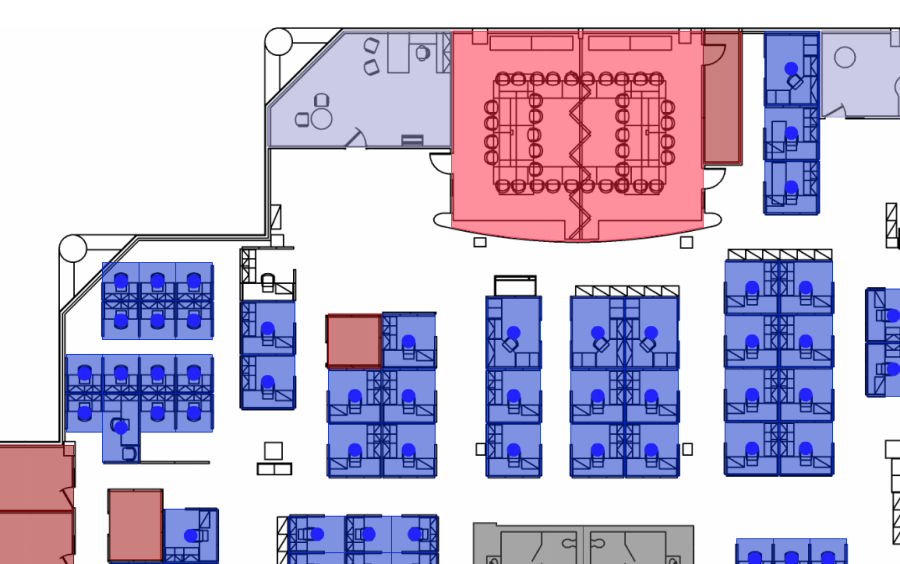
To diagnose and resolve issues, compare the CAD plan, Schema and floorplan mapping side-by-side.
For the cases where these troubleshooting steps do not resolve floor issues, contact Serraview Support team for assistance.
Space Not Mapped
If you find an unmapped space, the first step is to check the space in the CAD plan and if the issue is not listed below then it could be an issue with the Schema.
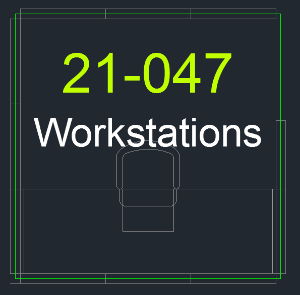
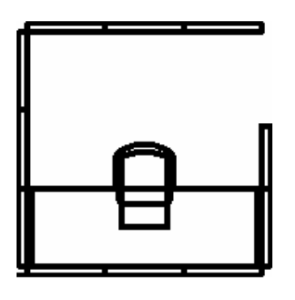
- Space has a polyline (green lines) around the entire shape
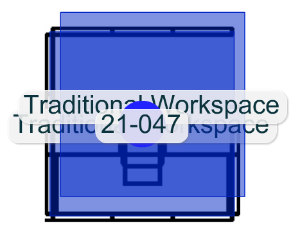
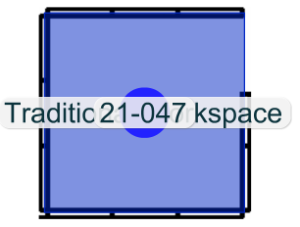
The below example displays a workstation space which does not have the polylines mapped on the bottom and left-hand side of the square. Ensure the polylines are closed around the Space to resolve this issue.
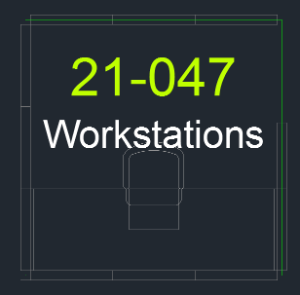
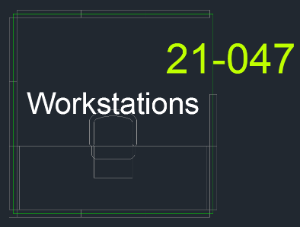
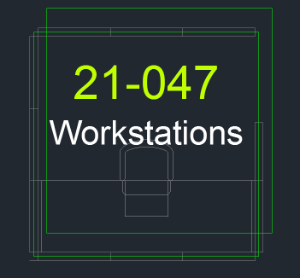
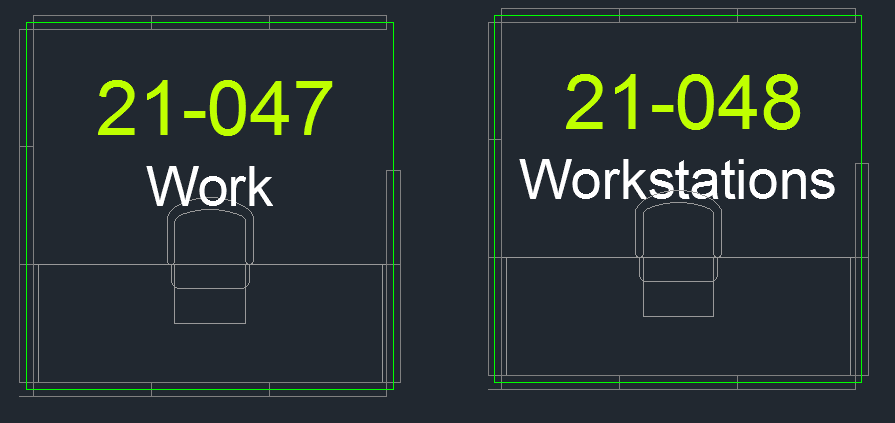
- Middle point of Space Name label is within the Space Shape
Here we can see the space label 21-047 is not within the center of the Space Shape and therefore will not map. Resolve this issue in the CAD plan to ensure the Space Name label is within the Space Shape.
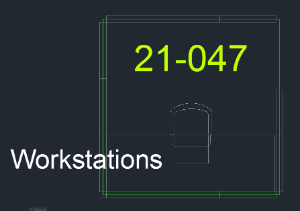
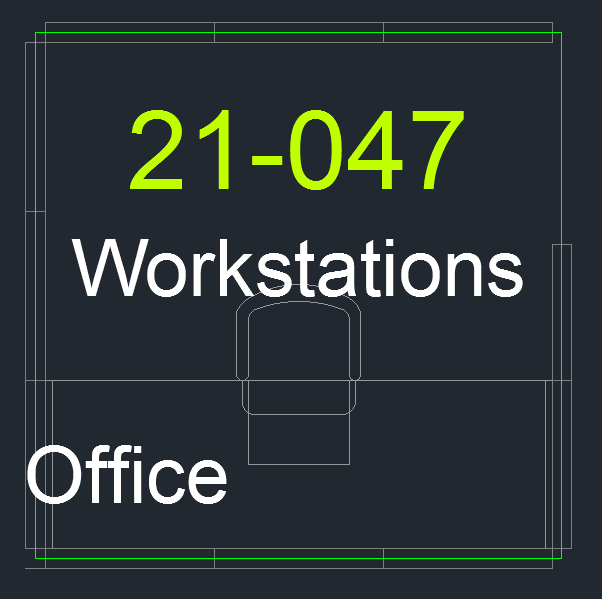
- Middle point of Space Type label is within the Space Shape
The workstation below displays the Space Type label sitting away from the middle of the Space Shape and this will not map correctly in Serraview. Ensure the Space Type label is within the Space Shape in the CAD plan to resolve this issue.
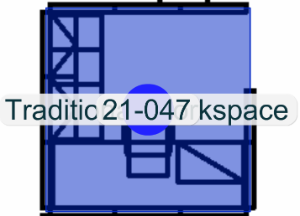
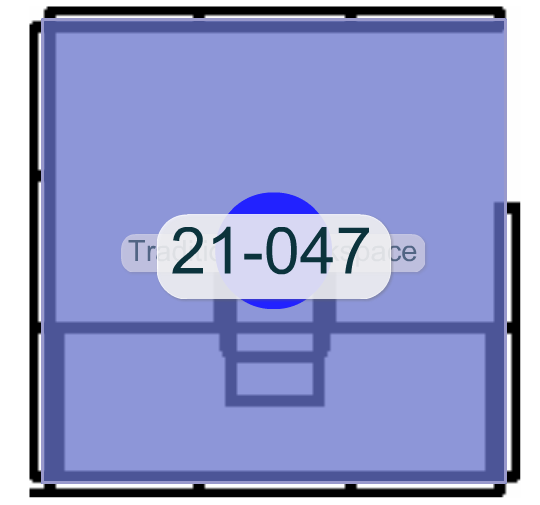
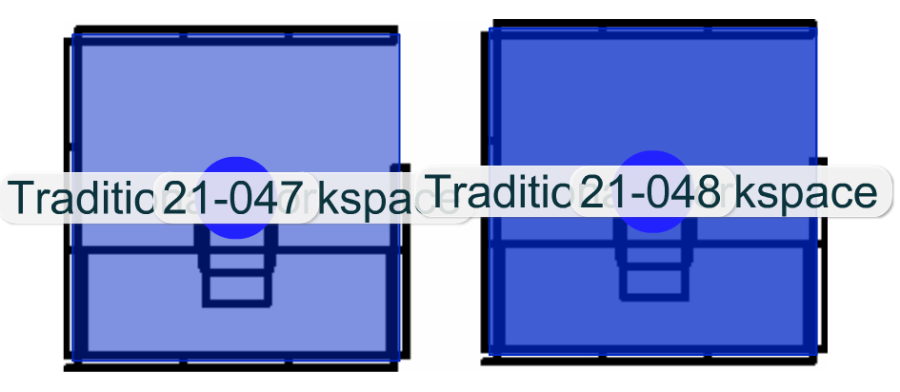
If you imported the CAD plan with any of the above three examples unresolved, the resulting floorplan view in Serraview will display without mapping, as shown below:
- Polyline type is incorrect
The Polyline line type must be 'Polyline'. To check the polyline line type, select the space area polyline, and right click properties. The line type will displayed in the first row.
In the example below, the polyline line type is '3D face' and this will not be accepted by the Floorplan Importer tool.
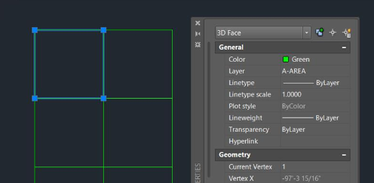
Resolution: Change the polyline line type to 'Polyline' by following the instructions AUTOCAD Documentation - To change the Linetype Display Style of existing 2D Polylines.
Multiple Spaces with the same Name
Issue: There are multiple spaces in Serraview with the same name. The container names must be unique.
Results error message: Unable to match spaces. There are 2 spaces in Serraview named 'XX' that match a space in the CAD file. Please update the duplicate names in Serraview.
Resolution: To resolve this error, you will need to:
- Navigate to Spaces.
- Use the Location selector to search and select the building and floor.
- Click the Edit Floor button.
- Double click the space. The Edit form displays.
- In the Name field, update the space's name. This name must be unique for example from '28-01' to '28-04A'.
- Click the Update Space button.
Double Mapping – review the CAD plan
When mapping displays darker over a space in Serraview, it is an indication that there are multiple shapes mapped on top of each other. Review the CAD plan to see why this is the case.
Checklist:
- Multiple polylines around shape (could be several smaller shapes in a bigger shape)
In this example, we will remove the incorrect polyline shape.
|
|
|
This example displays the overlapping double mapped space. In other examples, you may see the double mapping sitting directly on top of each other.
- Multiple Space Type labels within a Space Shape
In this example, we can see two Space Type labels listed in the one shape. Confirm which Space type label is correct for the space and remove the incorrect label in the CAD plan. Here we remove the Space Type Label "Office".
|
|
|
If the issue is not one of these examples, the import settings chosen when uploading the floorplan may not have been accurate for the import.
Wipeouts
Issue: A Wipeout creates a polygonal area that masks underlying objects with the current background color.
Reason: This causes FPI issues where some objects are shaded black which covers the whole object
Resolution: You will need to ask the architect send a file without wipeouts.
For more information, refer to AUTOCAD Documentation - WIPEOUT (Command)
Plotting Error
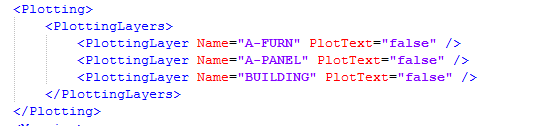
If the plotted floorplan does not match the CAD plan, an error has occurred during the plotting phase of the import. It will usually be due to the floorplan lines being in an incorrect layer, or a line type present that is not supported. For example, this plan has mapping, but the desk and chair is missing. Below is an example of where to look in the CAD plan and Schema for the expected plotting layers.
|
|
|

Other items to check in CAD plan:
- Properties of the line set to closed
- Layer is not frozen
- Shape is not in a block
Schema Issue
Another reason spaces may not display mapped is due to the CAD plan not matching the Schema.
Serraview Only Configuration
To access the Schema for a client:
- Navigate to Admin Settings > General > Data Imports.
- Locate the DWG Template Schema field. The Schema XML code is found here.

3. To view the Schema full screen, copy and paste the Schema code into a text editor tool using XML as the language, for example, Notepad++.
Before you edit the schema, make sure you save a copy of the original schema in case you need to revert any changes made.
5. Edit the schema in a text editor.
4. To save any updates you make to the Schema, you must copy the XML from the text editor and paste the updated Schema back into the DWG Template Schema field.
6. Click the Update button.
Space Not Mapped
In the case where a space is not mapped, and no CAD issues can be found then there may be an issue with the Schema.
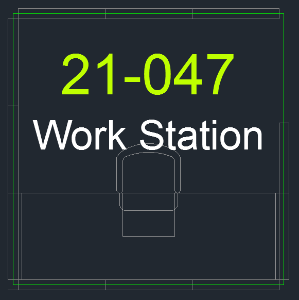
The space type label does not match any 'filter include value' in the Schema
The below CAD example displays the Space Type label as 'Work Station' where as the Template is looking for 'Workstations'. If we update the Schema to include 'Work Station' the workstation will now map.
No ContainerType ID is listed or no ID which matches for the mapping container
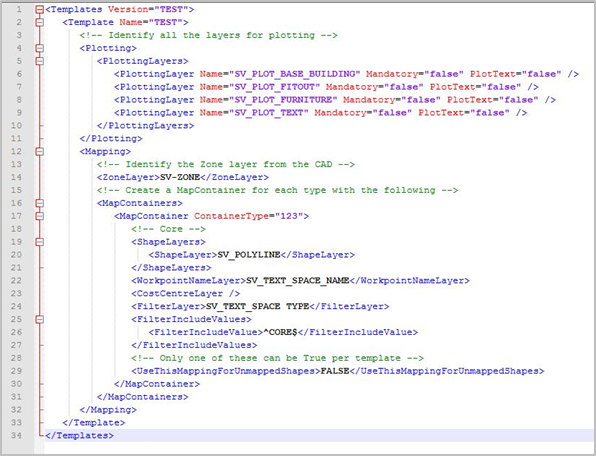
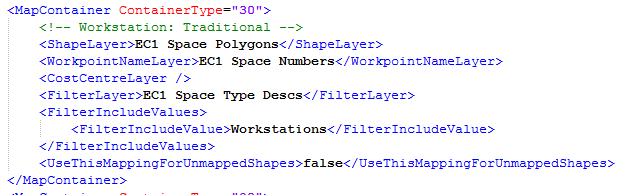
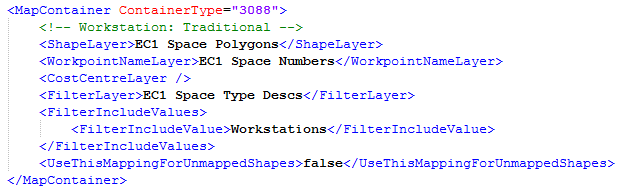
Using the example below you can see the container type is looking for '3088' as the Container ID for workstations.
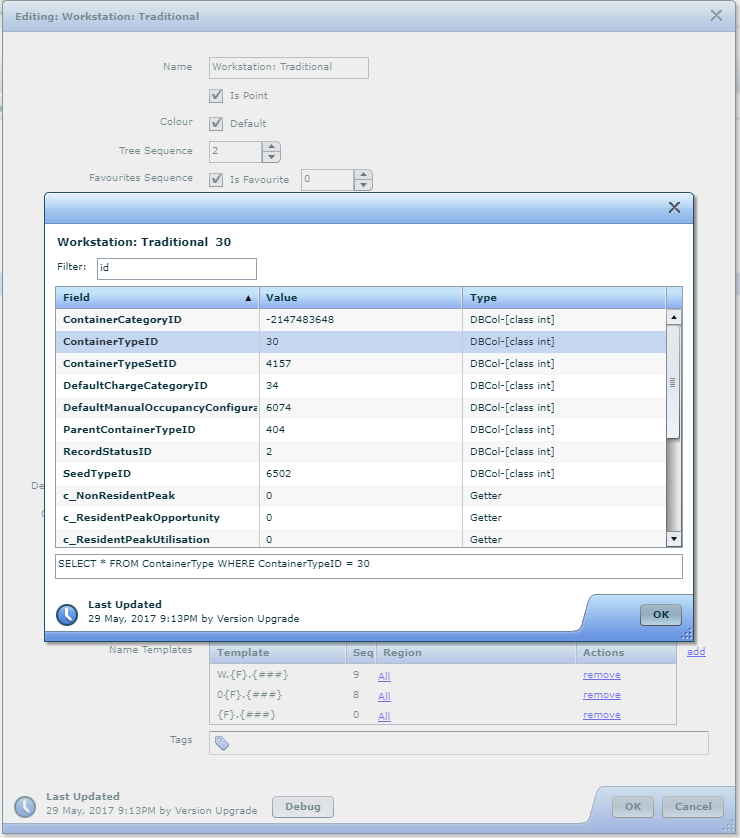
To confirm the container type ID, go to Configuration > Mapping. Select the Container Type you need to check e.g. Workstation Traditional to find the ID number. Update the Schema with the correct Container Type ID and save the Schema.
Double Mapping – review the schema
In the case of double mapping where no CAD issues can be found, there can be an issue with the Schema.
Space Type label matches multiple 'Filter Include Values' in the Schema
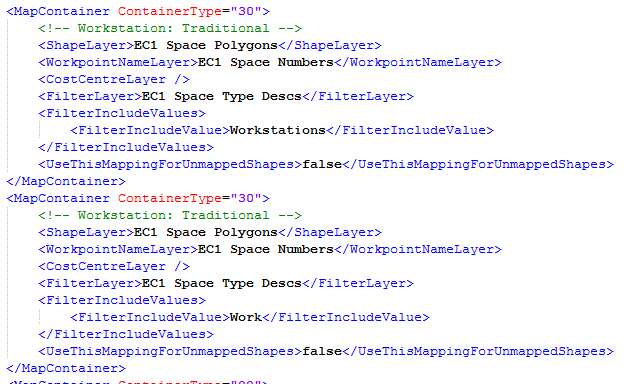
In the below example, Template Schema, there are two Container Types with the ID '30', one for 'workstations' and one for 'work'. The Floorplan Importer will first map containers with the ID 'work' and then map any additional Container Types with the same ID and <filter include value> with variations on the word 'work' e.g. 'workstations'.
The below example displays how this will display in Serraview with workstation 21.048 displaying as double mapped.
To update this in the Schema, you will use 'anchors' in the Container Types to ensure the Schema maps both 'work' and 'workstations' separately. In our example, we will name these ^Work$ and ^Workstations$ (the $ is the anchor).
Update and save the Schema with these changes.
Wrong Space Type Mapped
When the space type mapped does not match the expected result there is likely a Schema issue.
ContainerType ID in the Schema matches the wrong space type ID in Serraview
In the example below the Container Type is looking for '20' for workstations.
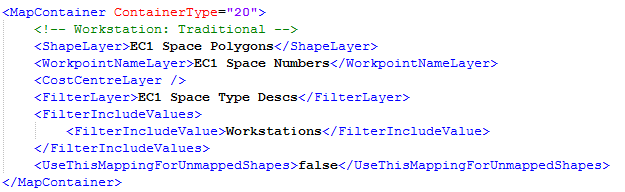
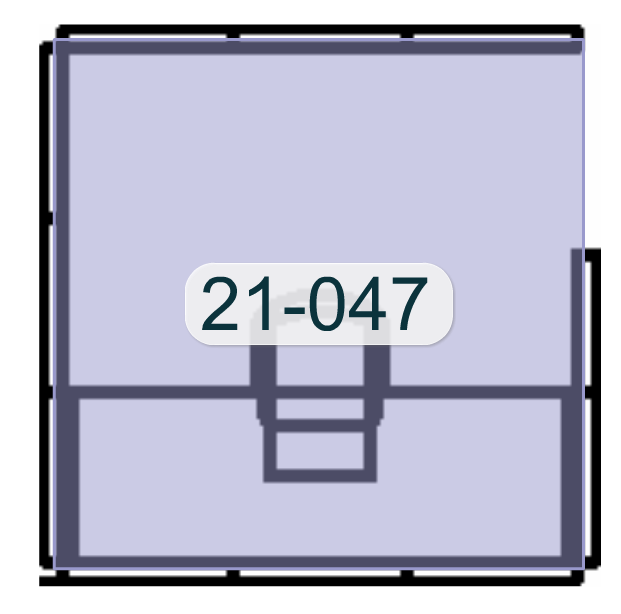
This is the space mapped in Serraview as it will display with the incorrect Container Type ID:
To search for the Container Type ID, go to Configuration > Mapping. In our example, we will search for the ID '20' and it displays the ID is for 'Office' Container Types.

We then search again for the correct Container Type ID 'workstations'. Select the Container Type for this name, which will display '30'.
Update the Schema with the correct Container Type ID and save the Schema.

AutoCAD Height and Width Limitations
Due to the technical limitations of the library we use for plotting floor plans with FPI, we can only plot floorplans to the maximum height or width of 16,385 pixels. Any floorplan that attempts to plot a floorplan image greater than 16,385 pixels in height or width will fail to import.
The AutoCAD measurements are referenced when importing, and the ratio is referenced to scale the real-world measurements for plotting measurements.
The following are the maximum AutoCAD floorplan width and heights for plotting floorplans:
- 0.015 ratio: 0 to 245.775 meters width or height
- 0.030 ratio: 245.776 to 491.55 meter width or height
By default, floorplans are imported at 0.015 ratio. However, if the floorplan is longer than 245.775 meters in length or width, and the ratio is 0.015, the import will return an error. This can be resolved by completing a manual floorplan import (when a floorplan is imported for the first time) and set its floor ratio to 0.030. This will ensure that it is successfully imported and any future FPI imports use the floor's set ratio of 0.030.
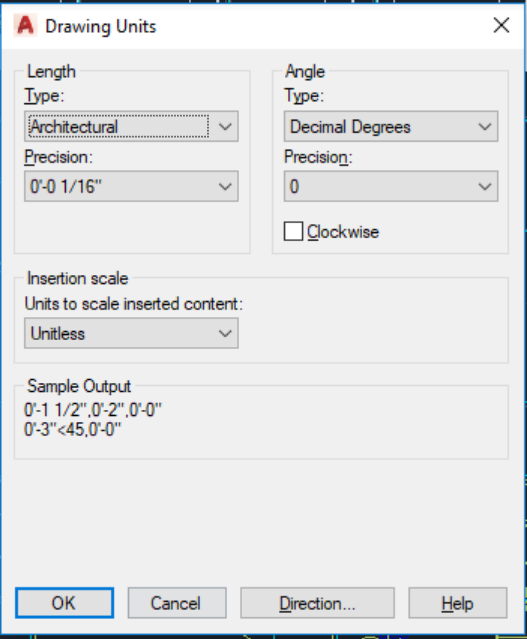
Insertion Units Error
Error Occurred: Attempted to use units from file (INSUNITS) but none are defined in dwg.
Cause: 'From File' Cad Units selected insertion units not found in file.
Resolution:
- Choose the correct CAD units for the file
- Edit the insertion units found in the 'Drawing Units' form in CAD, which you can find by typing in 'Units'.
The default units for all clients is 'From File', however this can be changed in the configuration by adding one of the options to the 'Floorplan Imports - Default Units' field.
3. Navigate to Configuration > General > Data Imports.
4. In the Floorplan Import- Default Units field, enter the units.
5. Click the Update button.
Extra Spaces
Issues
The extra spaces that were causing the mapping to be skewed.
Resolution
Check the floorplans for any hatches/polylines that are outside the expected plotting area, as these can skew the mapping. You will need to remove the hatches/polylines from the floorplan.