Automated Reports
I'm sure you've seen all the fabulous reports we have on offer, or have even asked us for a custom report. These reports are what you swear by, and you use quite frequently to show off to your manager or to maintain your portfolio. So much so, that it can add another task to your to-do list.
So what if you could automate this?
Automating reports helps you schedule these regular reports; examples of common automated reports include:
- monthly archive candidate report
- monthly utilization report
- bi-weekly asset report
When you automate reports, this lets you schedule reports to be emailed, imported, or sent to SFTP.
Reports can be automatically emailed to specified people at your desired time and then these can be downloaded from your Document Library.
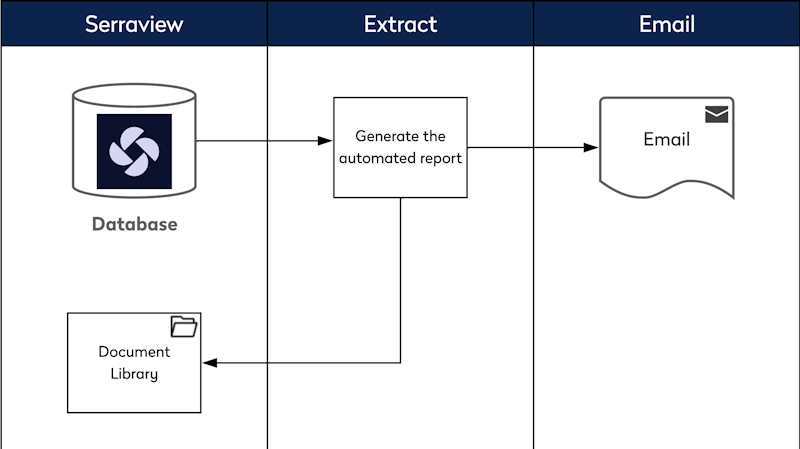
- SFTP
Reports can be automatically sent to an external SFTP, so that they are delivered securely to a specific folder.

- Import
After you have the automated report set up, you can import the automated reports to automatically and seamlessly manage your portfolio data. Learn more about Automated Report Imports.
Let's get automating
Contents
Add Secured Actions
You will need to add the following to the user's role:
- "Automated Report Import" secured action - This gives you access to the Report settings.
- "Report [##] - report name" secured actions
- Document Library - Access - This lets you download the Automated Report from the Document Libary.
Learn more in Manage User Roles.
Add the Report Schedule
From Serraview, complete the following:
- Navigate to Admin Settings > System Config > General > Reporting. Remember, you can add the General setting to your Favorites menu, so that you have quick access to these settings.

- Click the Add button.
- From the list, select the report.

(A) Report Parameters
Depending on the report selection, different parameters display.
Date parameters are not compatible with automated reports
If you want to automate a report with date parameters, then this will need to be created as a custom report with hard-coded date ranges. For example StartTime >= -7d and EndTime <= 1d.
(B) Options
Complete the Options:
- From the Output Type drop-down, select either Excel, PDF, or CSV. Note: When you select the import, the output type will automatically change to CSV.
- From the Page Size drop-down, select either A4 or A3.
- From the Orientation drop-down, select either Portrait or Landscape.
(C) Frequency
From the Frequency drop-down, select either:
- Daily - Then select the time.
- Weekly - Then select the day(s) of the week and the time.
- Monthly - Then select the month(s) of the week and the time.
(D) Delivery Method
You need at least 1 method selected:
- Import
- SFTP
Email Settings

- In the Recipient field, enter the recipient's email address.
- In the Subject field, enter the email's subject. Note that when the report is scheduled, it will automatically append the frequency to the report's name.
- In the Email Body field, enter the email's body.
- When you have finished completing the settings, click the Update button.
Import Settings
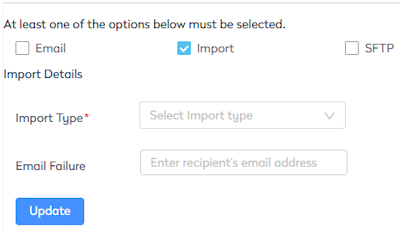
- From the Import Type drop-down, select the import and depending on the selection, different settings display.
| Import | Settings |
|---|---|
|
Asset Import |
Create assets when not found? |
|
Building Import |
Create buildings when not found? |
|
Floor Import |
Create floors when not found? |
|
Occupancy Import |
- |
|
Person Import |
Create people when not found? Remove old attributes from people in this import? Create new attributes when found? |
|
Team Import |
Create teams when not found? |
|
Workpoint Import |
Assign new teams to hoods (neighborhoods) if possible? Clean up container shape data? |
|
Hood (Neighborhood) Import |
Create hoods (neighborhoods) when not found? |
|
User Import |
Create new user when not found? |
- In the Email Failure field, enter the recipient's email address.
- When you have finished completing the settings, click the Update button.
SFTP Settings
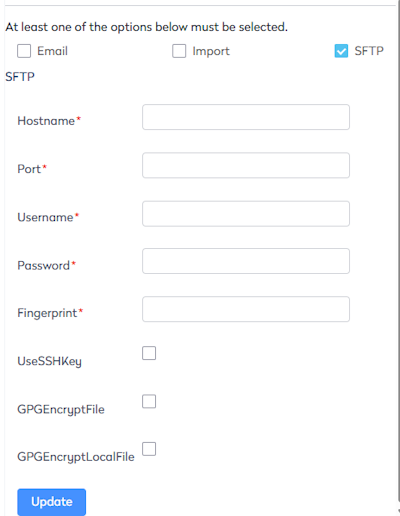
- Complete the SFTP details, and it will override the SFTP details configuration in the Configuration > General > SFTP.
| Parameter | Description |
|---|---|
| Hostname | SFTP server host name. |
| Port | Port number on SFTP server to connect to. |
| Username | Account name for server authentication. |
| Password |
Encrypted password. |
| Fingerprint |
Each SFTP server has a unique identifying host key code to prevent it from forging another server's key. Provided by the client. |
| UseSSHKey | T.B.A. |
| GPGEncryptFile |
When this is checked, it will use the following options to encrypt the report:
|
| GPGEncryptLocalFile |
When this is checked, it will use the following options to encrypt the report:
|
| GPGPublicKey |
Provided by the client. |
| GPGRecipient |
Provided by the client and in an email format indicates who generated the public / private keys. |
| GPGASCIIArmored |
Check this setting to specify the output file in ASCII or binary format. |
- When you have finished completing the settings, click the Update button.
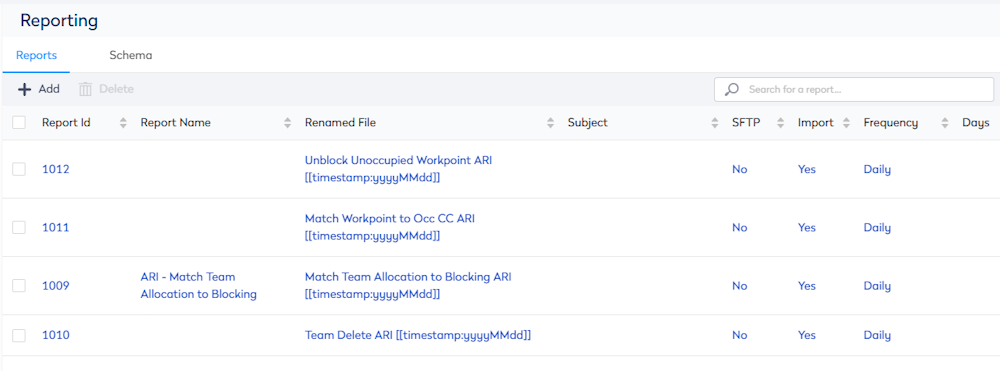
Edit the Report Schedule
The reporting list will contain scheduled reports and ARI (Automated report Imports).
You may notice that the existing ARIs won't display in the Reporting Module's list. When the ARI (custom report) was created by Serraview Support team and they have the ability to uncheck the "Show In Reports Tab" in Report Builder and this hides the report from the Reporting Module. This is done to safeguard the ARI so that no users can edit the custom report or delete it.
- Select the report you want to edit and the Automated Report form displays.
- Edit the settings.
- Click the Update button.
Delete the Report Schedule
- Select the report you want to delete.
- Click the Delete button and the message "Are you sure you want to proceed with deleting this report?" displays.
- Click the Ok button.
Behind the Scenes
Serraview Only
These instructions are for the Serraview Support team as they still have access to the Report Schema.
The report details need to be set up in a JSON schema. A step-by-step instructions are outlined below in Automate a Report.
Pre-requisite Knowledge
- Understanding of basic JSON
Modify the Automated Report Schema
- Navigate to Configuration > General.
- Select Reporting.
- In the Automated Report Schema field, enter the JSON code.
Remember to validate the JSON code before you paste it into the field, use the JSON Validator https://jsonlint.com/
See the Automated Report Schema Examples - JSON Code below for the examples and code description.
5. Click the Updated button.
Automated Report Schema Examples - JSON code
The automated report is created using the JSON (JavaScript Object Notation) format.
Monthly Example
This report is created on the 5th day of the month at the time of 22:30.
The second report is created on the 5th day of the month at the time of 23:30 and it is generated from the latest snapshot. The report is renamed to the timestamp of yyyyMMdd HH.mm.ss.
The email notification is sent to username1 and username2 and if the SFTP fails then username1 will receive the failure email.
{
    "reports": [
    {
        "frequency": "monthly",
        "days": "5",
        "time": "22:30",
        "reportUrl": "2&floorSelector=&shiftToSnapshot=-2147483648&OutputType=Excel&PageSize=A4&PageOrientation=Portrait",
        "subject": "report 2 monthly"
    }
    {
        "frequency": "monthly",
        "days": "5",
        "time": "23:30",
        "reportUrl": "2&floorSelector=&OutputType=Excel&PageSize=A4&PageOrientation=Portrait",
        "parameters": [{
            "useSnapshot": "[[latest]]"
        }],
        "renameFile": "[[timestamp:yyyyMMdd HH.mm.ss]]NewFileName.ext[[timestamp:yyyyMMdd HH.mm.ss]]"
    }
    ],
    "to_email": "username1@company.com, username2@company.com",
    "sftp_config": {
        "hostname": "sftp.xxxx.xxxxx",
        "port": "22",
        "username": "testusername",
        "password": "bkcd/EMD1+oPFPltJhB9Hdhz2a/QN9KAB6tpY6K7cwAw8XDlQHSw8dUIC0S",
        "fingerprint": "ssh-rsa 1024 39:05:08:3d:f8:fb:41:f2:17:a4:68:3a:2f:ab:a0:2b"
    },
    "sftp_remote_path": "to_client_name",
    "local_path": "\\test",
    "emails_on_failure": "username1@company.com"
}
The JSON parameters are:
| Parameter | Description | ||||||||||||||||||||||
|---|---|---|---|---|---|---|---|---|---|---|---|---|---|---|---|---|---|---|---|---|---|---|---|
| reports | Define an array of report objects. | ||||||||||||||||||||||
| frequency |
Defines the frequency. The options are monthly, weekly, daily, hourly If the frequency parameter is not defined, it defaults to weekly, and then days parameter is mandatory. When it is set to monthly, use the digit to represent the day of the month. A negative will count from the end of the month e.g. -1 means the last day of the month. |
||||||||||||||||||||||
| days |
Defines the days. If frequency parameter is not provided then the days parameter is required to specify which days the snapshot must be created. The days parameter's values are:
|
||||||||||||||||||||||
| time |
Defines the time the automation will occur. Use the 24 hours format, for example, 23:30. Do not use a time from 1:30 to 03:30 as this is reserved for nightly tasks that start at 1:30, instead use 00:45 or 03:45. |
||||||||||||||||||||||
|
reportUrl |
The ReportID and the following parameters. From the Reporting module complete the following:
For example: ReportID=2&floorSelector=&OutputType=Excel&PageSize=A4&PageOrientation=Portrait 3. Copy all characters after 'ReportId= into the JSON code. 2&floorSelector=&OutputType=Excel&PageSize=A4&PageOrientation=Portrait |
||||||||||||||||||||||
| subject |
When the to_email is defined this is mandatory. This is the email subject for the email that is sent to the receiver. Each report will be sent in separate emails. |
||||||||||||||||||||||
| email_body |
This is the email body and it can be either defined or not defined. email_body defined If it is defined then you include a customized HTML content. Content will be in HTML format and you must use HTML tags. Also, note that the following format must be used:
email_body not defined If no email_body field is defined then by default, the content is: Please click the <a href="$link">link</a> to download the report. |
||||||||||||||||||||||
| parameters |
The following parameters can be applied to the reportUrl
|
||||||||||||||||||||||
| renameFile |
The downloaded report will be renamed to NewFileName.ext. Important note the file extension must be .csv. If the 'OutputType=CSV' is specified in the reportUrl, then the renameFile must be NewFileName.csv. You can use the following values:
Timestamp supports the following:
If \ (forward-slash) is used then an extra \ is required to be placed in front as the escape character (this is part of the code syntax). For example |
||||||||||||||||||||||
| to_email |
This is the receiver of the email. If there is multiple receivers then use a comma separate list. "to_email": "username1@company.com, username2@company.com", If both to_email are defined in the report and common field, it will send the report to the specified recipients plus the common recipients. When this field is given, the Automated Report will be created and uploaded to the Document Library and it will include the download link in the email body. If an email address is invalid e.g. fake@serraview.com, the report will still be created and uploaded to the Document Library. |
||||||||||||||||||||||
| sftp_config |
This is the SFTP details and it will override the SFTP details configuration in the Configuration > General > SFTP.
|
||||||||||||||||||||||
| delimiter |
The delimiter can either be: Tab, Pipe, or Tilde. When you use the delimiter this will force the renaming of the report file's extension to .TXT. This will override the report's extension and the extension specified in the renameFile. |
||||||||||||||||||||||
| trimLastEmptyLine |
True / False This indicates if the last empty line will be trimmed or not. If set to True, then it will not append '\r\n' to the last line of data row. |
||||||||||||||||||||||
| sftp_remote_path |
Remote path to push reports to. Serraview will use the SFTP details in the Configuration > General > SFTP, unless a specified SFTP server is configured as above. |
||||||||||||||||||||||
| local_path |
This is a local path (local to Serraview's SFTP server) to which reports are pushed. The local_path will contain the report files and then a Client's SFTP can pull them and this requires that the Client has requested SFTP access to Serraview's server. Serraview will append local_path to the instance's SFTP \out folder, creating any sub-folders as needed. Use "//" for dumping the file to the root \out folder and if the local_path contains any sub-folders then separate each with a double backslash e.g. "local_path": "my\\local\\path" |
||||||||||||||||||||||
| import |
This is used for Automated Import Reports. For this report to be imported then set this to "true" and any other values are ignored. |
||||||||||||||||||||||
| importComment |
This is only used when the import parameter is used. Any text in the importComment will be added to the Recent Imports' Comment field, refer to View Recent Imports. |
||||||||||||||||||||||
| disable |
Use this to disable the automated report. Set this to "true" and any other values are ignored. |
||||||||||||||||||||||
| emails_on_failure |
Whenever there is email / SFTP Remote / SFTP local failure, this will send an email alert to the specified comma separated emails. This can be configured to a specific report definition, so the configured emails will only receive when that individual report fails to run. Or it could be configured to the common field, then it will send to these emails for each failure report (in one email). |