Workplace Awareness
Many organizations are now fast-tracking such solutions in an effort to be prepared to control physical distancing regulations and safety protocols. As more people return to the office, these capabilities can monitor proper distancing, track workplace usage patterns and ensure safety.
How can I retain my current portfolio state prior to beginning my back to work planning?
Before you begin any back to work planning, you may want to retain a copy of your pre-back to work planning state. To do this:
- Take a snapshot labeled Pre Back To Work to retain key data. Refer to Snapshots to confirm this option captures all information you require.
- On request our Client Services team can create a dedicated back up of your entire database on a nominated date. This backup can be retained for an on-demand restore of your UAT environment. The UAT environment with the dedicated back-up data is then used as a reference point for the state of your portfolio prior to your back to work planning, allowing you to view allocation and occupancy in VBS and run needed reports.
Prerequisites
The prerequisites for the process are:
| No. | Description | Responsible |
|---|---|---|
| 1 |
If required, retain a copy of your current data. This can be done by using a Snapshot labeled 'Pre-Back to Work', or by submitting a support ticket to create a dedicated back up that you can restore to your UAT environment post back-to work planning. Support to create the backup on request. Refer to the 'How can I retain my current portfolio state prior to beginning my back to work planning?' section directly above this table for the process. |
Client/Serraview Support |
| 2 |
Complete Regional Awareness activities to identify affected buildings/regions. |
Client |
| 3 |
Buildings & Floors and underlying floorplans up to date. |
Client |
| 4 | Occupancy and Utilization data up to date. | Client |
| 5 |
Create new space types, for example:
Refer to Add, Edit, or Delete the Space Types If you are using Locator, consider whether any new space types will continue to be available via the Find a Desk or Find a Space. |
Client |
| 6 |
Create an integer custom field against space called 'Original Meeting Room Capacity'. This field is referenced in the Shared Space Capacity report. Refer to Manage Custom Fields |
Client |
| 7 | Client to submit a support ticket to add the Workpoint Area Report to the client environment. Serraview Support to add report to the client environment. |
Client/Serraview Support |
| 8 | Client to submit a support ticket to add the Allocations with Tags Report to the client environment. Serraview Support to add report to the client environment. | Client/Serraview Support |
| 9 | Client to submit a support ticket to add the Back to Work - Space Capacity Changes dashboard to the client environment. Serraview Support to add reports to the client environment. | Client/Serraview Support |
Process
The process involves:
| No. | Description |
|---|---|
| 1 |
Where social distancing measures are required, the Density-Based Capacity Report can allow you to enter a minimum density requirement at a region, building, or floor level. This allows you to identify floors where you have people occupying spaces that do not meet your minimum density requirement and look at all spaces you have mapped on a floor to see where you may have the opportunity to repurpose spaces. For example, you may find workpoints where the square footage is too small, and you may need to consider shift work, or moving some people out of the space to another floor. You may also find shared spaces such as Meeting Rooms where you can continue to maintain social distancing measured by decreasing their capacity based on your minimum density requirement. |
| 2 |
Analyze each floor to identify where you may need to adjust seating capacity The existing floor plan design and the working style of the teams help determine your approach to identify usable space to create a Back to Work plan. For example, a single floor or building may mean you have the capacity to house the teams within their existing allocation. Review the VBS For each floor, assess the current allocation/occupancy in the VBS to provide you with a clear view of the currency of your data, and the potential number of people returning. The Information Panel shows statistics around occupancy and allocation.
It is recommended you look over the available Color By options to enrich your understanding of the possible solutions. For example:
Useful Reports 215 Validation Summary Report
Allocations with Tags Report
Badge Data Utilization Reports
SvLive Utilization Reports
Workpoint Area Report
|
| 3 |
If you identify any spaces in the Workpoint Area report that fall under your minimum area requirements.
|
| 4 |
Next, you may choose to complete some of the activities below, this will depend on the space you have available and the working style of the teams inhabiting the space:
|
| 4a |
Change Space Types Changing space types is a quick and easy way to repurpose the space without making changes to existing space mapping. For example, you may repurpose a meeting room to a Temp Office or Isolation Room space type. Remember when changing spaces from one space type to another, you may need to update the Charge Rule, the number of Workpoints, and the number of seats assigned to each space. Refer to step 4b of this process when changing the number of Seats Change a Space To change a single space in Serraview 3.0, refer to Space Details Form, or you can use the Space Mapping tab as per the example below.
6. Click the Update Space button. |
| 4b |
You can change the number of seats in a Meeting Room to allow people to maintain social distancing while still using the space for meetings. To carry out these changes in Serraview, refer to Space Details Form. Also, this can be completed via a Workpoint Import to change space types in bulk or another way is to use the Spaces module. |
| 5 |
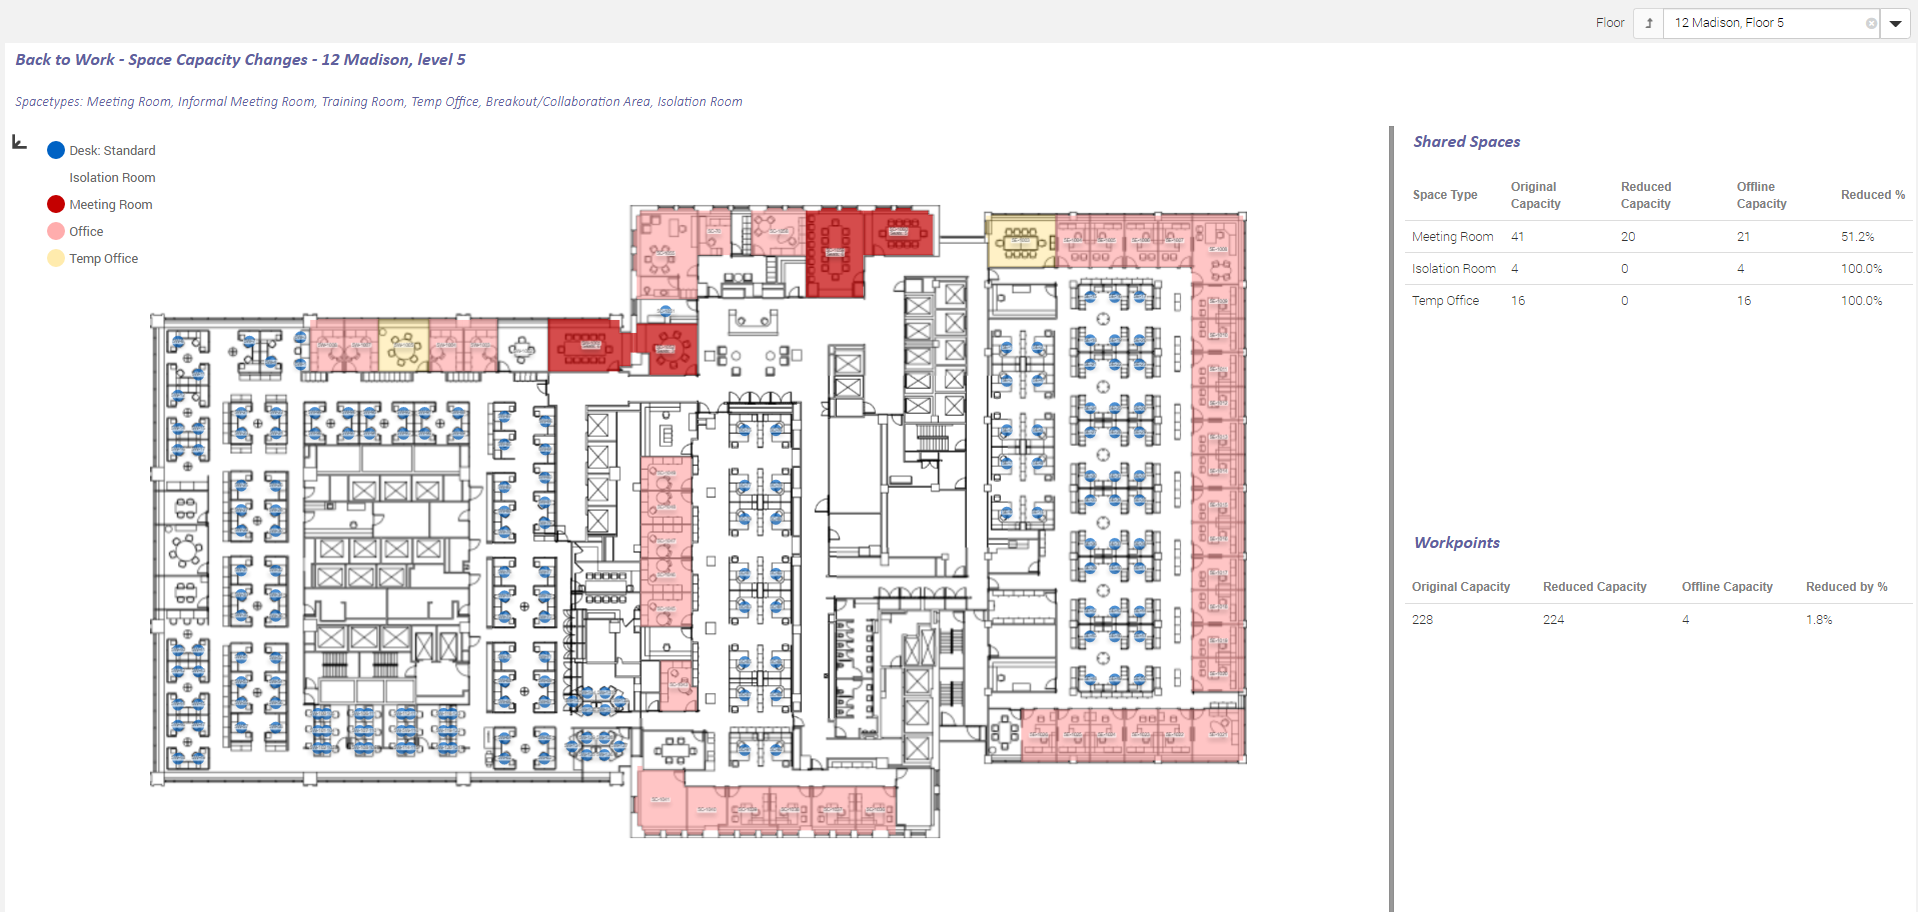
Generate the Back to Work - Space Capacity Changes Dashboard Any changes to space capacity using the methods in steps 4a and 4b above will enable you to run the Back to Work - Space Capacity Changes report from the Reporting Dashboards. This provides oversight into the overall reduction of capacity on a floor.
While not part of this process, the Covid-19 Space Buffer space type is referenced in some back to work processes and is a specific workpoint type that is included when this report calculated the Workpoints table of the Back to Work - Space Capacity Changes dashboard. |
.PNG?revision=1)