Floorplan Importer
- Last updated
- Save as PDF
Floorplan Importer Implementation
If you want to use the Floorplan Importer, first read Serraview CAD Preparation and the Floorplan Importer must be configured by Serraview. If you want the Floorplan Import to be configured then contact your Customer Success Manager.
Upload CADs to Serraview
We provide the following methods for uploading new or revised CAD files:
- Floorplan Importer Tool – This can be used for CAD technicians who want to load plans on their own schedule and change the default settings.
- File Upload – This can be used for CAD technicians who want to load plans on their own schedule, as the plans are ready. In the File Upload, use the automated floorplan option.
- SFTP – This can be used for CAD technicians who want to bulk load plans into Serraview.
When loading a revised plan, Serraview will:
Try to match every polyline in the SV-SPACE layer based on its Space name in the SV-TXT-SPACENAME layer and the space type in the SV-TXT-TYPE layer.
- If a match is found, the existing space polyline in Serraview will be updated with any changes.
- If a match is not found, a new space will be added to the floorplan in Serraview.
- If there are any spaces on the floorplan within Serraview that are no longer present in the new CAD plan, those spaces will be deleted within Serraview.
Upload New Floorplan using the Floorplan Importer

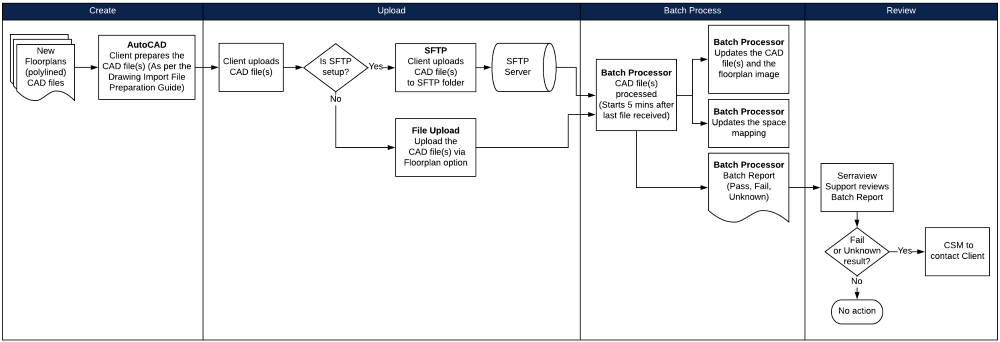
- During implementation, Serraview set up a schema for importing CAD files.
- CAD files are uploaded using SFTP or File Upload using the category Automated Floorplan or using the Floorplan Importer Tool.
- Files are processed by the Serraview Floorplan Importer, resulting in updated floorplans and space mapping.
- For any unsuccessful files, the Serraview Support team will review the batch report and then contact the Client.
SFTP (Secure File Transfer Protocol) involves a secure connection being made from the Client to Serraview's SFTP, and files being sent through to update the Serraview data, refer to Import files into Serraview via SFTP.
File Upload's Automated Floorplan category can be used to upload one file or bulk files refer to File Upload.
Update Existing Floorplan using the Floorplan Importer

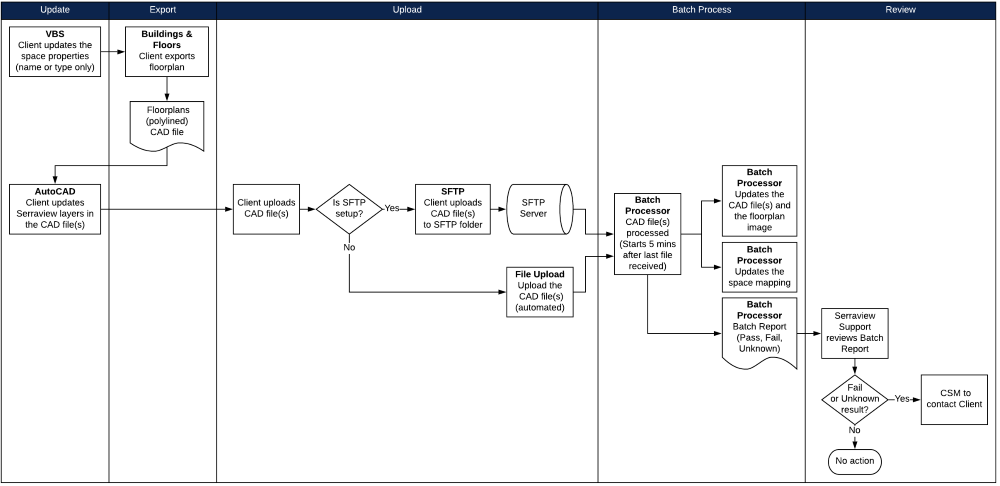
Update Space Properties
If you want to export changes to space names and space types made in Serraview back to a new .dwg file, this can be done for space types and space names only.
If you create new space shapes in Space Mapping these will not be exported.
The space properties can be updated either:
- Make changes to the space type or space name, refer to Space Details Form or Update Space Details via the Spaces Module.
- Use an import to make bulk changes, refer to Workpoint Import.
Export the Floorplan, update the CAD Plan, and Reload the File
If you have changes to an existing CAD plan, you can make these in a CAD file and upload the file again.

Users require the following secured actions to access the Floorplans:
- General – Save BAU
- Import – Floor Plans
- File Upload – Floorplan
Users require the following secured actions to use the icons and links:
- Buildings & Floors - Export Floorplans
If you require access, then contact your System Administrator. For information on how to add secured actions to a role, refer to Manage User Roles.
From Buildings & Floors module:
- Navigate to Resources > Building & Floors.
- Click on the building.
- Click on the floor you want to edit. The Floorplans section displays the floorplans.

4. Click the Export Floorplan button.
A new .DWG file (CAD Plan) is created and downloaded, with 3 layers inserted, named SV-SPACE, SV-TXT-SPACENAME, and SV-TXT-TYPE. These 3 Serraview layers can then be used for editing in AutoCAD and re-importing back into Serraview, or, they can be merged back into your own layers and then deleted prior to re-importing back into Serraview.

For the Export Floorplan icon to be enabled the active floorplan must have been uploaded by the Floorplan Importer. If the Export Floorplan icon is grayed out (disabled) then the active floorplan was not uploaded by the Floorplan Importer.
