Create your own Import File
You can create your own import file from the sample import file. Complete the following steps.
Step 1. Download the sample import file
From the Imports screen, complete the following:
- Navigate to Admin Settings > Data Imports > Data Imports.
- Click an import heading. For example, Workpoint import.
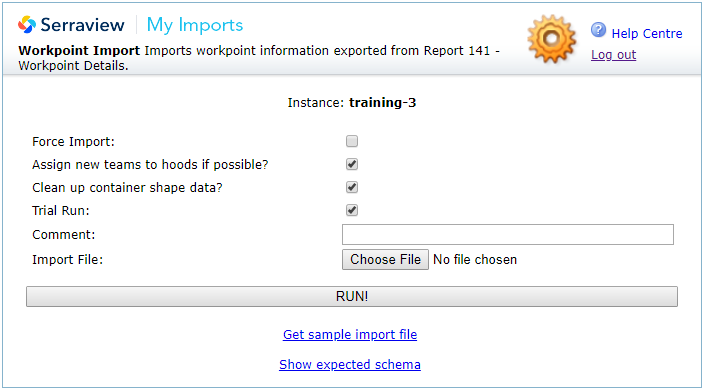
3. Click the Get sample import file link. The sample .csv file downloads e.g. Import schema for Workpoint Import.csv
4. Open the csv file in Microsoft Excel.

Step 2. Complete the CSV file using the expected schema
The import contains an expected schema that you can use to complete the CSV file.
- Click the Show expected schema link.
Expected Schema
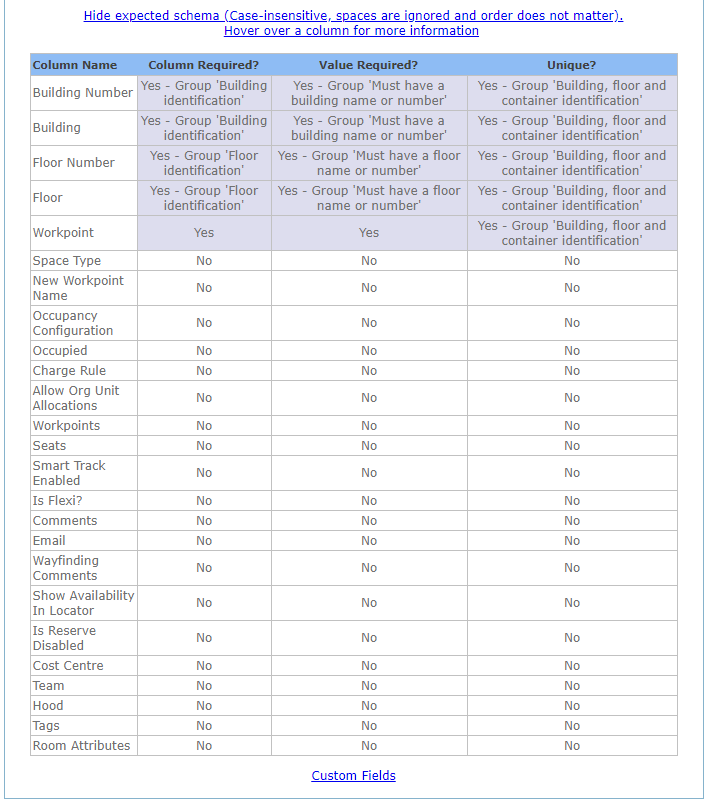
The expected schema displays:
|
Column |
Description |
|---|---|
|
Column Name |
The column name is used in the import file's column header and it must comply to the following:
|
|
Column Required? |
Is the column required?
|
|
Value Required? |
Is the value required?
|
|
Unique? |
Is the value unique?
|
Custom Fields
If you need to import data into custom fields then you will need a report that contains the custom fields. For more information on Custom Fields, refer to Custom Fields.
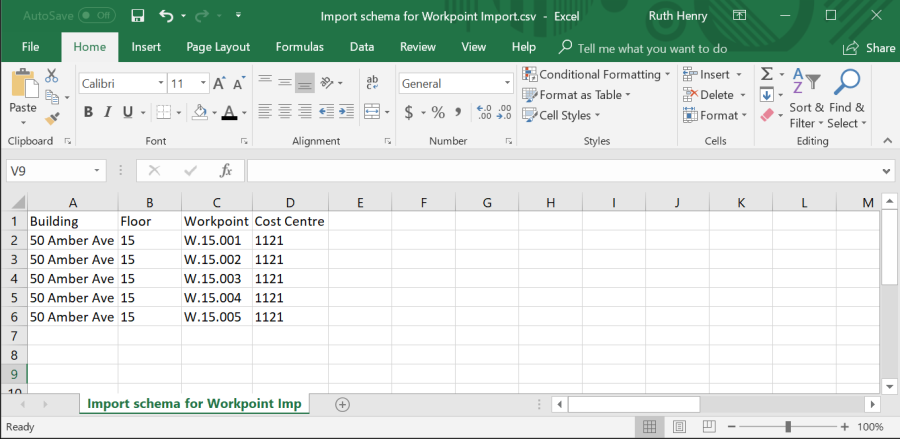
Step 3. Check that the column's header row matches the import schema's column names
The first row of the CSV file will contain the Column Names. Check that the header row matches the expected schema.
For example:

Step 4. Remove unnecessary cells and worksheets
- Remove additional tabs, even if they are blank. If you have more than one worksheet (tab) in your file, the file will not be read.
- Remove all empty border columns and rows.
- With non-required columns that do not have any data, you can delete them. The exception is when a column is required but a value is not then you can keep these columns as place-holders.
For example:
Step 5. Remove or preserve table formatting
If your data contains any values that starts with a zero you will need to prevent removal of zeros when you clear the table formatting. For example, employee numbers in the format of 00035463.
To prevent removal of zeros from columns.
- Open your file in Excel.
- Select the column(s) that contain number format that you want to preserve.
- Right-click the column. A popup menu displays.
- Select Format Cells.
- In the Category list.
- Select Text.
- Click the OK button.
To remove the number, text, etc formatting from columns.
- Open your file in Excel.
- Select the column(s).
- From the ribbon, click the Home tab.
- In the Editing group, click the Clear drop-drop arrow. The drop-down menu displays.
- Click the Clear Formats item.
Step 6. Test your import file
Serraview recommends that you always perform a trial run.
When your import file is ready and saved, you can complete a trial run. This will show you how you how Serraview will read the import file and if the file will be successful or cause warnings and errors. Refer to Trial Run Imports for details on how to complete a trial run.
Step 7. Run your import file
After you have completed the trial run and you know the file will be successful then you can complete the import .
- From the import screen, for the Trial Run untick the check box.
- For the Import File, click the Choose File button.
- Navigate to and select the import file.
- Click the RUN! button. The Import Summary displays.
The import file will be recorded in the Recent Imports, refer to View Recent Imports.