Set up the Concierge Menu for 3 or more menu items
Level: System Administrator
The Concierge Menu can be set up to connect your employees to:
- Find & Book - This menu item could be called Maps or another name that suits your business. This is used by employees to find what they are looking for and make bookings. For set up details, see Set up the Concierge Menu item to launch Maps.
- My Bookings - Engage displays the desk reservations you have made for desks in a calendar. Note currently the My Bookings only displays the desk reservations, the meeting room reservations are coming soon, refer to What's Next in Engage.
- QR Scanner - Link up the QR Scanner when you have your desks labeled with the QR codes so your employees can either make a desk reservation or check into a desk.
- A Safer Workplace - Link up to the the official COVID-19 Health Department for your location or link your company's Back to Work Policy.
- Employee Survey - Link your employee to their My Profile page in Serraview ,so they can quickly update their details in regards to when they are back in the office. For set up details, see My Profile and Set up the My Profile Questions.
- Service Requests - Link to either Serraview's Service Request or a third-party Service Request.
- Leave - Link up your company's leave system.
- Expenses - Link up your company's expense system.
- Uber - Link up your ride share app.
- Coffee - Link up your coffee app.
- First Responders - Link up your employees so that they find their First Aid Officers or Fire Wardens quickly. For set up details, see Set up the Concierge Menu item to launch the First Responders.
- Or link to a web app that your employees will need.
The Concierge Menu is a continuous scroll menu in both directions up and down. Also, the menu can display on Engage Mobile and Engage Web.
You will need:
- Decide on what Concierge menu items to display as the Engage app must have 3 menu items set up
- Image - Either download an image from Concierge Menu Images Gallery OR source your own Concierge Images (Width 750px Height 836px PNG image)
- System Administrator access to Engage Configuration settings
Add a Menu Item
The Concierge menu must have 3 menu items set up for it to work in the Engage Mobile or Web app.
- Navigate to Admin Settings > System Config > General > Engage Configuration.
- Click the Concierge Menu tab.
- Click the Add icon. The Add form displays.
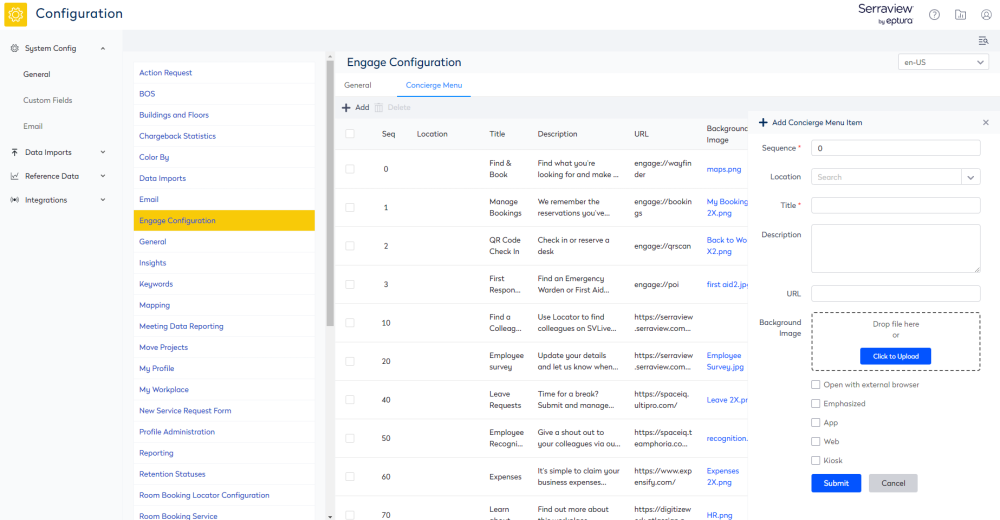
4. In the Sequence field, enter the sequence number. The concierge menu displays the items in a circular scroll. For example from number 1 beginning the first item to number 10 last item.
5. From the Location selector either search or select a region, city, or building.
6. In the Title field, enter the heading.
7. In the Description field, enter the short description.
8. In the URL field, enter the URL to link to.
Links
These links need a particular format, for more details see:
9. Upload the image.
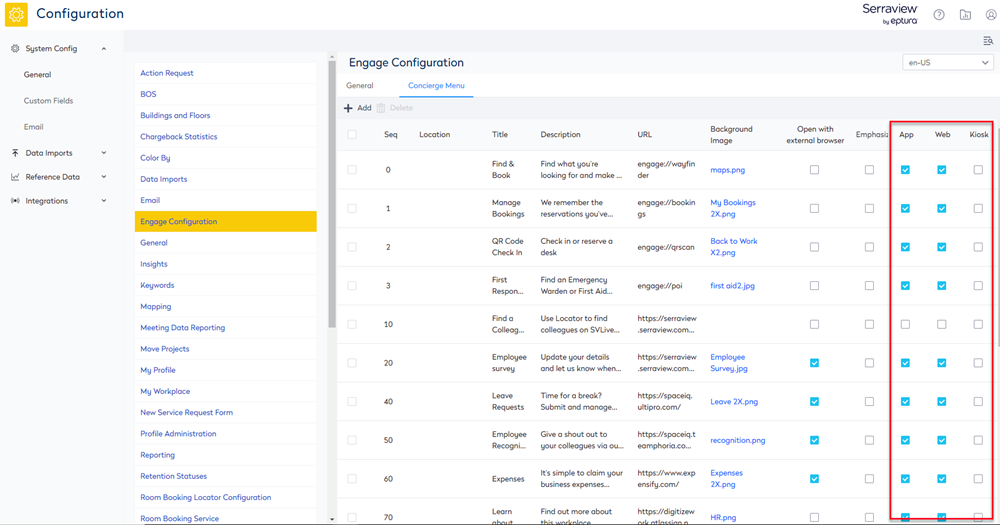
10. Optional - Check the Open with external browser check box to display the URL in an external browser.
11. Optional - Check the Emphasized check box to display the accent line next to the heading and short description.
12. Optional - Check the Hidden for App check box to hide it from the Engage App menu item.
13. Optional - Check the Hidden for Web check box to hide it from the Engage Web menu item.
14. Click the Update button.
Hide a Menu Item from Engage Web, Engage Mobile or both
It is possible to hide an item from the Concierge Menu.
- From the Concierge Menu screen for you the menu item, either check the Hidden for App check box to hide it from Engage Mobile, check the Hidden for Web to hide it from Engage Web, or check both boxes to hide it completely.
Delete a Menu Item
Or if you want to complete delete it.
- Check the selector for the concierge menu item.
- Click the Delete icon. The message Are you sure you want to delete the select menu item? displays.
- Click the OK button.