Register a Serraview Service Account
The Serraview Service Account is used when you are setting up access to the Serraview V2 API. For more information, refer to Access Serraview APIs.
Before you can use OAuth 2.0 with your application, you will need to create a service account within Serraview. After you have created the service account, write down the service account's id and store the service account's private key in a location accessible to your application. Your application needs these to make authorized API calls.
If you do not have a private key, you will need to create a new service account.
Serraview does NOT store private keys.
Step 1. Add a service account
To create a service account, complete the following.
- Navigate to Resources > User Security.
- Click the Service Account
 icon.
icon. -
Click the + Add Service Account icon. The Add Service Account form displays.

4. Complete the following:
| Field | Description |
|---|---|
| Email field |
Enter the email address. The service account must be a separate email address (do not use an existing email address). At this time the email is only used to satisfy the requirement that the field be populated. You can use a fake address such as placeholder@serraview.com. |
| Description field |
Enter a description. For example 2020Apr09 Service Account. The Description field becomes the User Account First Name and the Last Name remains blank. If you add a date it will make it much easier to identify the most recent User Account. |
5. Click the Add Service Account icon. The New Service Account Created dialog displays.
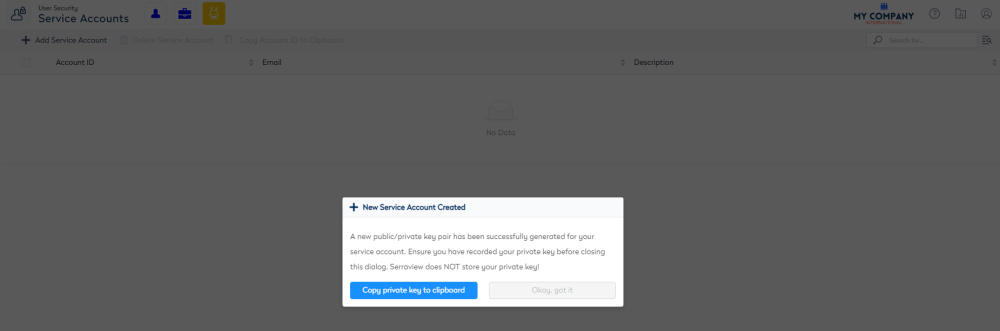
6. Click the Copy Account ID to Clipboard button to keep copy of the Private Key and then paste the Private Key in a secured file.
Do not send this Private Key via email. Email is not a secure method of transferring information and receiving them may be in breach of Serraview's or your organization's security protocols. If you want to send a file to Serraview, then use the File Upload.
7. Click the Okay, got it button. The service account is created.
When you create a service account a user account is also created. You will need to ensure the user's role has the required secured actions then you will have the ability to access Serraview.
Step 2. Assign the role to the user account for the service
There is a role existing role called Service Account that can be used to gain access to the Serraview API, and this role contains the secured action called API - Access. Either assign the role to the user account or assign the secured action to a custom role.
The service account for the API will need to be assigned the Service Account role.
- Click the Users
 icon.
icon. - In the search field, enter service. This will search for the user accounts with the User Type of Service.
- Select the user account for the service. The user form displays.
- In the Add Role area, click the Filter
 icon.
icon. - In the filter field, enter service account. The list is filtered.
- Click the role checkbox to select the role.

- Click the Update User button.
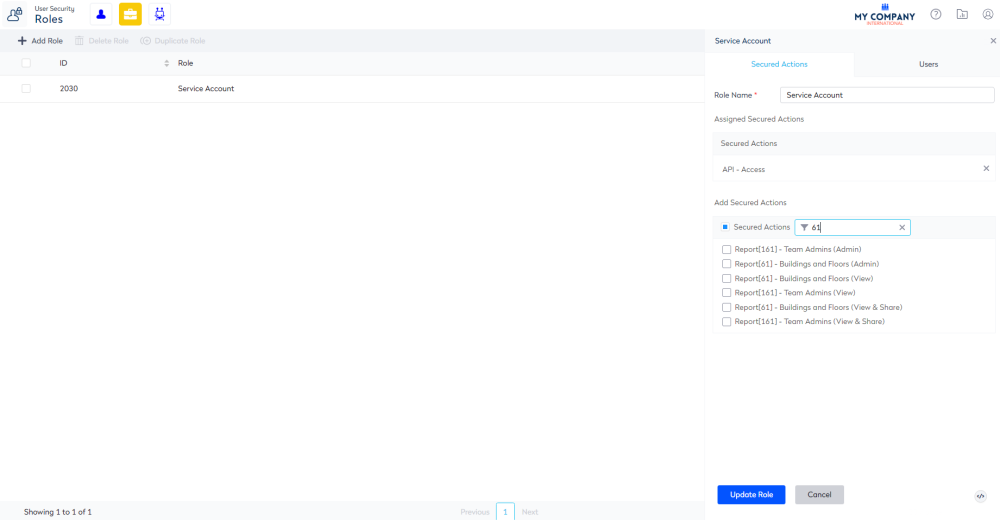
Optional - Step 3. Assign the report's role to the user account for the service
If you require the API access to particular reports, then you will need to assign the report's secure action to the Service Account role.
- Click the Roles
 icon.
icon. - In the search field, enter service account.
- Click the service account role. The Edit Role form displays.
- In the Add Secured Actions area, click the Filter icon.
- In the filter field, enter in the name of the report's secured actions. The list is filtered.
- Click the report's secured role checkbox to select the secured role(s).
- Click the Update Role button.
For example, the Add Secured Actions list is filtered for 61 Buildings and Floors report's secured actions.