Shifts for Fixed Teams
Prerequisites
The prerequisites for the process are:
| No. | Description | Responsible |
|---|---|---|
| 1 |
Refer to Workplace Awareness in regards to creating a backup of your current state prior to back to work planning. |
Client/Serraview Support |
| 2 |
Buildings & Floors and underlying floorplans are up-to-date. |
Client |
| 3 | Occupancy and allocation data is up-to-date. | Client |
| 4 | Complete the Situational Awareness activities to identify affected buildings/regions. | Client |
| 5 |
Create one floor per building to house remote workers, named "WFH". For details, refer to Manage a floor or Floor Import. |
Client |
| 6 |
Create 'Blue Squad' and 'Red Squad' tags against the Space tag set. Refer to Add, Edit, Delete, Remove, or Merge Tags and Apply Tags in the Block and Stack. |
Client |
| 7 |
Create 'Blue Squad' and 'Red Squad' tags against the Person Attribute tag set. Refer to Add, Edit, Delete, Remove, or Merge Tags and Apply Tags in the Block and Stack. |
Client |
| 8 | If people are moving into permanently working from home, the client to submit a support ticket to add the Import - WFH Teams Report. Serraview Support to add the report. | Client/Serraview Support |
| 9 | Client to submit a support ticket to add the People (55) with Tags Report. Serraview Support to add the report. | Client/Serraview Support |
| 10 | Client to submit a support ticket to add the Occupancy Details (50) with Tags Report report. Serraview Support to add the report. | Client/Serraview Support |
| 11 | Client to submit a support ticket to add the Shift Assignment Floorplan Dashboard. Serraview Support to add the report. | Client/Serraview Support |
| 12 |
Client to submit a support ticket to get the Back to Work - Space Capacity Changes report. Serraview Support to add the report.
|
Client/Serraview Support |
In this process, we do not seek further information via a Micro Survey or a Complete audit with the Managers using BOS. We simply use a person's assigned seat to determine their shift.
Process
The Shifts for Fixed Teams process involves:
| Step | Description |
|---|---|
| 1 |
While you may not require any changes to fixed seating, it is important to analyze the floor to see if there is any requirement to change seating capacity or space types. |
| 2 |
Collect information about working from home or desired shifts using one of the following methods: |
| 3 |
Permanent work from home If you have people moving to permanently work from home, this process will move them into WFH teams on your WFH floor. a) Navigate to Analytics > Reporting module and run the Import - WFH Teams Report. This report generates one row for each team where one or more assigned people has the Work From Home field checked on their person record. b) Navigate to Admin > My Imports and perform a Team Import, using the Import - WFH Teams Report as your import file. This Team Import will create the teams on your WFH floor, with the team name appended with “WFH”. c) Navigate to the Analytics > Reporting module, run the Import - WFH Occupancy Report. This will Identify all people with the WFH flag checked on their person record d) Navigate to Admin > My Imports and perform an Occupancy Import, using the Import - WFH Occupancy report as your import file. This will move all people from their original team to the WFH teams on the WFH floor. If you only want to update the WFH status of people in bulk rather than move them into separate teams on a WFH floor, you can use Bulk Update or complete a Person Import. |
| 4 |
Review the Insights Dashboard for Safe Seating Capacity Use the following Insights Dashboards:
|
| 5 |
Person Shift Assignment - Tag Spaces A person's shift assignment is determined by their existing assigned seat adjacency and is a two-step process. We first tag the space with the shift or "squad", then we use that information to tag the person assigned to that space to that same shift. The Serraview back to work process uses Blue Squad and Red Squad tags only.
Another option could be to run the 141 Workpoint Properties Report filtered to workpoints without the Blue Squad tag, then use this as the basis of a Workpoint Import to apply the Red Squad tag to all remaining spaces. |
| 6 |
Person Shift Assignment - Tag People Now our spaces are tagged, we need to apply corresponding tags to the people assigned to those desks. to do this, run the Occupancy Details (50) with Tags Report and use the space tag information to do a Person Import to update the Blue Squad or Red Squad tag to the person record.
|
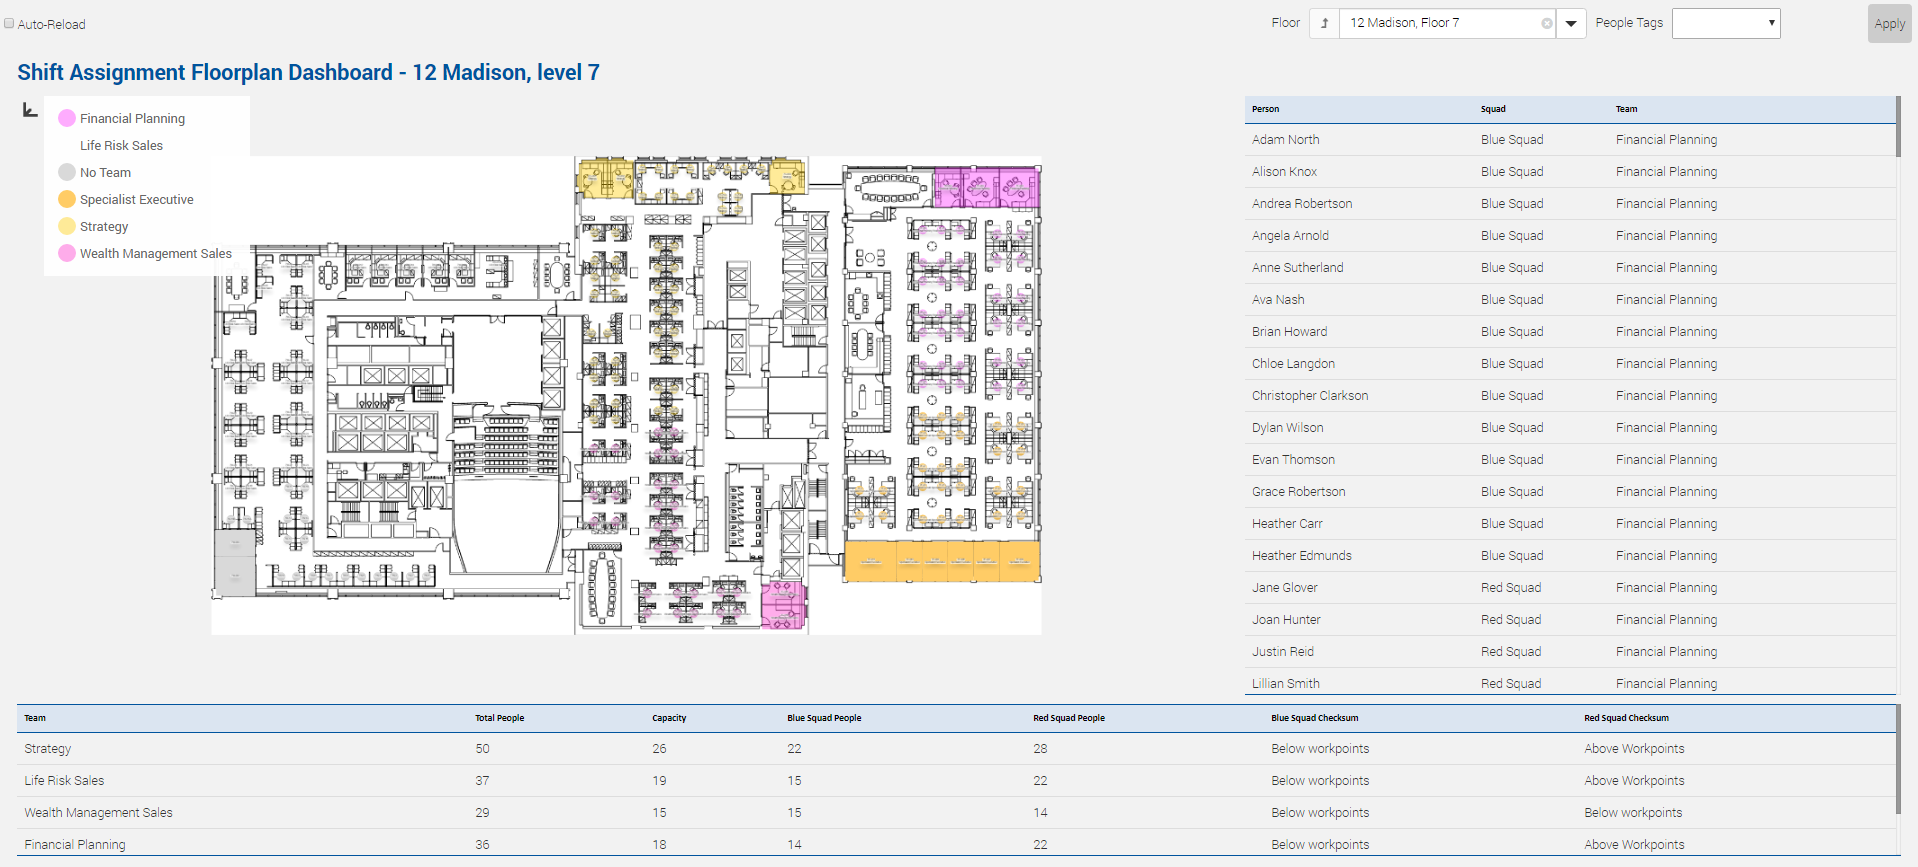
| 7 |
Run and review the Shift Assignment Floorplan Dashboard The space and people tags applied in steps 5 and 6 allow us to run the Shift Assignment Floorplan Dashboard, showing us the split of staff into the Blue or Red Squads based on their current seating assignment.
|
_with_tags.PNG?revision=1)