MacOS SPS Installation
SVLive Presence Service (SPS) is installed via a PKG on Mac OS X. An instance of the application is started automatically when a user logs in and closes when the user logs out. If multiple users are logged into the Mac, each user will have a separate instance of SVLive Presence Service running.
SPS must be installed on all Mac OS machines in the organization, where the Corporate Real Estate team expects utilization data to be collected.
Delivered files
The following files are provided for Mac OS X installation:
- SerraviewLive-MacOS-x86_64-v.v.v.pkg (where v.v.v is the version)
- sps-installer.sh
Prerequisites
To install the SVLive Presence Service you will need to know:
- The host and port portion of the configuration url, including the protocol and path. This value will be provided by Serraview. This value is referred to as [config-api-url].
Install or upgrade SVLive Presence Service with install script
This approach is designed to be rolled out via computer management software that can run a script on all Mac computers. The same script will work for both fresh installations of the SVLive Presence Service and upgrading existing versions of the SVLive Presence Service.
The following command will be executed:
sudo bash ./sps-installer.sh PKGFILE=[pkg-filename] CONFIGAPIADDRESS=[config-api-url]
Where:
- [pkg-filename] – the full name of the pkg file
- [config-api-url] is the host and port portion of the URL, including the protocol and path. This value will be provided by Serraview.
This script will install, configure, and launch SVLive Presence Service.
Validate the Mac OS X Installation
Complete the following:
- Reboot the device.
- Log in
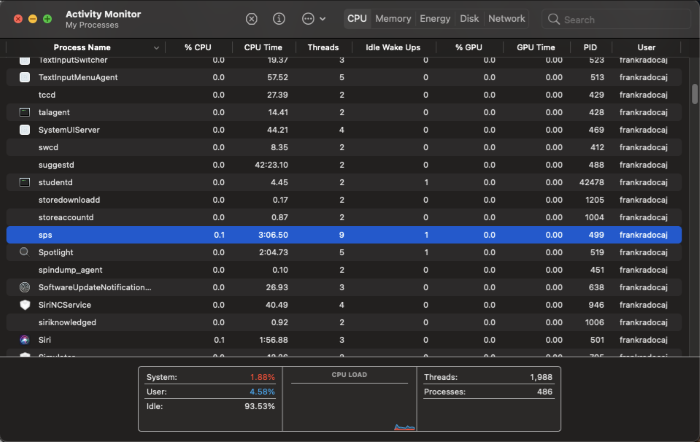
- Check the application is running in the Activity Monitor for MacOS.
If the application is not running, check the Event Logs from the Operating System to see if there are any errors thrown.
Activity Monitor for MacOS Example
Check that sps is running in the Activity Monitor.
After the installation is finished make sure you complete the Post Install Validation checks. see SVLive Post Install Validation Checks.

