SVLive Wi-Fi WAP Configuration
WAP Mapping in Serraview
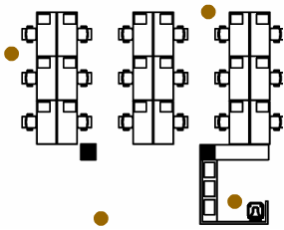
Example of the Wi-Fi Access Points on a floorplan:
You will need the following access point information for each WAP:
- Name
- Location – This is the location of the WAP on the floorplan.
- BSSID (Base Radio MAC address) - Details on how to Obtain and Validate the WAP's BSSID can be found below.
- WAP Model name - Note the model if it is a WAP from Meraki or Cisco Aironet vendors.
- Height - Optional - This is the distance in meters from typical desk height to access point height. During the setup, we can also enter a default value for the Height, which will be applied when calculating the position for all WAPs. If require, then provide the values to your Eptura Project Manager to be configured.
In Serraview, set up the location of the Wi-Fi Access Points on the floorplan. From the Spaces module complete the following:
- From the left-menu, click Spaces.
- Use the Location Selector drop-down to navigate to the building and floor or enter the location.
- Click the Edit Floor icon.
- From the View Selector area, click Equipment & Reporting.
- Check the Wi-Fi Access Point check box. This will display the Wi-Fi Access Points on the floorplan.
- Click the Add Polyline
 icon. The Add Polyline panel displays. For more details, refer to Add Serraview Polyline.
 - From the Select a Space Type selector, enter in Wi-Fi Access Point and select the space type.
- Click on the floorplan where the Wi-Fi Access Point will be located. The Wi-Fi Acess Point is added as a point.
- Optional - If there is more than one point then keep adding the points on the floorplan.
- Click the Publish Changes icon.
The Wi-Fi Access Points must be added to a parent space type, such as Primary Circulation or Corridor.
After the Wi-Fi Access Point is added to the floorplan, you will need to edit it.
- Double click the WiFi Access Point. The Edit Space form displays.

- In the Name field, enter the WiFi Access Point's name.
- In the BSSID field, enter the BSSID.
- In the WAP Model field, enter either:
- meraki - for WAPs that are from the Meraki vendor
- aironet - for WAPs that are from the Cisco Aironet vendor
- Leave blank - for all other WAP vendors
The model names of meraki and aironet are case-sensitive and must be entered in lower-case.
- Optional – In the Height (m) field, enter the height (distance in meters from typical desk height to access point height).
- Click the Update Space button.
If you have multiple Wi-Fi frequencies, 2.4, 5, or 6 GHz them these points need to be added close to each other so we can capture the data. For example, they need be next to each other even if it is one modem.

Obtain and Validate the WAP's BSSID
You will need to know the BSSID of the Access Points. BSSID is typically the Base Radio MAC address of the WiFi Chipset running on a Wireless Access Point. For more information on BSSID (https://www.juniper.net/documentation/en_US/network-director1.5/topics/concept/wireless-ssid-bssid-essid.html)
After you have your list of BSSIDs, you can perform the below test from your wireless computer to confirm you have provided the correct information.
- Working from a wireless computer.
- Ensure you are connected wirelessly.
- Open a command prompt, and type in:
netsh wlan show interfaces
This displays all wireless interfaces on your system. When your wireless is active and connected to an AP, you get output similar to this example below.
Name : Wireless Network Connection
Description : Intel(R) WiFi Link 5100 AGN
GUID : f5ad6606-3b9d-41b3-8e5b-91b870edd256
Physical address :00:21:6b:9d:db:ec
State : connected
SSID : green
BSSID : 00:23:69:94:0c:f9
Network type : Infrastructure
Radio type : 802.11g
Authentication : WPA2-Personal
Cipher : TKIP
Connection mode :Auto Connect
Channel : 11
Receive rate (Mbps) :54
Transmit rate (Mbps) :54
Signal : 99%
Profile : green
To display all networks and access points that are visible to the computer running the command. Use the following command:
netsh wlan show networks mode=bssid
This can be used to compare the list of the BSSIDs to what is mapped.