Configure Microsoft Exchange with OAuth
- Last updated
- Save as PDF
The Serraview's Room Booking Service integrates with Microsoft Exchange Server 2010, 2013, or 2016, and Exchange Online/Office 365 via the Exchange Web Service (EWS), refer to https://msdn.microsoft.com/en-us/library/office/bb204119(v=exchg.150).aspx
Prerequisites
- Microsoft Office 365 Administrator account
- Serraview administrator credentials
- Experience managing Exchange and mailbox permissions
Set up the App Registration in Azure
From the Azure Active Directory admin center, complete the following:
- Click All services.
- Select App Registrations.
- Click New Registration.
The Register an application screen displays.
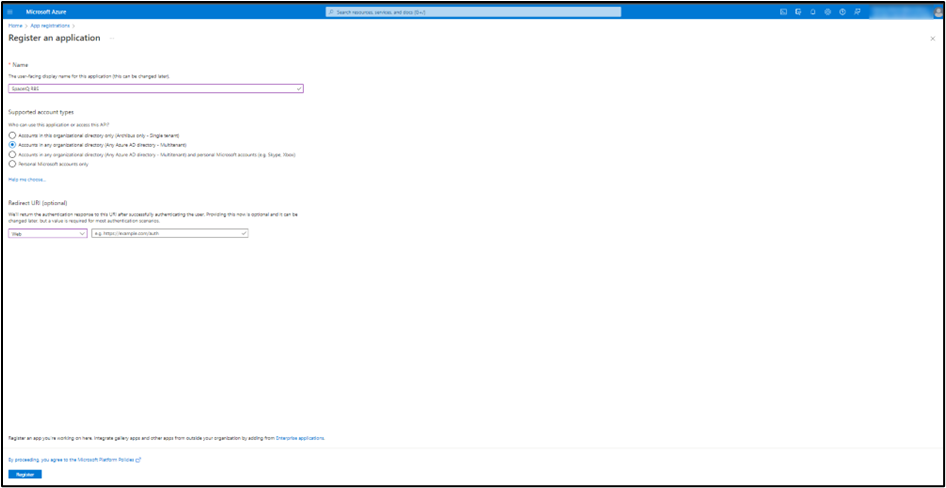
4. In the Name field, enter the user-facing display name. For example, <your company’s name> RBS.
5. For the Support account types option make sure the Account in any organizational directory (Any Azure AD directory – Multitenant) is selected.
6. Click the Register button. When the App Registration is complete, you will be redirected to the app page that was just created.
7. From the left-menu, click Authentication.
The Authentication screen displays.
8. Click the + Add a platform button.
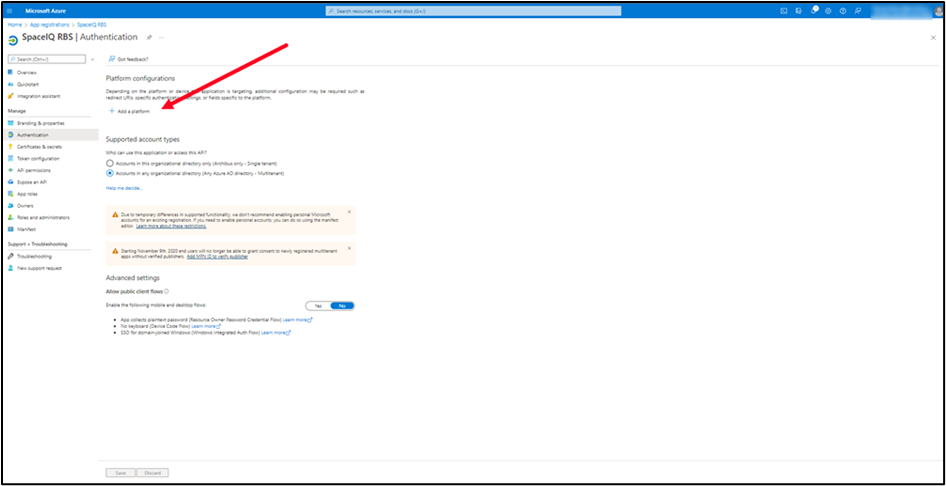
The Configure platforms form displays.
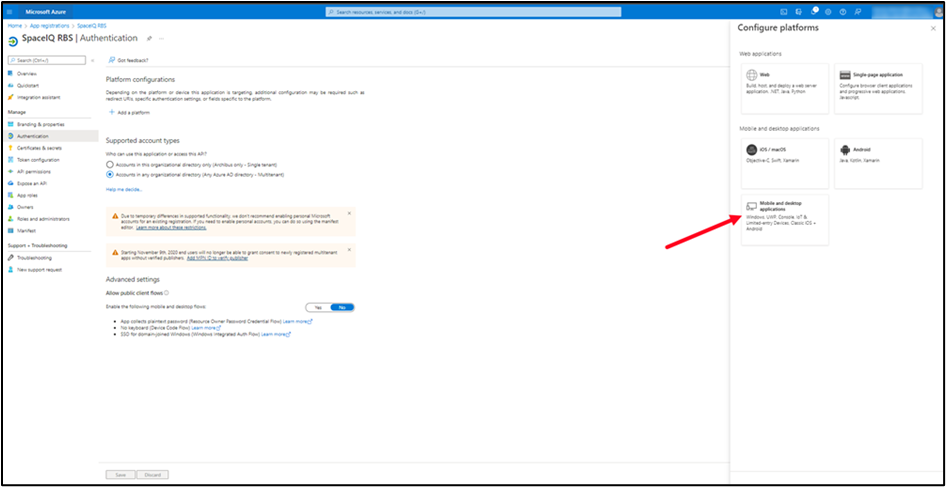
9. Click the Mobile and desktop applications tile.
The Configure Desktop + devices form displays.
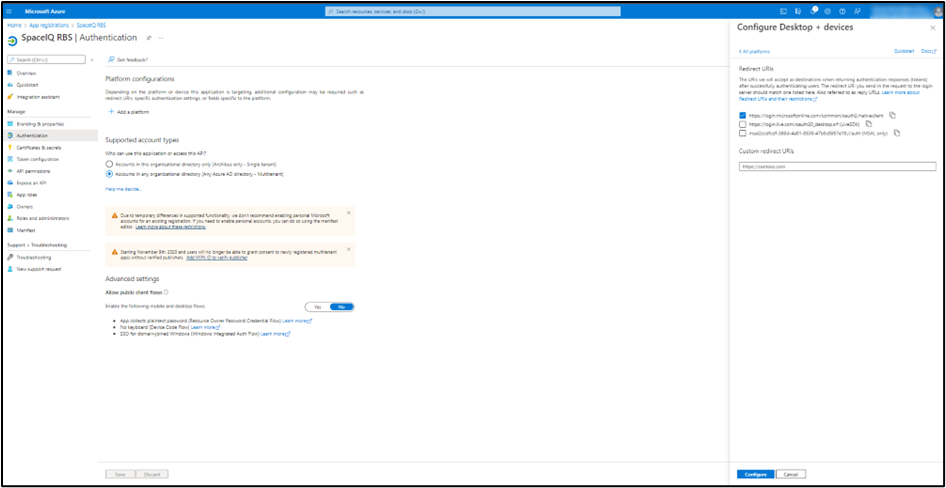
10. Check the https://login.microsoftonline.com/co...2/nativeclient check box.
11. Click the Configure button to save.
Next, you need to create a new client secret for the Room Booking Service.
12. From the left-menu, click Certificates & secrets.
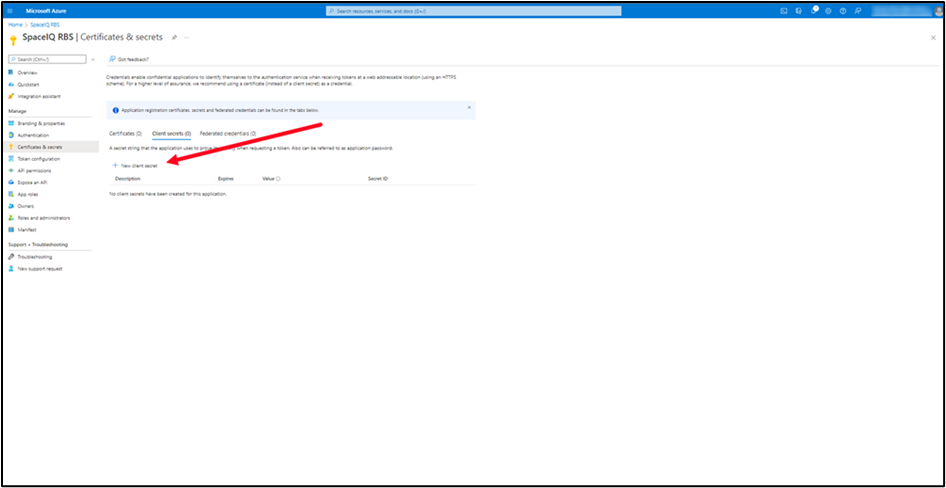
13. Click the + New client secret button.
The Add a client secret form displays.
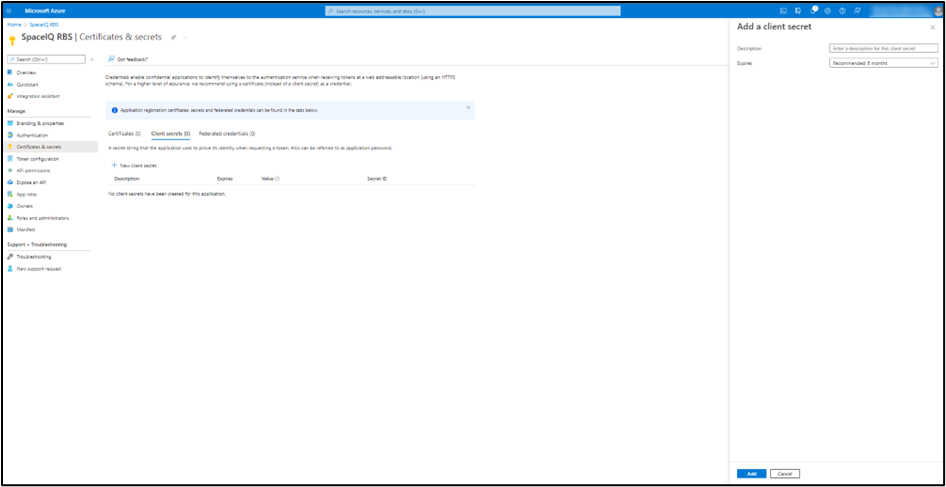
14 . In the Description field, enter the client's secret description.
15 . In Expires field, either enter 3 months, 6 months, 12 months, or 24 months to indicate how long the secret must last.
16. Click the Add A secret key will be generated, make sure you copy the secret key. We recommended that you keep a copy of the secret key in a secured location.
17. From the left-menu, click API Permissions.
18. Click the + Add a permission button.
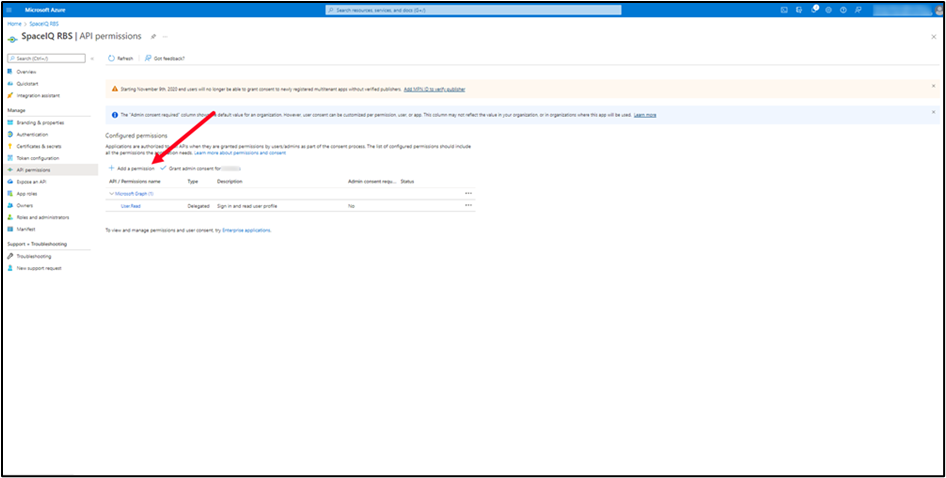
The Request API permission panel displays.
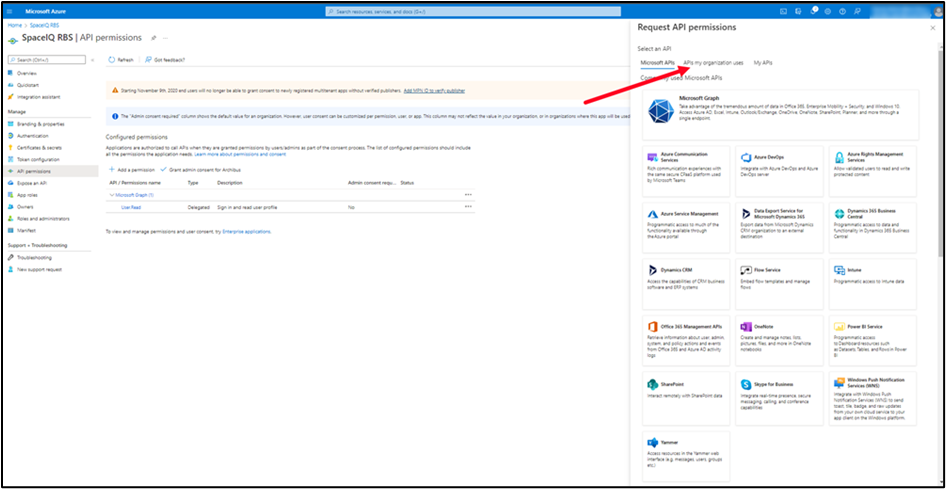
19. Click the APIs my organization uses tab.
20. In the Search field, search for office 365 exchange and then select this.
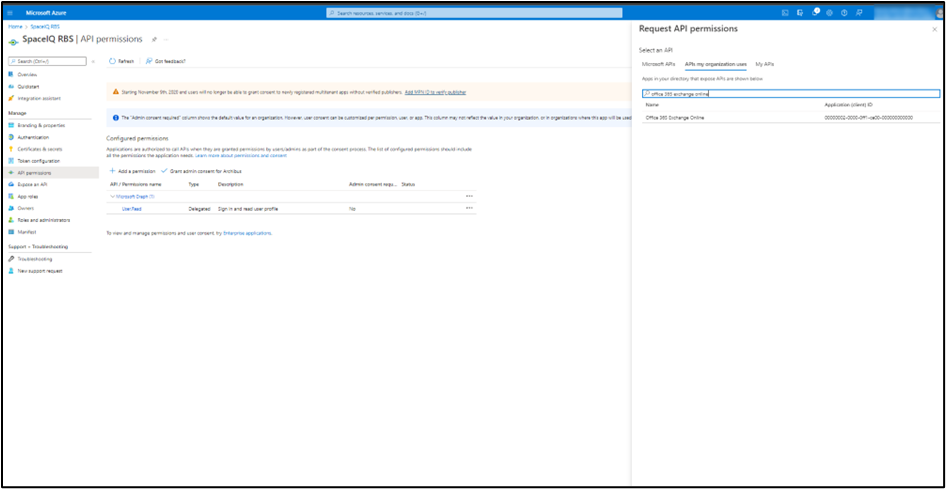
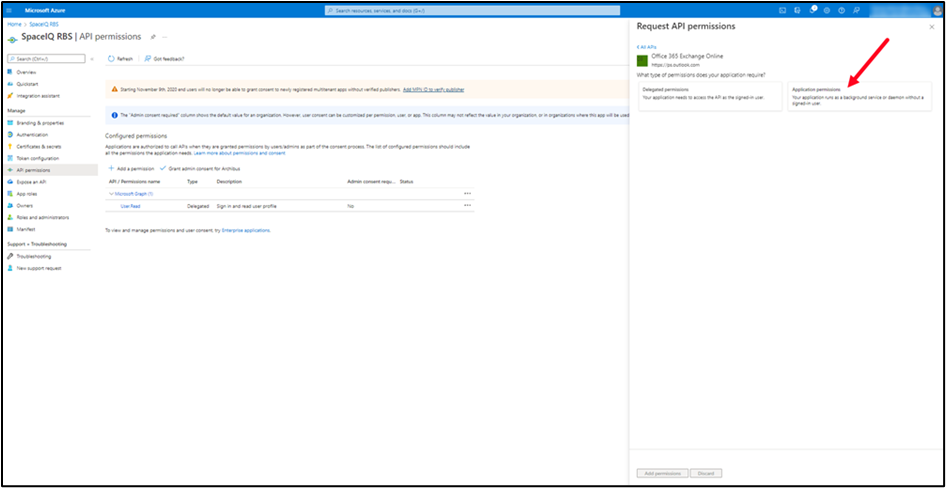
The Office 365 Exchange Online screen displays.
21. Select the Application permissions tile.
22. At the top of the list, check the full_access_as_app.
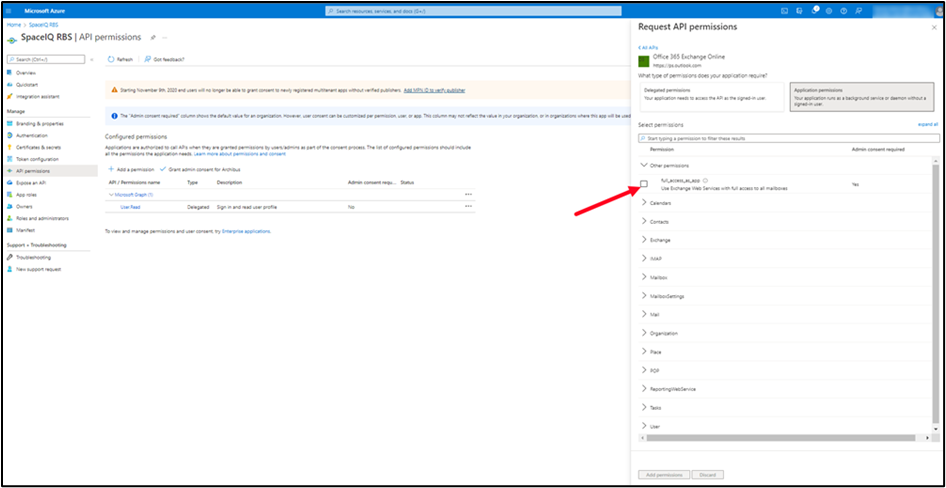
23. Click the Add permissions button.
Next, you will need to grant administration access.
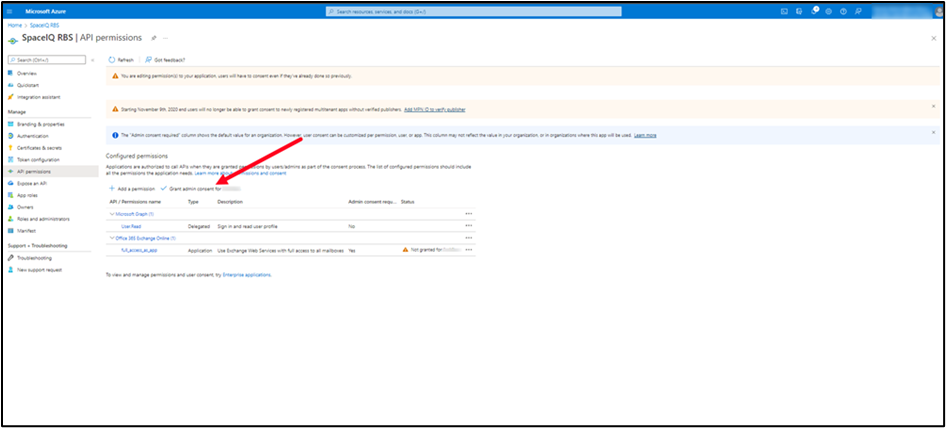
24. Click the Grant admin consent for <your company>.
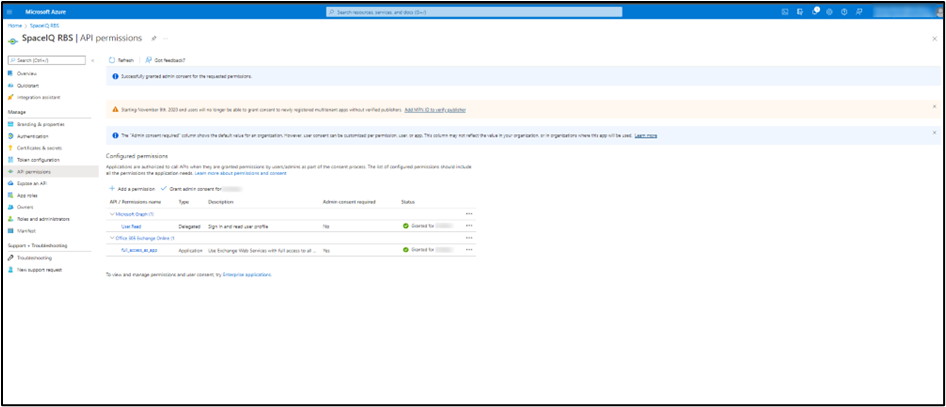
25. From the left-menu, click Overview to return to the Overview screen.
Next, you can add a scope that is used to restrict access to data and functionality protected by the API.
26. From the left-menu click the Expose an API.
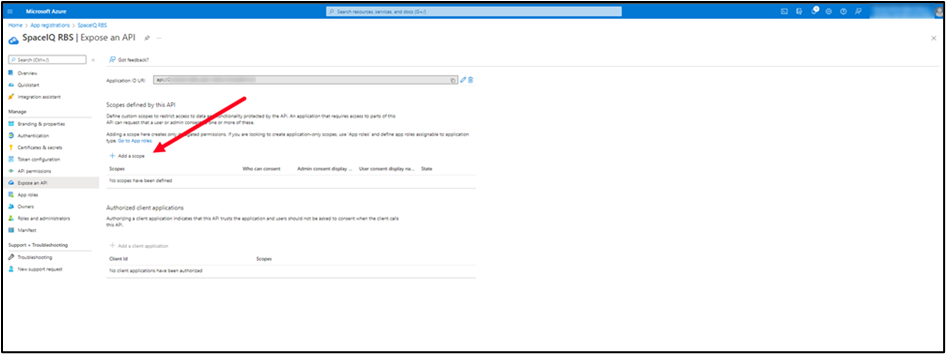
27. Click the + Add a scope button.
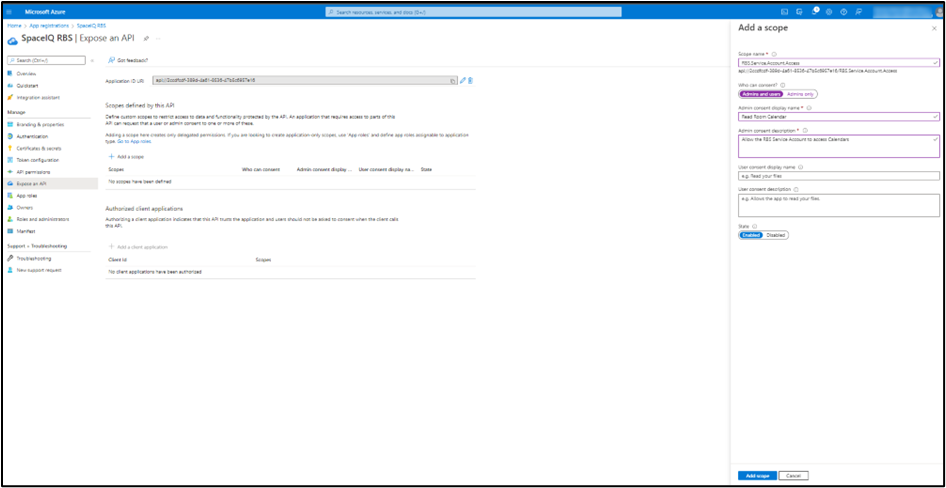
The Add a scope form displays.
28. In the Scope name field, enter the scope name. For example, RBS Service Account Access.
29. In the Admin consent display name field, enter Read Room Calendar.
30. In the Admin consent description field, enter a description. For example, Allow the RBS Service Account to access Calendars.
31. Click the Add scope button.
32. From the left-hand menu, click Overview. The Overview screen displays.
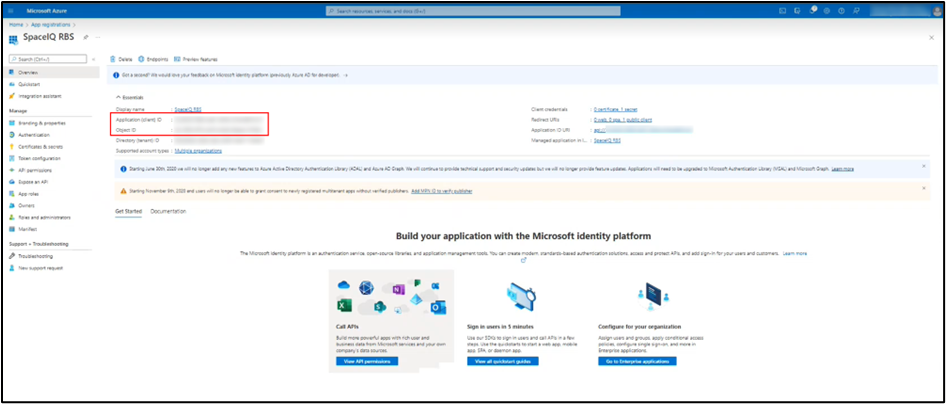
The highlighted keys become the inputs for the Room Booking Service configuration in Serraview.
Configure the Serraview Room Booking Service with Exchange (OAuth)
This describes how to configure Serraview so that it can communicate with your company's Exchange service.
- Sign into Serraview.
- Navigate to Configuration > General.
- Select Room Booking Service.
- From the Calendar Service drop-down, select Exchange Calendar OAuth.
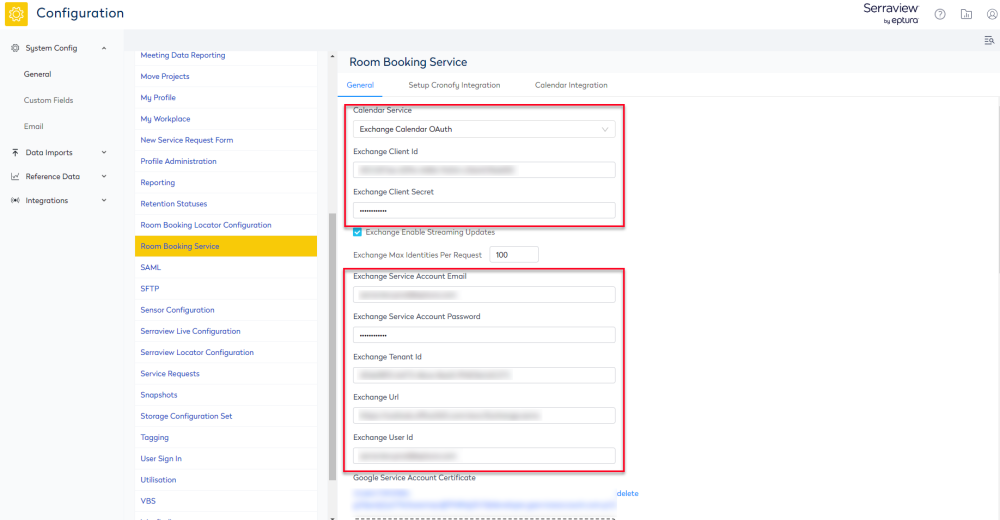
5. Complete the following:
|
Calendar Service |
Exchange Calendar |
|---|---|
| Exchange Client Id | This is the Application (client) ID from the App Registration in Azure. |
| Exchange Client Secret | This the Client Secret from the App Registration in Azure. |
|
Exchange Enable Streaming Updates |
If the check box is checked then, when the availability status of a room changes in Exchange, it will be updated in Serraview in real-time. |
|
Exchange Service Account Email |
This is the email address for the service account created in the Service Account section above. |
|
Exchange Service Account Password |
This is the password for the service account created in Service Account section above. |
| Exchange Tenant Id | This is the Exchange Tenant ID from the App Registration in Azure. |
|
Exchange Url |
This is the URL for your Exchange EWS server. This usually looks like https://outlook.office365.com/ews/Exchange.asmx and will look similar to the URL you use to access Outlook Web Mail. |
The other settings are for Google Calendar and can remain empty if you are using Exchange.
6. Click the Update button.
Calendar Permissions
To take advantage of all features, it is recommended to assign the service account to the Author role on every meeting room mailbox that will be available in Serraview Locator.
|
Feature |
Minimum Required Folder Access Role |
|---|---|
|
Display Free Busy Timeline and Show Availability. Not in real time, availability is updated when refreshing Locator such as a browser refresh. |
AvailabilityOnly |
|
Show Meeting Details (Subject & Attendees) including the above feature. |
Reviewer |
|
Show and Update the Free Busy Timeline in Real Time |
NonEditingAuthor |
|
Reserve a Meeting Room including the above feature. |
Author |
To add Access Rights, first connect to Exchange Management using PowerShell (Refer to Connect to Exchange Management section below).
Calendar Folder access rights are added using the Add-MailboxFolderPermission (https://technet.microsoft.com/en-us/library/dd298062%28v=exchg.150%29.aspx) owerShell cmdlet. There is an example below, where 'meeting.room@contoso.com' will be replaced with the email address for the room resource and 'service.account@contoso.com' will be replaced by the service account created earlier in the Service Account – Exchange section.
For example:
Add-MailboxFolderPermission -Identity meeting.room@contoso.com:\calendar -User service.account@contoso.com -AccessRights Author
Verify
Serraview will complete the checks to verify the Room Booking Service is successfully set up.
