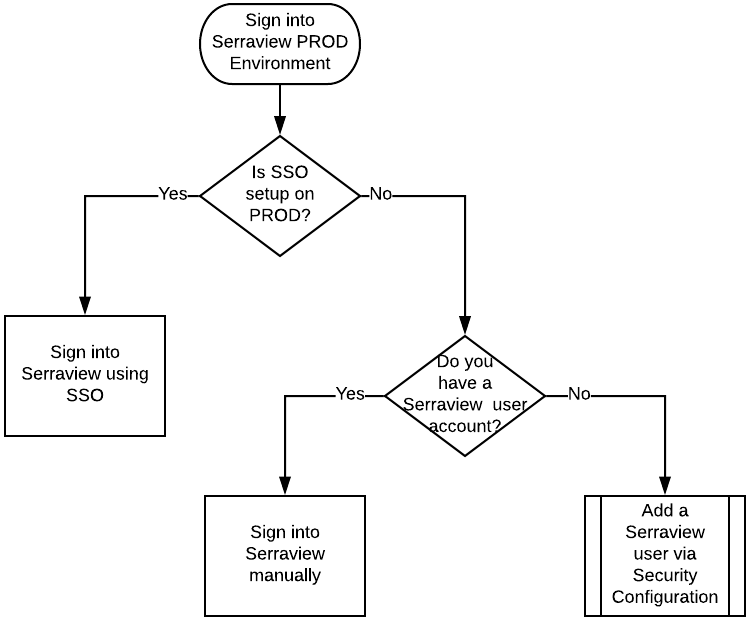
Sign into Serraview
- Secured Actions: Secured actions control each individual function in the Serraview system e.g. the ability to run a report or edit floorplans. Types of secured actions include Read-only, View and Edit. Users may be assigned Edit access to one function, but Read-Only for others.
- Roles: A role consists of a bundle of secured actions which align with the job role of an individual. For example, a Data Analyst Role would contain secured actions to enable them to run reports, whereas an Occupancy Planner Role would contain secured actions to enable them to adjust team allocations and occupancy. For more information, refer to Corporate Real Estate Team.
You will either sign into the Serraview Production (PROD) Environment via:
- SSO (single-sign on) Identity Provider (IDP) initiated:
- IDP web login - The user is taken to the IDP web login, the user logs in and then they are re-direct to the Serraview product. The Serraview sign in screen does not display.
- SSO (single-sign on) Service Provider (SP) initiated:
- Option 1- Sign in with SSO
- Option 2 - Automatic Sign in with Force SSO
- Option 3 - Bypass the SSO redirect
- manually
Sign in using Single Sign On (SSO)
If your business uses Single Sign On, Serraview will use SAML 2.0 technology to provide the Single Sign On service, refer to Single Sign On (SSO).
Option 1 – Sign in with SSO
-
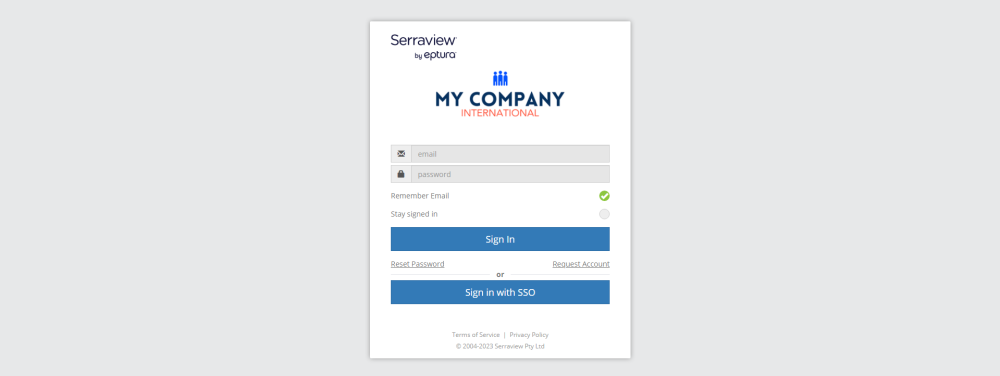
Navigate to your environment at https://[instance_name].serraview.com. Note: Replace the [instance_name] part of the URL. The Serraview Sign In screen displays.
- Click the Sign In with SSO button.
You are automatically authenticated via your Identity Provider (IdP). If the authentication was successful you are redirected to the Landing page.
The name of the SSO Sign in button can be configured by your System Administrator.
- Navigate to Configuration > General.
- From the Configuration drop-down, select SAML.
- Click the Edit button.
- In the SSO Name field, enter the name of the button.
- Click the Save button.
Option 2 – Automatic Sign in with Force SSO
This option involves configuring Serraview to Force SSO which automatically signs you into Serraview and directs you to the Landing page, without seeing the sign in screen.
-
Navigate to your environment at https://[instance_name].serraview.com. Note: Replace the [instance_name] part of the URL with your company's name or abbreviation provided by Serraview.
Failed authentication is typically caused by a break in the link between the Serraview and the client servers. This will impact all users and you will need to contact your System Administrator.
Option 3 - Bypass the SSO redirect
If you need to bypass the SSO redirect (to access the Sign In screen) then use the PROD Environment link in the browser's URL:
https://[instance_name].serraview.com/default.aspx?bypassSSORedirect=true
Sign in to Serraview manually
Initially, you will receive an email from your System Administrator, and this contain a link and instructions to reset your password. If you have a Serraview user account, then you can sign in manually.
-
Navigate to your environment at https://[instance_name].serraview.com. Note: Replace the [instance_name] part of the URL with your company's name or abbreviation provided by Serraview.
The Serraview Sign In screen displays.
2. In the Sign In area, enter your username and password. For example:

3. Click the Sign In button. The Landing page displays.
If you need to reset your password then refer to Reset password (from the Sign In screen) and if you do not have a user account then contact your System Administrator.