SVLive1 Components
Managed Location Service (MLS)
Serraview Managed Location Service (MLS) performs many tasks to consolidate the data collected into utilization data. These tasks include:
- Receiving user presence information.
- Periodically querying network switches to determine where computers are plugged in.
- Sending any changes in location / user presence information to Serraview.
MLS only sends changes in information to Serraview, dramatically reducing the amount of data send to Serraview.
Hardware Requirements
- RAM - 8GB Ram
- HD - 60GB Free Disk Space - post OS & software installed
- CPU - min 2.4GHz, 4 cores
Software Requirements
- Erlang 22.3 (installed by Serraview).
- RabbitMQ 3.8.3 and requires administrator privileges for both installation and execution (installed by Serraview).
- A modern Web Browser capable of viewing the MLS administration page.
Desktop Presence Service (Lightweight Desktop Monitor or LDM)
- Microsoft Windows 10
- Apple Mac OSX 10.13, 10.14, or 10.15
On-Prem Server (Managed Location Service or MLS) – Standard Mode
- Windows Server 2008R2 or above
- Microsoft .NET 4.6
- 2.4Ghz x 4 core CPU with 8GB RAM
On-Prem Server (MLS) – High-Performance Mode
- Windows Server 2012R2 with IIS enabled or above
- Microsoft .NET Core 3.1
- 2.4Ghz x 4 core CPU with 8GB RAM
Remote Access Desktop Protocol (RDP)
The SpaceIQ team manages the installation, configuration, and maintenance of Serraview Managed Location Service (MLS) and its dependencies. As such, we require remote access to the MLS server.
The core service is based on presenting real-time utilization data, enabling the business to achieve the highest level of portfolio optimization by getting consistently reliable data and reporting that supports effective communication, accountability, and smarter collaborative decision-making.
SVLive1 also provides Wayfinding technology for kiosks, laptops, desktops, tablets, and smartphones for employees to easily find people and workspaces, making it a universal service with high business exposure.
For the integrity of this data and the efficacy of reporting over time, as well as the cohesion of Wayfinding services for staff across the portfolio, it is imperative to have minimal loss of service or data.
For us to support and maintain the service, we require:
- Remote Desktop Access to the server running MLS.
Remote access to the MLS is required to:
- Maintain MLS -perform any patch upgrade necessary.
- Install new versions after communications, testing and agreement.
- Configure MLS to get the best results for the business' requirements.
- Investigate any issues with access to the MLS logs and configuration without a delay to ensure minimal loss of service or data.
Set-up Requirements
Find below the Serraview access accounts required to set up remote access to MLS:
- MLS Service Account (Serraview_MLS).
- This is the account that the MLS Windows service will run as.
- Serraview Vendor Account (For example Serraview_Vendor).
- This account requires remote access to the server hosting the MLS application.
The MLS Service Account will need:
- Permission to bind a TCP port on the MLS server, using a command like the following on the server where MLS will run:
netsh http add urlacl url=http://+:16000*/* user=[MLS Service Account]
This urlacl could be added by a client IT Admin in advance, or the Serraview Vendor Account would need permission to execute the above command on the MLS server.
- Run a Windows Service on the MLS server.
- Read/write permission on the folder where MLS will be installed as well as all sub folders. By default, this is "%PROGRAM FILES%\Serraview\SvLive MLS\"
-
Permission to make outbound HTTPS requests to https://[client_instance].serraview.com and https://svlive.serraview.com on port tcp/443. Ensure that this includes all necessary proxy authentication and firewall permissions.
The Serraview Vendor Account will need access to the following tools and applications:
Web Browser
- Manage MLS via web based management console.
- Delete/archive logs files.
- Manage RabbitMQ via web based management console.
-
Test access to Serraview(https://svlive.serraview.com, https://[client_instance].serraview.com).
- View details of any certificate errors that may be preventing a secure connection from being established.
Command Prompt
- Launch MLSmsi installer with elevated privileges (open Command Prompt as admin and run msi using msiexec).
- Run SnmpWalk (refer to SnmpWalkbelow for details).
- Basic ping checks to Serraview.
- Check that Switch DNS entries resolve.
SnmpWalk (https://www.snmpsoft.com/cmd-tools/snmp-walk/)
- Command line utility used to independently confirm communication to the switches and the time in which scan results are returned. For more information on SnmpWalk, refer to the section below.
Powershell
- If the browser/proxy is locked down, we can use Powershell scripts (Invoke-WeRequest) as an alternative to test connectivity to Serraview. For example:
- Proxy cannot be configured in browser and default differs from that configured in MLS.
- Cannot log into server using service account, but access via proxy is locked down to service account.
File Explorer
- Read/write permission on the folder where MLS will be installed as well as all sub folders. By default, this is "%PROGRAM FILES%\Serraview\SvLiveMLS\".
- Pre-upgrade backups.
- Clear out of old log files.
- Edit configuration files.
- Manual editing of configuration may be needed to allow MLS to start, from which point the web based management console may be used.
Event Viewer
- Review system and application events to help diagnose issues.
Services
- Start/Stop/Restart MLS Service.
- Permission to install and manage Windows services.
- Manage service account for MLS Service.
Task Manager
- Check running processes.
- Monitor performance.
- Kill processes
Firewall Manager
- Review firewall settings.
- Adjust firewall settings (with approval, typically expected to be managed by your IT department).
Certificate Manager
- Review installed certificates and trusted authorities.
- Install certificates and trusted authorities (with approval, typically expected to be managed by your IT department).
Notepad
- View/edit configuration and log files.
Add/Remove programs
- Manage installed Serraview applications.
Registry Editor
- Create and/or edit of Serraview related registry keys.
Internet Access
- Microsoft Office 365 as a minimum – to allow transfer/download of logs/installation files
OR
- Adobe Flash enabled on the server to retrieve files securely from the client's instance.
SnmpWalk Test
The Snmp software can be download from Snmp Software - SnmpWalk (Shell Tool) (https://snmpsoft.com/shell-tools/snmp-walk/)
Complete the SnmpWalk Test
Use the SmnpWalk to check at least 5 switches.
Copy and paste the command, change the -r parameter to the correct switch ip.
This is the structure of the command used which calls the SNMPWALK.exe with a few parameters.
|
Parameters |
Description |
|
-r: |
SwitchIP to scan. |
|
-c: |
Community string. |
|
-t: |
Timeout value, defaults to 60 but the batch scan script uses its own value of 10. |
|
-os: |
OID table to get data from, the OIDs used just to get the VLAN information from the switch. |
Command
%snmpwalk% -r:%ip% -c:%pwd% -t:%timeout% -os:1.3.6.1.4.1.9.9.46.1.3.1.1 -op:1.3.6.1.4.1.9.9.46.1.3.1.2
Command with example values
snmpwalk -r:10.35.63.12 -c:public -t:10 -os:1.3.6.1.4.1.9.9.46.1.3.1.1 -op:1.3.6.1.4.1.9.9.46.1.3.1.2
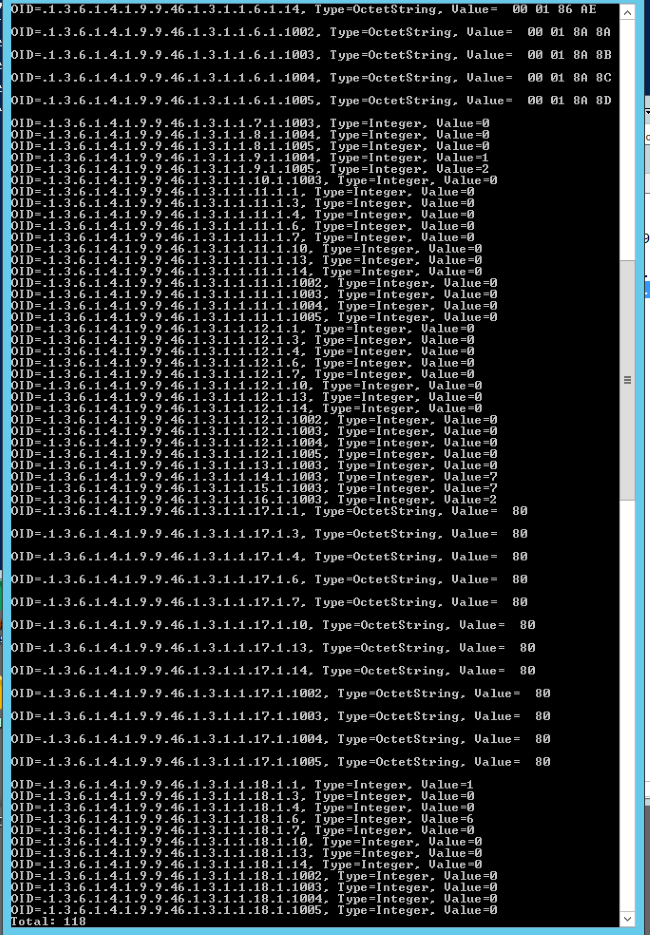
Example of a successful scan
Note that the exact output may vary.
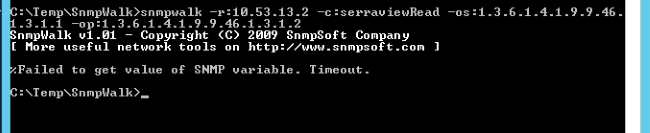
Example of a failed scan
Lightweight Desk Monitor (LDM)
The LDM collects User Presence Information and Signal Strength Information (optional) that allow MLS to determine the current location of users once combined with additional Location information obtained from switches and Wi-Fi Location Services (optional).
Hardware Requirements
The hardware requirements are;
- Windows installations
- RAM – 10MB Ram
- HD – 2MB Disk Space
- Mac OS X installations
- RAM – 10MB Ram
- HD – 10MB Disk Space
Software Requirements
The software requirements are:
- Windows 7 and above (including Windows 10)
- Mac OS X 10.10, 10.11, 10.12, 10.13, or Mac OS X 10.14 (Mojave)
Serraview Wi-Fi Location Service
The Serraview Wi-Fi Location Service (WLS) is a Software as a Service (SaaS) component hosted in the Serraview cloud.
Serraview Wi-Fi Location Service determines the approximate location of Wi-Fi devices by comparing signal strength readings to the preconfigured access point locations on each floor.
- MLS passes the signal strength readings received from LDM onto Serraview Wi-Fi Location Service.
- Serraview Wi-Fi Location Service determines the approximate location of a device and a confidence measure indicating the accuracy of the calculation.
- MLS forwards this location information onto Serraview if it determines the device's location has changed significantly since the last update (as defined by a configurable radius).
SVLive1 Wire-up (Once Off Audits)
To determine utilization to the desk level, SVLive1 needs a link created between the switch ports and the connected data point or desk.
Example of collected data
The following table displays an example of data collected as a result of deploying and installing LDM and MLS from above:
|
LDM |
MLS |
Location |
|||
|
User Name |
MAC Address |
MAC Address |
Switch Port |
Switch Port |
Floor |
|
Jsmith |
00-24-1D-1C-67-A9 |
00-24-1D-1C-67-A9 |
Switch X – SA1 |
Switch X – SA1 |
L5, 21 Martin Place |
With this data, Serraview can deliver utilization reporting down to a floor level, as switches are generally tied to floors and are configured as such in Wayfinder. Highly accurate utilization reports to the floor and building level can form a basis for many strategic business decisions. Such information will help to quickly identify areas for improvement and can facilitate in prioritization of which floors to audit first.
Auditing increases the utilization data granularity further down to the work point level. A switch port is permanently wired to a work point until either the network is physically rewired, or the floor plan is changed. Serraview's Wireup module, facilitates the collection of this information quickly and accurately. This is performed manually as a once-off audit and involves wire-up to assist in "connecting" switch ports to work points.
Example of collected data with Workpoint
|
LDM |
MLS |
Location |
||||
|
User Name |
MAC Address |
MAC Address |
Switch Port |
Switch Port |
Floor |
Work point |
|
Jsmith |
00-24-1D-1C-67-A9 |
00-24-1D-1C-67-A9 |
Switch X – SA1 |
Switch X – SA1 |
L5, 21 Martin Place |
W5.102 |
Where is switch port SA1 on the floor plan?
LDM+MLS - John Smith is currently connected to switch port SA1 and John is at work point W5.102, therefore SA1 is at W5.102.
The link between a work point and a switch port is the information that Serraview stores. The reference of a username here is used to assist the audit process. After the audit, if jsmith moves to a new work point (W5.111), we know that:
- Work Point W5.102 is no longer utilized
- Work Point W5.111 has jsmith utilizing it (providing W5.111 previously had its location "connected" to a switch port by an audit)
The diagram below displays resolving the LDM activity to a Workpoint

After a location has been connected to a switch port, it will not need to be connected again until the network or the floor plan changes. This makes the auditing process much faster and more accurate.
Below displays an example of Serraview's Wireup module used to link data points to switch ports.
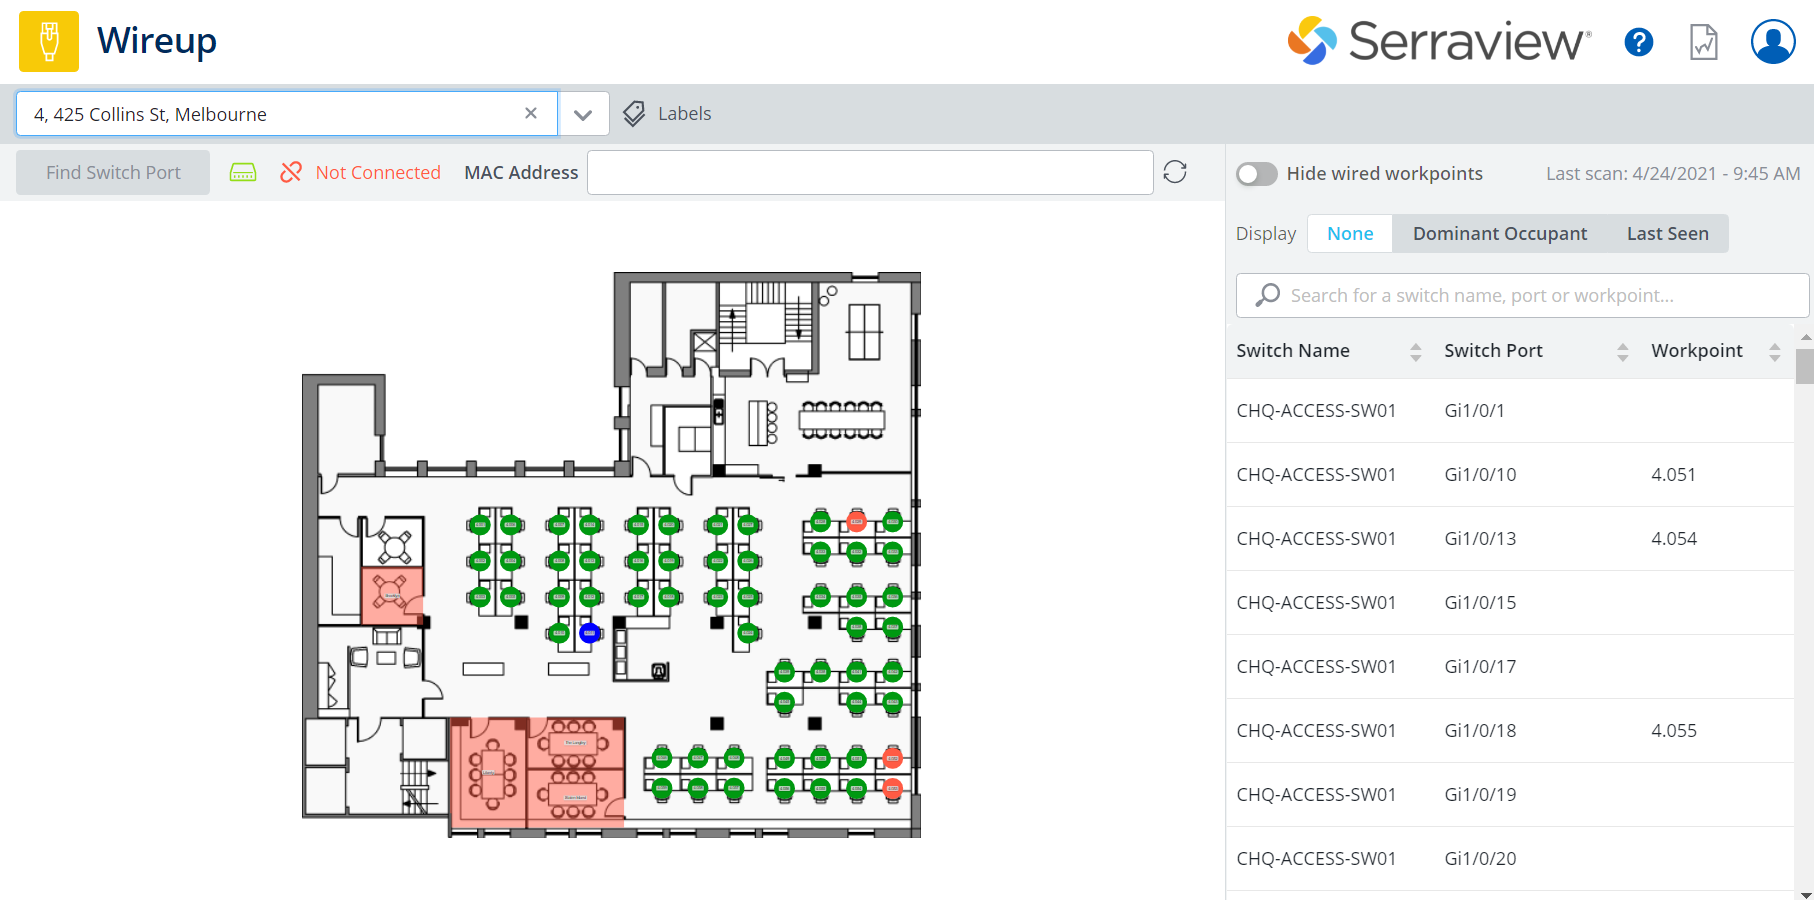
For any location where there is not currently a person, the location can be audited in one of two methods:
- Finding the machine name in the list on the right and dragging it to the appropriate workpoint, or;
- If there is no machine at the location, plugging the tablet PC device into the network location and clicking the associated location on the map.
(The 'person' is only used to identify the location of the switch at that desk)