Review the Scenario Plan Summary
When you have completed the Scenario Plan, you can review the moves from the Scenario Move Plan Summary and this article covers the following:
- Access your Scenario Move Plan Summary screen
- Filter or Search the Move Rows
- Generate Scenario Plan Reports(s)
- Delete Move(s)
- Synchronize Team Moves
Access your Scenario Move Plan Summary screen
Click the Scenario Move Plan  icon. The Scenario Move Plan Summary screen displays.
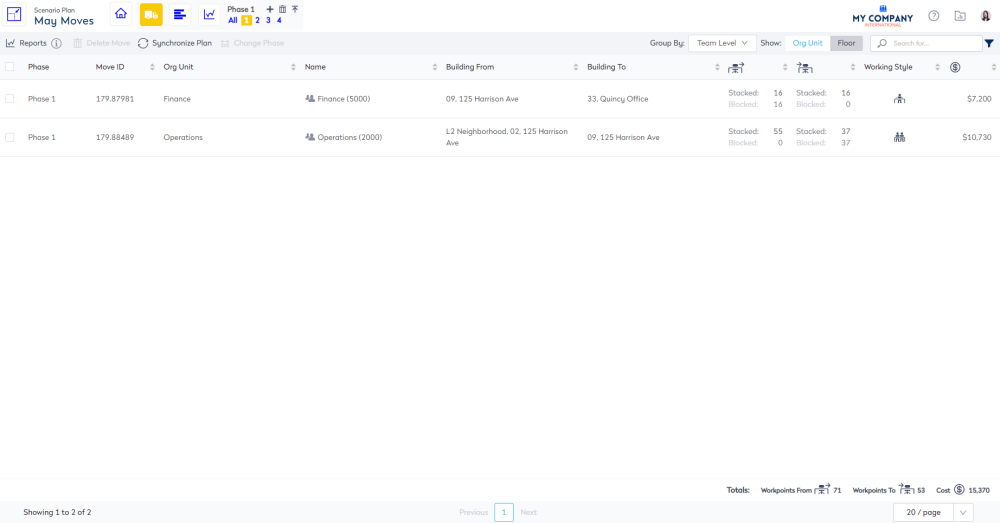
The following columns display the Team Moves, which are explained below.
| Column | Description |
|---|---|
|
|
Select All icon This will only select all the items on the page. |
 |
Phase |
|
|
Move ID |
|
|
Org Unit |
|
|
Team Name |
|
|
Move From Location |
|
|
Move To Location |
|
|
Workpoints From |
|
|
Workpoints To |
 |
Working Style |
 |
Cost |


Filter or Search the Move Rows
The rows can be filtered using the filter and search.

Use the Group By to display the different levels.
- From the Group By drop-down, select a level. For example, Org Unit Level 2 or the Team Level.
Use the Show Filter to display by the org unit or floor.
- Click the Floor icon to display the moves by floor.
- Click the Org Unit icon to display the moves by org unit.
Search
- In the Search field, enter your search criteria.
Use the filter to display the org unit and from location.
- Click the Filter
 icon. The filter displays.
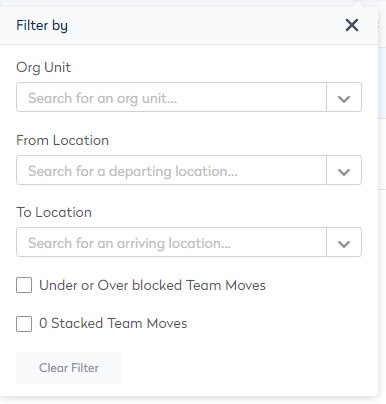
2. In the Org Unit drop-down, search or select an org unit.
3. In the From Location drop-down, search or select a from location.
To remove the filter, click the Clear Filter button.
Generate Scenario Plan Reports(s)
As you review your Scenario Plan reports can be generated and these can be used if you need to obtain approval for your Scenario Plan. You can quickly generate a report to contain all the move row or you can search/filter the move rows and then generate the quick report.
The reports can be quickly generated from the Reporting module or the Scenario Planner Quick Reports.

Delete Move(s)
You may come across move(s) that needs to be deleted from the Scenario Move Plan and this is best described using and example.
So let us explain how a Customer Service's team move can be deleted independently of Asset Costing team move. Note that the Asset Costing team move will still exist however it will be impacted in respect to ‘blocked’ workpoints i.e. it will relinquish any workpoints it needs to in order to successfully delete the Customer Service team.
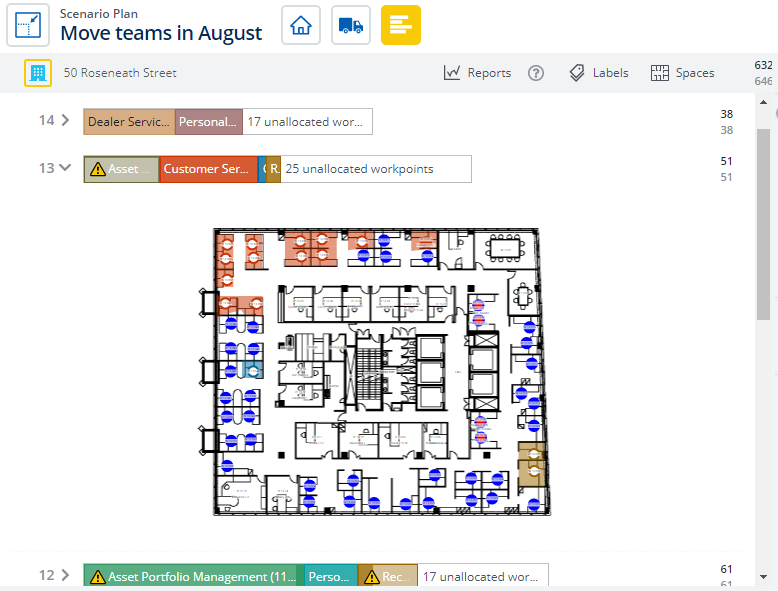
Below displays the start position of the Customer Service team on Level 13 and the Asset Costing team on Level 12.
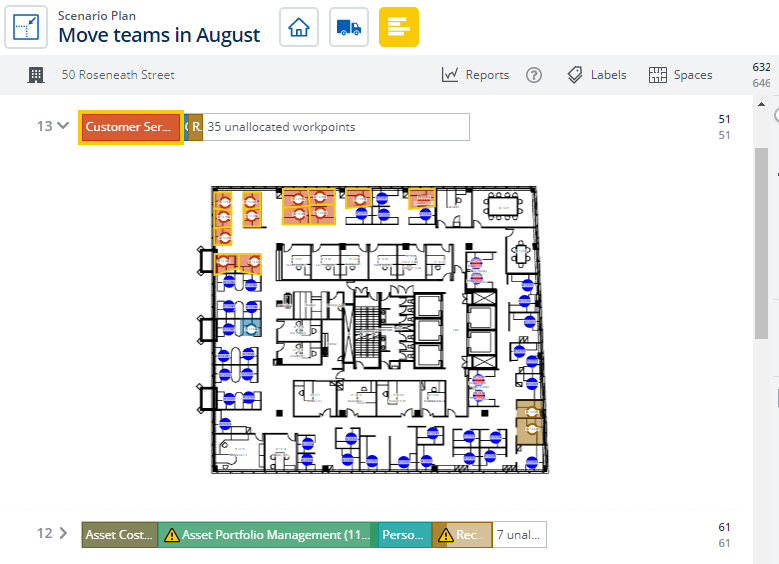
Step 1. Change Teams Location
In this step, the Customer Service team is moved to a different floor and then the Asset Costing team takes over to their allocation .
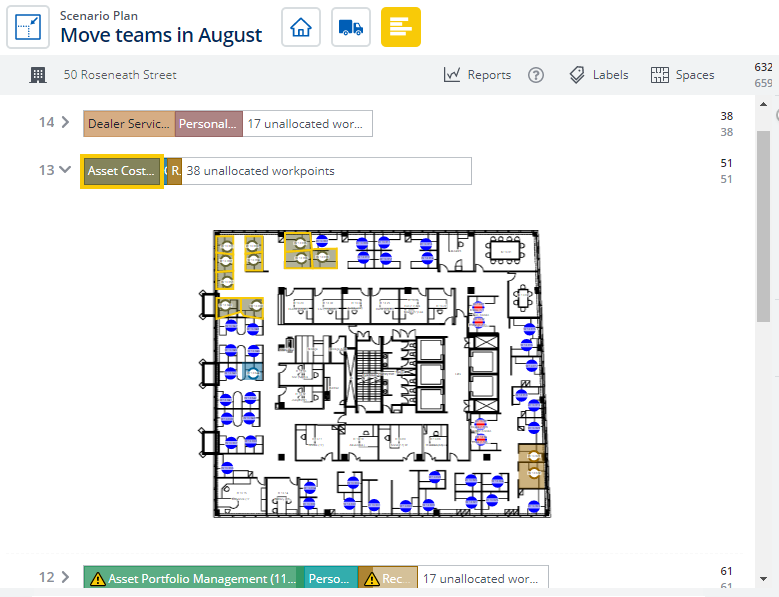
Step 2. Delete Team Move

Then the Customer Service team's move is deleted.
- Select the row check box to the left of the row. Note: You can select the top check box to select all the rows OR to select multiple rows, use Ctrl key + click to select multiple rows. You can also select the first row, hold the Shift key and then select the last row which will select all rows between those two points.
- Click the Delete Move button. The warning message displays Are you sure you want to delete the X selected moves?
- Click the Okay button.
The move is deleted.
End Result
This results in the Customer Service team being moved back based on its Live VBS data position and the Asset Costing team who ended up taking up their space losses its acquired desk.
The Asset Costing’s team move still exists and its allocation (workpoint count increases) are still reflected in the Scenario except it will display a Under-Blocked Warning because in order to be successfully deleted the Customer Service team, it had to give up the desk it acquired.

Synchronize Team Moves
When a Scenario Move Plan is created it copies all the building data to a Sandbox environment. Some changes from the VBS will flow through, however, they will not change the end state of your scenario. The scenario keeps track of what rows have been modified in the phase (currently this is a single phase).
Over time the Scenario Move Plans will become out-of-sync with the Live VBS. The table below details the action in the Live VBS data and what effect it has on the Scenario.
| No. | Change/delete in the Live VBS data | Does the action flow through? | Effect on the Scenario Phase |
|---|---|---|---|
| 1a |
Team allocation changes. |
Example - Existing Team Move in the Scenario If there is an existing Team Move in the Scenario, it will show the Workpoints To column for that Team based on what is in Live VBS data. In the Scenario:
In the Live VBS data:
Then in the Scenario:
|
|
| 1b | Team allocation changes. |
Example - No existing Team Move in the Scenario If there is no existing Team Move in the Scenario then no record will display in the Scenario Plan Move Summary screen as this team does not exist in Scenario. Refer to the SP-8.0 Synchronize Phase from the Live VBS for how Team Moves are synchronized. |
|
| 2a | Team location changes. |
Example - Existing Team Move in the Scenario If there is an existing Team Move in the Scenario, it will show the Workpoints To column for that Team based on what is in Live VBS data. In the Scenario:
In the Live VBS data:
|
|
| 2b | Team allocation changes. |
Example - No existing Team Move in the Scenario If there is no existing Team Move in the Scenario then no record will display in the Scenario Plan Move Summary screen as this team does not exist in Scenario. Refer to the SP-8.0 Synchronize Phase from the Live VBS for how Team Moves are synchronized. |
|
| 3 | New team added to neighborhood or floor. |
Scenario has no idea about new teams and they are ignored. Refer to the Synchronize Phase from the Live VBS for how new teams are synchronized. |
|
| 4a | Team deleted from neighborhood or floor. |
Example - Existing Team Move in the Scenario If it is an existing Team Move in the Scenario, it will update the Move From Location for that Team, example below: In the Scenario:
In the Live VBS data:
Then in the Scenario:
|
|
| 4b | Team deleted from neighborhood or floor. |
Example - No existing Team Move in the Scenario If there is no existing Team Move in the Scenario then no record will display in the Scenario Plan Move Summary screen as this team does not exist in Scenario. Refer to the SP-8.0 Synchronize Phase from the Live VBS for how Team Moves are synchronized. |
|
| 5 |
Person assigned to space or team. |
The Scenario Plan Move Summary screen will not display the difference between the Live VBS data and the Scenario VBS for occupancy changes. What If Strategic Planning When using Scenario Planner to conduct What If Strategic Planning, the focus is on how to move or consolidate teams and to get your stack organize to suit the Business needs. When it comes down to Occupancy changes at a desk or team level, this will be completed later using Serraview's BOS module to collect your move data. Also, the BOS can be used to assign occupants to their future locations in conjunction with the impacted business units. Bulk Updates When you use a Scenario Move Plan to complete bulk updates, you will need to complete the following:
|
|
| 6 | Person removed from space or team. |
If person is assigned to a space or team this does not flow through to Scenario Plans. Refer to the Synchronize Phase from the Live VBS for how person changes are synchronized. |
|
| 7 | Person attributed changed e.g. Name, Email, Employee Number. | The change cascades through to Scenario Plans. | |
| 8 | New neighborhood added to floor. | Does not flow through to Scenario Plans, use the Synchronize Phase from the Live VBS to update this. | |
| 9 | Neighborhood deleted. | Does not flow through to Scenario Plans, use the Synchronize Phase from the Live VBS to update this. | |
| 10 | New space added to floor. | Does not flow through to Scenario Plans, use the Synchronize Phase from the Live VBS to update this. | |
| 11 | Space attribute changed e.g. Space Name, Charge Rule. | Does not flow through to Scenario Plans, use the Synchronize Phase from the Live VBS to update this. | |
| 12 | Org unit deleted. |
The delete cascades through to the Scenario Plans and the org unit will be deleted from the Scenario Plans.
|
|
| 13 | Org unit attribute changed e.g. Org Unit Name. |
The change cascades through to the Scenario Plans.
|
|
| 14 | New floor added to the building. |
The new floor does not flow through to the Scenario Plans, use the Synchronize Phase from the Live VBS to update this. |
|
| 15 | Floor deleted from the building. |
The delete cascades through to the Scenario Plans and the the floor will be deleted from the Scenario Plans. |
|
| 16 |
Floor attribute changed e.g. Floor Name. |
The change cascades through to the Scenario Plans. | |
| 17 | Building deleted from the Portfolio. |
The delete cascades through to the Scenario Plans and the building will be deleted from the Scenario Plans.
|
|
| 18 | Building attribute changed e.g. Building Name. | The change cascades through to the Scenario Plans. |


