Manage Custom Fields
Before you add a custom field, you must decide which entity you want the custom field to show against, refer to the Custom Fields Prerequisites. This determines where the data will be stored in Serraview and how it is pulled out in a report.
The most typical entities to store custom field data against are:
- Asset - Car Park, Locker, Storage. Custom Fields for assets can be added to either Car Parks, Lockers, or Storage or to all assets.
- Space - Building, Floor, Neighborhood, Team, Storage.
- Other - BOS Move (Stored against the BOS move row, typically used for data that does not need to be used after the project is implemented), Service Request, Org Unit, Person
Example
You may need to add a 'Secondary Occupant' field to a car park space, to record a person's name who is permitted to occupy this space when the Primary Occupant takes leave. The standard method to do this would be to set this up as a free text Custom Field. This means the name of the Secondary Occupant is typed free text into the Secondary Occupant field (which is linked to the Car Parks table).
The alternative is to set the Secondary Occupant as a Built-In Field.
This means:
- Users who view the Custom Fields tab of the Car Park form will see the Secondary Occupant field as a Person Search field instead of a free text field. The user searches for and selects the required Secondary Occupant from the People table.
- The Secondary Occupant field data now has significantly more information attached to it – not just a name, but details like their position, Org Unit, location. Therefore, in this example, the Car Park Custom Fields tab has a 'built-in' field from the People table.|
The management of custom fields includes:
Add Custom Field
You can add custom fields.
- Navigate to Admin Settings > System Config > Custom Fields.
The Custom Fields screen displays.
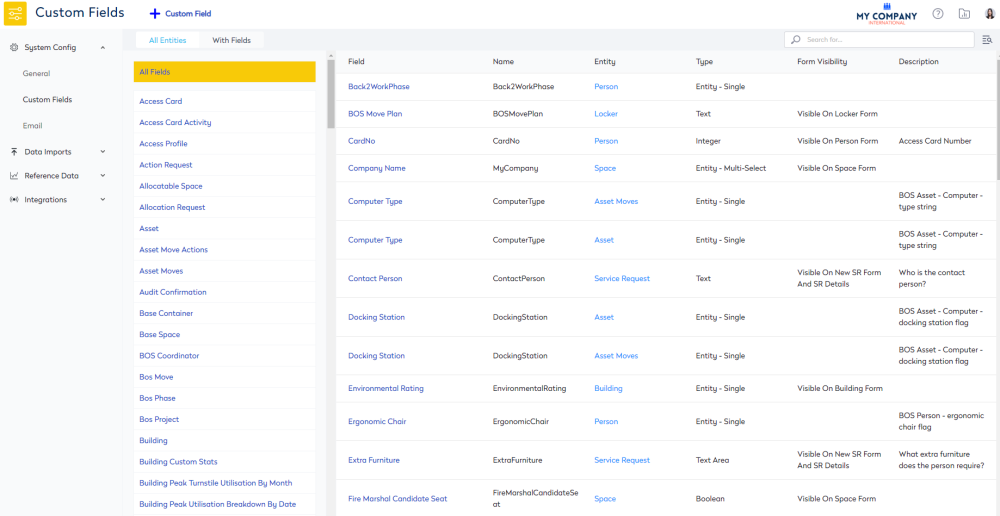
2. From the left-hand entity list, select the entity for the custom field that you want to add a new data field to. For example, Person, Team, Space, Asset, Car Park, Lockers, or Storage.
3. Click the New Data Field button. The Create Custom Field form displays.
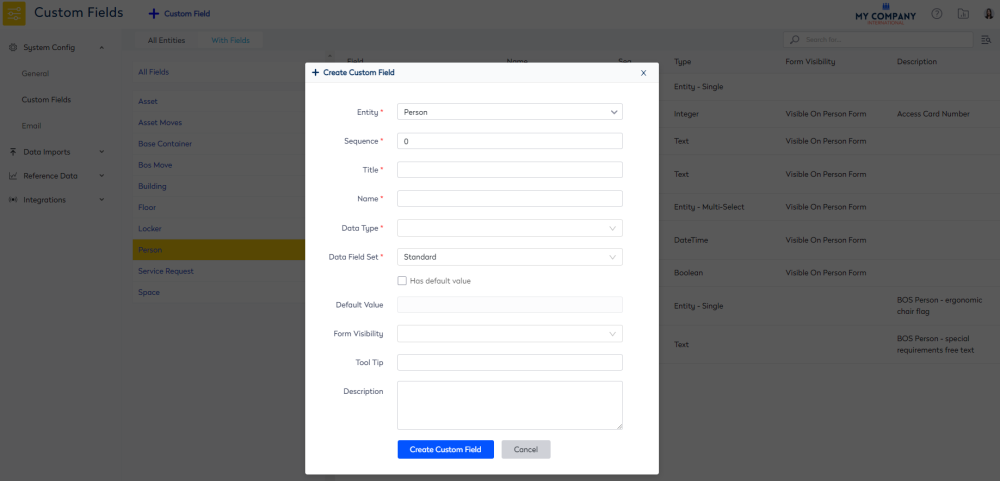
4. Complete the following:
| Field | Description |
|---|---|
| Entity drop-down | This will default to your entity selection. |
| Sequence | Enter the number corresponding to the display order. For example, 0 = first field, 1 = second field, 3 = third field. |
| Title | Enter the field title. |
|
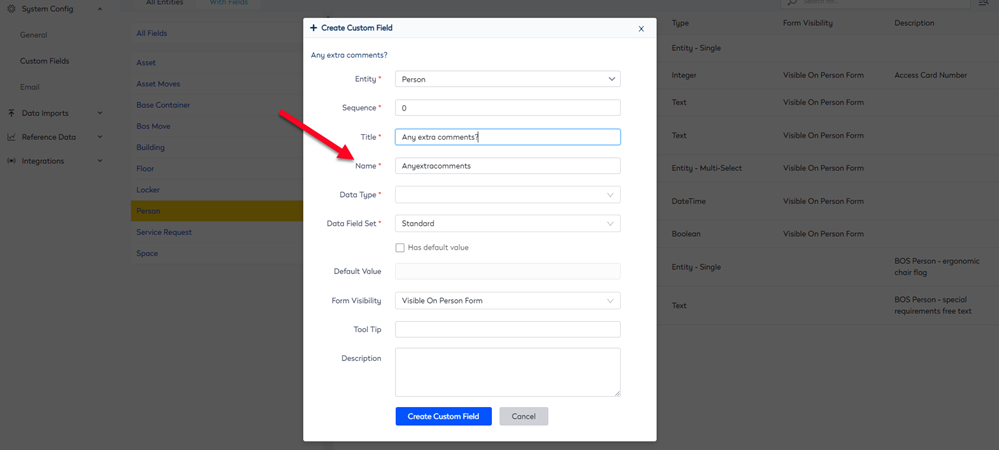
Name |
When you create a custom field, there is a relationship between the Title field and the Name field. As you enter the Title field, the Name field is automatically populated without any spaces or special characters.
The fields are used in Serraview in the following ways:
Remember when you edit the custom field, the Name field will be disabled to protect this field and you will still be able to edit the Title field as this displays on the forms. To minimize the renaming of fields, we recommend you use names that clearly define their purpose.
|
|
Data Type |
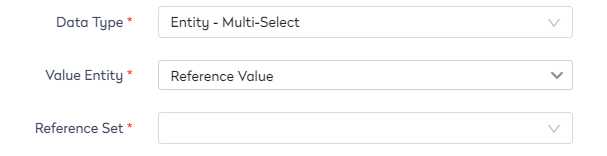
Select the type of field. For example, Boolean, Free Text, or Date. The data types are:
For more information on the field type, see Data Types and Default Values in the Custom Fields Prerequisites article. When you use Custom Field with the Multi-Select data type, then you will not be able to import this field into Serraview. Custom Field using a Keyword Set You can create a custom field using a keyword set. Step 1. Set up the Keyword Set
Step 2. Set up the Custom Field using the Keyword Set
|
| Data Field Set |
Select the data set this field is associated with from these options:
|
|
Has default value check box Default Value drop-down |
The default value can only be set for certain data types, such as Reference. For the Default Value check box either:
|
| Visibility drop-down | Select the required form for this field to display on. For example, when adding a car park asset, it will display on the Visible On Car Park Form, or a locker asset will display on the Visible On Locker Form. |
| Tool Tip field | Enter the text to display for the tip tool. |
| Description field |
Enter the description for your reference. This description will not display on the form. We recommend you enter a description as this will assist you when finding the Custom Field in the email templates. As the custom field parameter and the description displays. |
5. Click the Create Custom Field button.
Edit Custom Fields
- Navigate to Admin Settings > System Config > Custom Fields.
- Select the entity.
- Select the field. The Custom Field edit form displays.
- Click the Edit icon.
- Edit the required fields.
Rename Custom Fields
There are two names associated with the data field.
- Title: The Title refers to the heading that displays for this custom field – the name presented in the custom fields tab and in report column headers. While changes to this field may therefore seem superficial, we recommend using a consistent naming format that is similar to the Name field, e.g. 'staff name' to 'employee name'. This will prevent potential problems where investigation of the Custom Field may be required within the database e.g. to explore a potential anomaly found in reporting, imports or BOS grids. The report column's Title (the custom field title) is used to review the database and find the irregularity. So, if the 'Title' name doesn't correlate to the database 'Name', then the report output becomes difficult to reconcile with the database table.
- Name: The custom field Name is linked to the data table, so changing this requires additional changes (e.g. to the BOS grid and to all reports that refer to the original Name). Therefore, if changing the Name field, we recommend you:
- Consult with Serraview Support (who may need to organize some database changes for you and ensure any reports that rely on this field are updated); and
- Change the Title field to the same name or a similar name.
Data Type
Do not change the Data Type field on a custom field as the data for that custom field will still be stored against the original data type.
6. When you have completed the edits, then click the Update Field button.
Delete Custom Fields
When you delete a custom field Serraview will also delete all data attached to that field.
- Navigate to Admin Settings > System Config > Custom Fields.
- Select the entity.
- Select the field. The Custom Field edit form displays.
- Click the Delete icon. The message Are you sure you want to delete this field? displays.
- Click the OK button.