Version 2.45 - November 2016 Release Notes
Notable Changes and New Features
Portfolio Manager
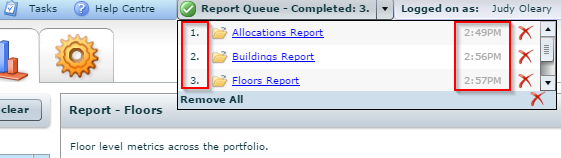
The report queue display now shows the report with a number sequence and time stamp. The first report is numbered 1. So, when you generate more than one report in quick succession, you can easily identify which report you ran first from the most recently generated report.
VBS and Scenario Planner
Changes to Retained Statistics
The display of Retained statistics is now controlled by a new configuration item, 'Statistics - Show Retained'.
Prior to 2.45, the display of Retained statistics was controlled by 'Statistics - Show Capacity' and 'Statistics - Show Opportunity' – if these two configuration items were not turned on, the Retained statistics would not display in some parts of VBS and Scenario Planner.
Now, the display of Retained statistics is independent of these two configuration items. So, if Capacity and Opportunity are turned off in Configuration, but Retained is turned on, the Retained statistics will always display in VBS and Scenario Planner under:
- Information Panel
- Team Form
- Hood Form
- Building statistics hover form
- Floor stack hover form.
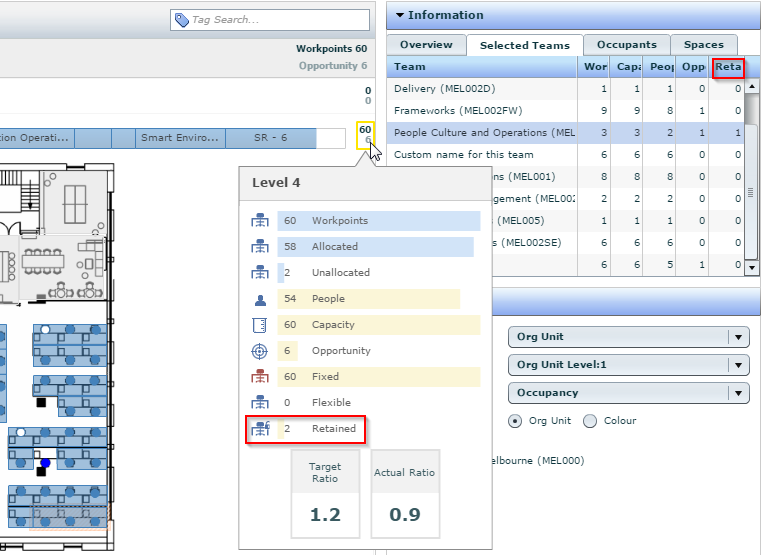
The Show Retained configuration item is turned on by default.
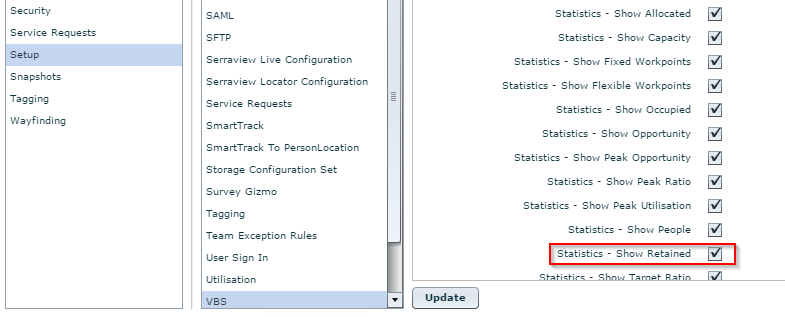
You can turn on Show Retained by selecting the check box in Configuration > Setup > VBS.
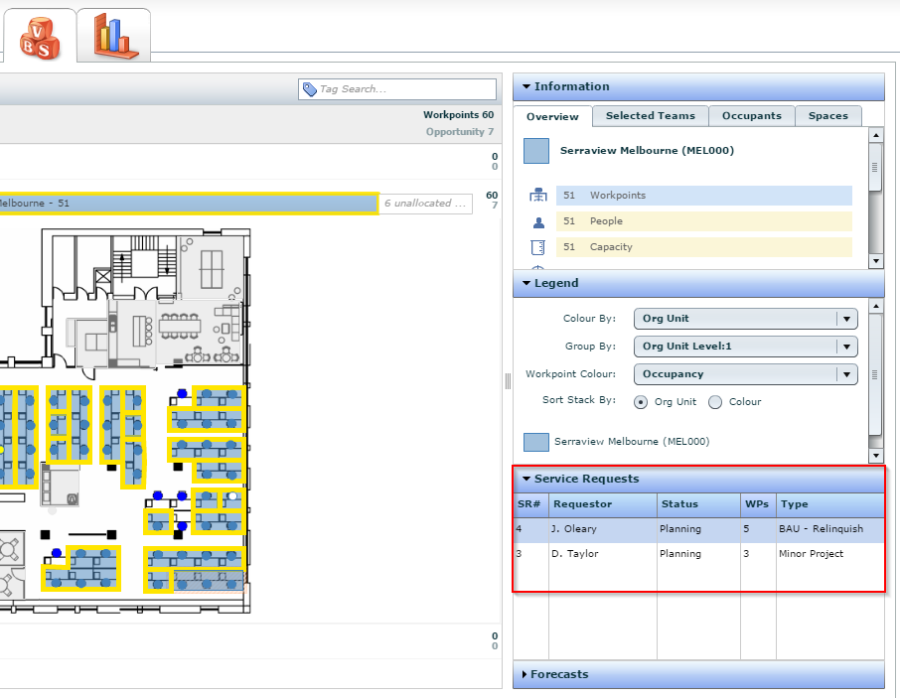
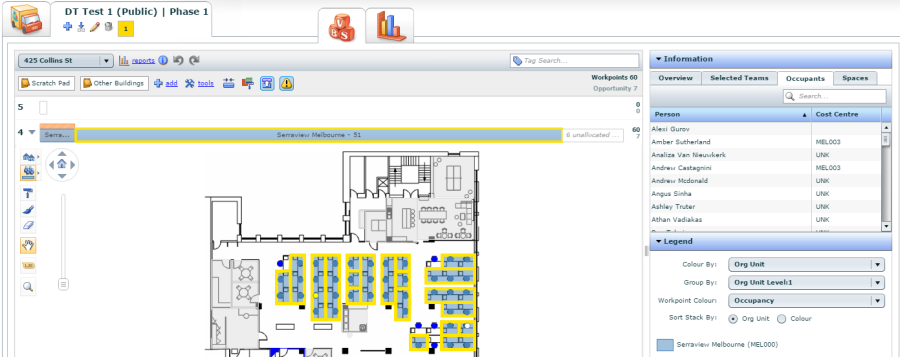
New 'Spaces' Tab
The right-hand Information panel of VBS and Scenario Projects now features a new 'Spaces' tab. This tab displays the breakdown of available workspace types (for example; Traditional Workstations, Sit-stands, Hot desks) for the selected floor, hood or team.
Workspace types are defined in Configuration > Mapping.
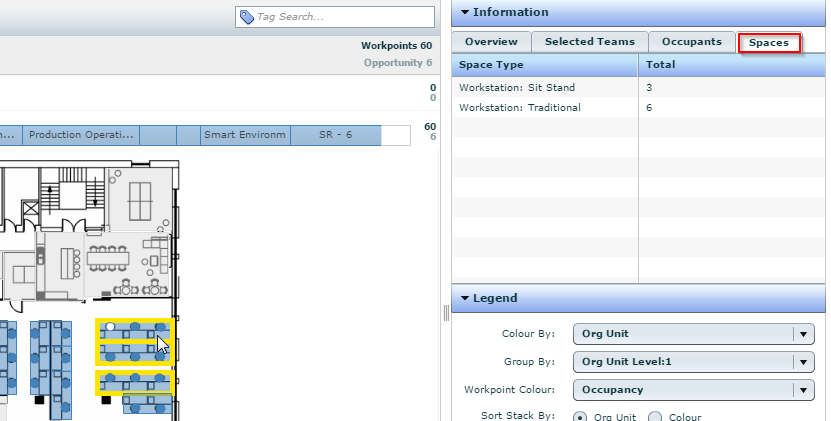
To filter the Spaces tab statistics to:
- Floor: click the stats on the right of the stack
- Hood: click the hood on the floorplan or the stack
- Team: click the team on the floorplan or the stack (see screen example above).
In Scenario Planner, the Spaces tab displays live VBS so you can have a direct comparison of space types between your scenario and BAU in the one screen. Any changes you make to the space types within your scenario will display on the floorplan, while your Spaces tab continues to show the current VBS space types.
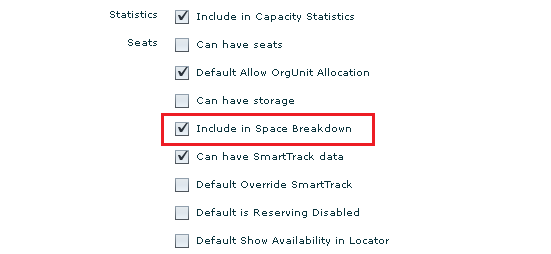
Since a floor could house a large number of different space types (potentially crowding the Spaces tab with information), the Spaces tab is filtered to only include those space types that have been enabled to display.
To enable specific space types to show in the Spaces tab, go to Configuration > Setup > VBS and select the Include in Space Breakdown check box.
The Spaces tab has been turned on by default. If required, you can hide it by clearing the check box in Configuration > Setup> VBS > VBS Show Space Types. The columns in the Space Types tab are not configurable.
New Service Requests Panel
The VBS and Scenario Planner phase screens now include a 'Service Requests' panel.
This panel allows you to check:
- The current status of a building in VBS while concurrently viewing all service requests that may impact this building.
- Any recently submitted Service Requests that may impact the building within your Scenario Project. The panel will always show any recently submitted requests, including those submitted after you first created your scenario.
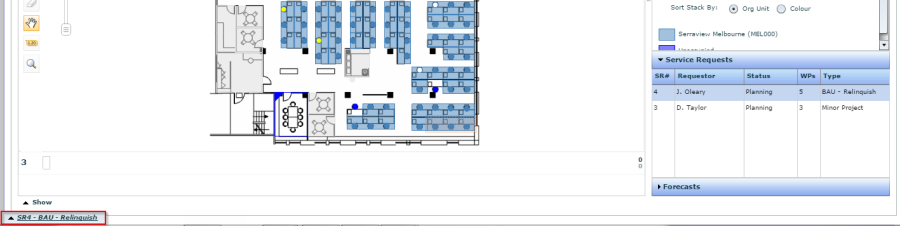
The Service Requests panel contains Service Requests related to the selected building (sorted by their number in descending order). Double-clicking a selected Service Request from the panel opens its Service Request form.
You can view and edit this form in the same way as if you had opened it from the Service Requests tab, depending on your level of access to viewing and editing Service Requests (the level of access you have to this panel corresponds to your access to the Service Requests tab or app).
Opening a Service Request takes up the space in your window, covering your VBS or Scenario phase. To return to VBS/Scenario, minimise the Service Request.
The default columns for the Service Requests panel are:
- Service Request number
- Status of the request (for example 'Planning', 'Implementation')
- Number of workpoints impacted by the request
- The name of the requestor
- The type of request (for example additional desks, relinquish)
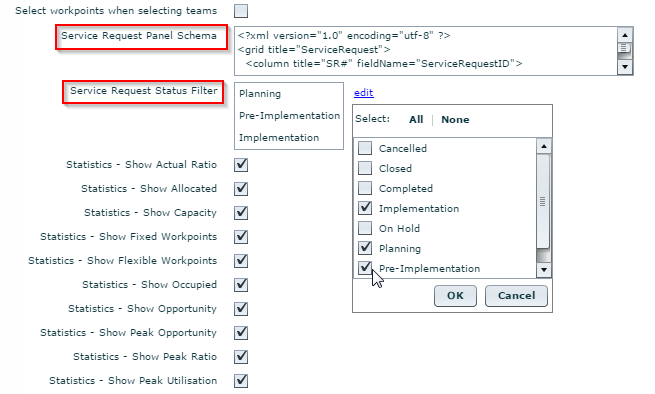
Columns within the Service Request panel can be customised to suit your requirements. You can define the field name, titles of each column and width of columns displayed here.
These columns are set in Configuration > Setup > VBS > Service Request Panel Schema and are a cut-down version of Configuration > Setup > Service Requests > Service Request Grid Schema. Contact your Client Manager if you wish to make customisations
Any customisations you make will apply to the panels in both the VBS and Scenario Projects.
The Service Request panel is filtered by default to display only requests with a status of:
- Planning
- Pre-implementation
Implementation.
To make changes to the status filter, go to Config > VBS > Service Request Status Filter, click edit and make changes to the filter check boxes.
Service request access
There are no changes to Service Request access within the 2.45 release.
The following information is provided to allow you to check the access levels within your team are appropriate since the Service Request functionality is now visible from VBS tab.
To view service requests from VBS (or the Service Request tab/app) that you have submitted, you require the secured actions of:
- 'Service Request Access'
- 'VBS access'
To edit these requests, you also require:
- 'Service Requests – Edit My Requests'
To view requests submitted by others you need: 'Service Requests - View All Request Queues'
To edit requests submitted by others you also need: 'Service Requests – Edit All Request Queues'.
Scenario Planner
Changes to the display of workpoints in Scenario Projects
Since Scenario Planning is about moving teams (not individuals), prior to 2.45, when a building was added to a Scenario Project, all desks on the floorplan of a phase would display with white dots. All team members associated with fixed desks were given a 'floating' status in the scenario – they were still associated with the team, floor and building, but no longer connected to a specific workpoint. This also applied to Retained workpoints: they too appeared as white dots.
Clients have told us that this 'white dot' display hinders the visualisation of available space and can make the tasks of consolidation or finding vacancies difficult.
We have responded to this feedback with changes in 2.45. Now, when a building is selected for a Scenario Project, the desks are no longer stripped of their occupants nor their retained status. Instead, the colour of workpoints in your scenario (at the time of creating the scenario) now correspond to their VBS colour for:
- Workpoints on the building's floorplans (visualised from the workpoint hover)
- Workpoint forms
- Team forms
- Hood forms.
Workpoints in your scenario with a Retained status (at the time of creating the scenario) now display yellow, again matching their VBS colour.
The only white workpoints on a Scenario Planner floorplan will be:
- Desks that were white in VBS at the time you set up the scenario
- Desks that you have allocated to a new team within the scenario. If you revert this move, the original occupants will return to these desks and the workpoints display their VBS colour again.
The Occupants tab of the right-hand side Information panel does not match individuals to workpoints in Scenario Planner. Any edit buttons in Scenario Planner forms for occupants and retention reasons are disabled.
Workplace
Changes when moving an occupant from a specific location or team
The 'Default Clear Person Rule' functionality in Workplace has now been superseded.
The 2.45 release includes an enhanced version of this clear rule functionality with a new configuration item 'Enable Move / Keep Functionality'.
You can enable this in Configuration > Settings > Workplace > Enable Move / Keep Functionality.
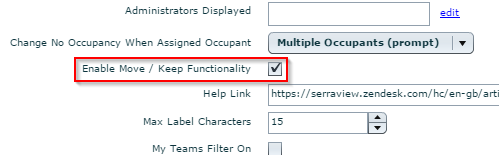
Enable Move / Keep Functionality is not turned on by default.
The 'Default Clear Person Rule' configuration item is no longer available in 2.45.
The following information explains how to move team members in Workplace when the Enable Move / Keep Functionality is turned on.
This configuration change has not impacted the behaviour of the existing move/keep functionality within My Workplace.
How to move a team member in Workplace
Before you do this for the first time: Go to Configuration > Settings > Workplace > Enable Move / Keep Functionality and select the check box.
- Open the required floor in Workplace.
- Do you want to move the team member directly to a workpoint on the floorplan?
- Yes: Skip to step 5.
- No: You can move the team member using the Teams panel. Click/Tap the required team in the Teams Pane. (Serraview Workplace > Location Selector > Teams Pane > Team Details panel)
- Click/Tap the Members tab.
- Click/Tap Add Member.
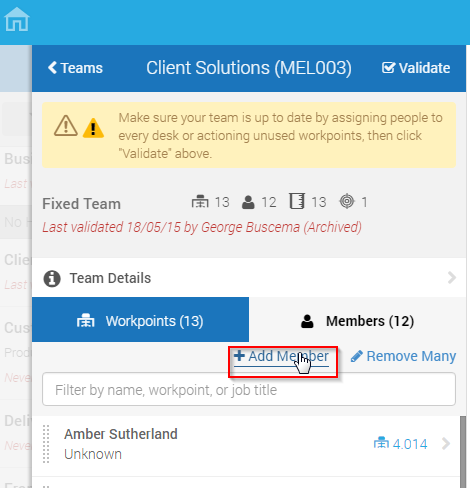
5. Type the first few letters of the person's name in the Add occupant box. Results will display filtered to those letters. The screen example below left relates to the Teams pane, the workpoint form is below right.
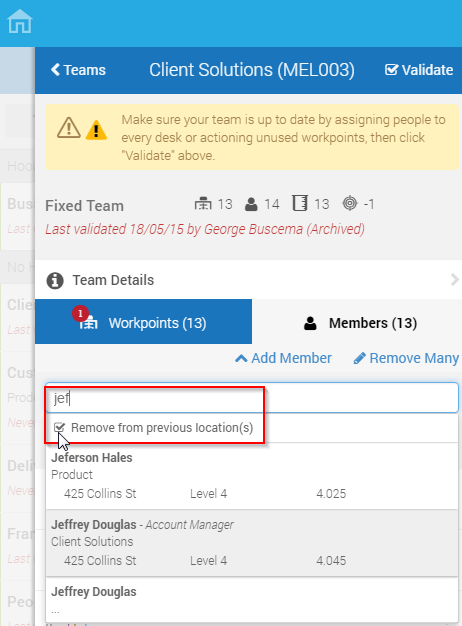
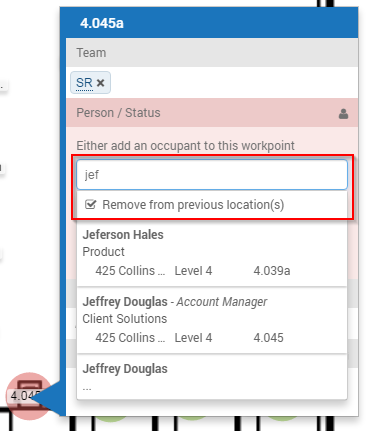
6. After you add them to this team, do you want this person to remain at their previous location?
- Yes: Clear the Remove from previous location(s) box check box. After this step the team member will have multiple locations.
- No: The Remove from previous location(s) check box is selected. This person will be cleared from any previous workpoints they were allocated to (including multiple workpoints).
The Move/Keep functionality is not activated with drag-and-drop moves (for example, where an occupant is dragged across the floorplan from one desk and dropped on another). Drag-and-drop moves involve the occupant being moved to the new desk/team and being removed from the desk they were dragged from. If this occupant had been assigned to more than one workpoint, they will only be cleared from the specific workpoint they had been dragged from – and will remain an occupant of the other workpoint/s.
Custom Team names now display in Teams panel
Teams can be given a customised name if preferred over their Org Unit name, by typing text into the Name field of the Team form in VBS (see screen examples below).
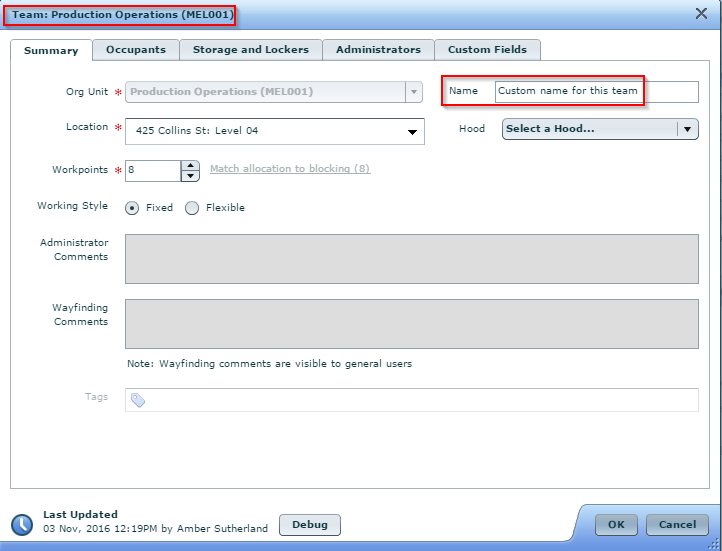
to

The new team name then displays in the Team form (as per example above) and most places where the team displays in Portfolio Manager (including the floor stack, Information panel) and My Workplace.
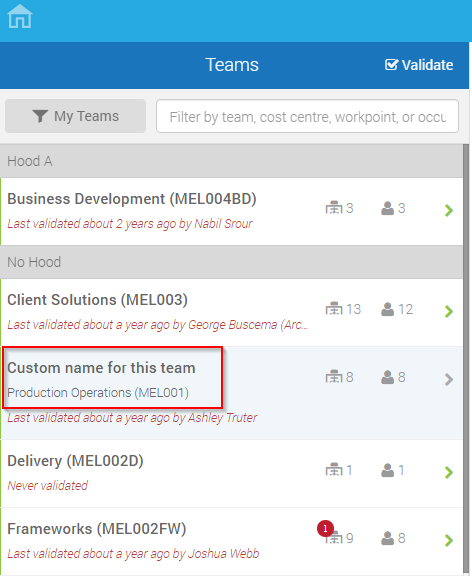
Now, this customised team name also displays in the Workplace Teams panel. The panel also includes the original Org Unit name directly below (see screen example below). The Changes panel also shows the new team name.
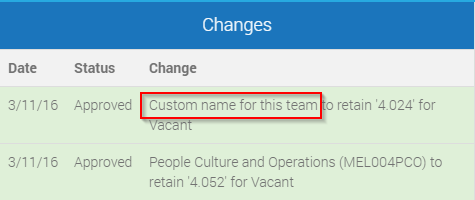
Similarly, this custom name displays on the Team form and any workpoints selected in Workplace.

New My Teams filter
Prior to 2.45, Workplace Administrators validating a large floor may need to search for their teams by first scrolling through a long list of teams they were not responsible for. The new release removes this searching step by providing a 'My Teams' filter.
![]()
Clicking My Teams shows in one place all the teams and hoods assigned to the Workplace Administrator.
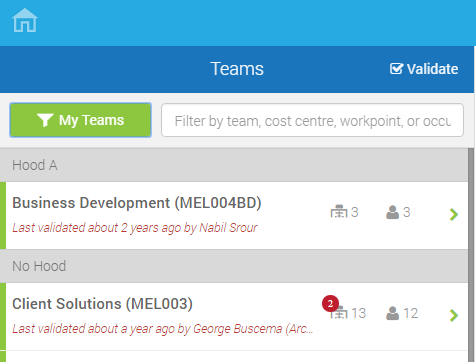
When the filter is clicked, it turns green.
Click the filter again and the list returns to its previous unfiltered state, the filter button returns to grey.
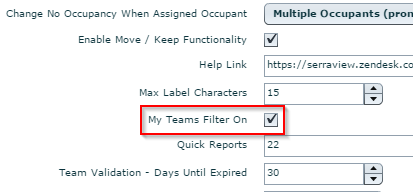
By default, the My Teams filter is turned off. This means the button displays in Workplace but needs to be clicked to activate the filter, as described earlier. If you prefer to have the filter initially active in Workplace, go to Configuration > Setup >
My Teams Filter On and select the check box.
General Release Notes
Custom Fields
Enhancement – It is now possible to report on any Administrator Notes added in Workplace using Report Builder, by running a 'Spaces' query to select the 'Workplace Notes' field.
Dashboards
Fix - Resolved an issue where the Peak number in dashboards report 292 was not being calculated correctly.
Fix - Resolved an issue where an error message was failing to display for dashboards reports containing charts that were not correctly set up.
Data Imports
Fix - Made changes to reduce the uploading time of the Person Import.
Fix - Blank hood names are now reported with a warning when processing a BOS Import, when team names are the same.
Emails
Fix - Resolved an email outbox issue, where any attempt to filter emails by date resulted in an error message.
Portfolio Dashboard
Fix - Resolved an issue with the Help link on Portfolio Dashboards where it was redirecting users to the Help Centre homepage instead of the Help Centre Portfolio Dashboards section.
Fix - Resolved an issue where the Portfolio Dashboards Teams panel was not responding after viewing details of a team's under capacity and overcapacity.
Fix - Resolved an issue where it was not possible to enter a workpoint cost of more than one digit (and subsequently attempt to change the cost) when using Internet Explorer.
Report Changes
Enhancement – Some changes were made to this report to improve reports 161 and 164 ('Manage Teams' and 'Manage Administrators'), including:
- Changed the report description
- Added Column Groups to help organize the table
- Added new columns: Org levels 2 & 3, Cost Centre, Employee Number, Last Confirmed By
- Added new date filter and changed name of existing date filter; now they are "Confirmed Since (Start Date)" and "Last Confirmed Before (End Date)"
In addition, the Administrator Details columns of report 161 now show all Manual Team Administrator Types for a team - it no longer filters to show only administrators of the admin type "Workplace Administrator".
Enhancement - Changes were made to the schema for unmodified versions of report 223 Speedgate Building Utilisation, including:
- Added legend to the chart
- Prevents unnecessary text from displaying in the results
- Improved processing time.
Enhancement - The schema for unmodified versions of report 215 Validation Report was updated to improve the calculations of summaries within the report.
Fix - Resolved an issue with unmodified versions of Report 145 Supply Grid Export where columns in the exported grid were not correctly formatting to the required width.
Fix - Resolved an issue in unmodified versions of Report 36 Detailed Building Stack where column totals were not calculating correctly; for example, the unoccupied count was incorrectly displaying as negative (for occupied teams with an incorrect allocation on the stack), instead of being rounded up to zero.
Scenario Planner
Fix - Resolved an issue where it was not possible to add a move cost for building A to building B, when a cost had previously been added for building B to building A. Calculations within the Move Project Summary report were also impacted by this issue; this report is now working correctly.
Storage, Lockers and Carparks
Enhancement – The Screen Tip for the Carpark & Lockers Management tab (displays when you hover over the icon) now displays 'Storage, Lockers & Carparks' (previously Carpark & Lockers Management) to better reflect the functionality and improve label consistency across Serraview.
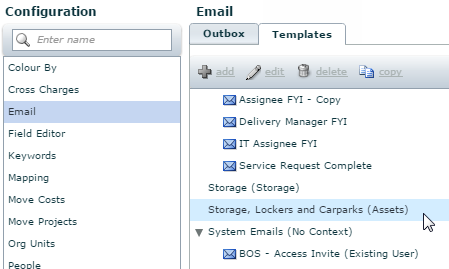
Enhancement – In addition, the Email Template category name has been changed to 'Storage, Lockers and Carparks (Assets)' (in Config > Email > Templates) from 'Storage/Carparks/Lockers (Assets)' to improve label consistency across Serraview.
Portfolio Manager
Enhancement – Manage Administrators and Manage Teams tabs are now filtered to only show current locations in VBS, not locations that are marked 'do not show in VBS'.
Fix – Resolved an issue where the ScreenTip for the VBS tab (displays when you hover over the icon) was not displaying.
Workplace
Fix - Resolved an issue where a Note / Retention reason added to a workpoint in Workplace was not saving correctly.
Fix - Resolved an issue where a team name containing an apostrophe would trigger an error in the display of the Workplace Workpoint tab.
Fix - Resolved an issue where a person with a name containing an apostrophe would trigger an error in the display of the last validated time in the Workplace team panel.