Archibus V.2023.03 Product Release
Archibus V.2023.03 introduces several enhancements, as listed below.
Web Central
Vergesense: Report on Space Utilization Trends (UserVoice Idea)
For V.2023.02, we released a solution for integrating with Vergesense IoT Occupancy Sensors . With V.2023.03, we refine this feature by making improvements to the IoT Space Utilization report. Space managers use this report to review key space utilization metrics per floor and then dig into the per-room data.
The IoT Space Utilization report now has:
-
Daily Floor Utilization chart. Select the Daily Floor Utilization tab to access a column chart to analyze the trend of Average Count of Persons, side by side with the peak person count for a floor.
-
Improved utilization calculations.
- Improved sample data that better illustrates space utilization.

Details
Help Topics
Navigator Path
-
Technologies / Innovative Solutions / Integrations - IoT / IoT Space Utilization
View File
-
ab-iot-sp-analysis.axvw.axvw
Vergesense
Continued Work on the FedRAMP® Certification Initiative
We continue to address vulnerabilities in order to achieve the goal of FedRAMP® (Federal Risk and Authorization Management Program) certification for the Archibus product. With this certification, Archibus will be hosted in an environment that aligns with U.S. Federal Government IT guidelines.
FedRAMP certification requires that Archibus follow very stringent procedures for development, implementation, deployment, updates, and support. Certification also entails rigorous process documentation, security audits, and remediation procedures.
Although the certification will be of note to customers that are U.S. federal agencies, all customers will benefit from the product improvements that this certification will bring.
Assets
The filter in the Asset Disposal Console, Asset Lifecycle Console, Equipment Systems Console, and Asset Registration Console now includes the "Remaining Life (yrs) From" and "Remaining Life (yrs) To" fields so that you can search for assets that are approaching the end of their life. Reviewing this set of assets can be important for determining which assets will soon need disposal. You can also budget for replacements for these items.

For example, you can search for all asset that have one to two years of remaining life so you that you know which assets you will soon need to take off line and dispose of.

BIM Viewer
BIM Viewer: Take Actions Directly on Assets and Rooms
So that you can advance your workflow while working with a BIM model, V.2023.03 adds the ability for you to right-click on an asset in the BIM Viewer and access a More Actions menu for:
-
reporting maintenance problems
-
viewing details of an equipment item
-
viewing details of a room
The More Actions menu was added to the core framework of the BIM Viewer so that in the future the menu can be expanded to support actions such as marking assets for disposal or reserving rooms.
Select an asset, right-click on it, and you receive the More Actions menu, from which you can select the View Details command (to display the Equipment Details panel) or the Report a Problem command (to display the Report Problem pop-up form for creating a work request). Likewise, selecting a room, right-clicking on it, and choosing More Actions / View Details presents the Room Details panel.
For example, in the below image, the user right-clicked on the left cooling tower, and chose the More Actions / View Details command. This action opened the Equipment Details panel in the right, displaying full details for this item.

Details
Help Topic
View File
-
ab-bim-viewer.axvw
Navigator Paths for the BIM Viewer
-
Maintenance / Corrective Maintenance (Archibus SaaS)
-
Assets / Assets / Asset Manager (Archibus SaaS)
-
Maintenance / Corrective Maintenance / Supervisor
-
Assets / Assets / Asset Manager
-
Assets / Enterprise Assets / Facility Asset Manager
BIM Viewer: Visualize Additional File Types
A construction package that is delivered to an organization might contain many types of files, all of which can be essential for onboarding a new facility. So that you can work with these documents in one tool, the BIM Viewer now supports the following Autodesk Docs file types:
| File Type | Description |
|---|---|
| IFC Models |
An IFC model is a building model created in the Industry Foundation Classes (IFC) open file format, designed for building data interoperability. IFC models are widely used across Europe. IFC models are an alternative to Revit models. |
| CAD Drawings | CAD files are a very popular file type used by architects and designers to deliver floor plans for construction projects. Organization might receive CAD files in an initial phase and later work with a BIM Manager to develop a Revit / BIM model. |
| PDF Documents |
The construction package that is delivered to an organization often contains many PDF documents that are key to operating asset systems within the building. For example, warranties and operating manuals are typically PDF documents. |
To work with these files types in the BIM Viewer:
-
You must have uploaded these documents to Autodesk Construction Cloud - Docs or to BIM 360 - Document Management.
-
The BIM Viewer must be connected to Autodesk Construction Cloud - Docs or to BIM 360 - Document Management (either via a generic account or individual sign-in to Autodesk).
-
You must have Autodesk permission to visualize these documents.
To access these types of files in the BIM Viewer, select the Autodesk Docs Projects icon from the BIM Viewer's ribbon menu.

This loads the Autodesk Docs Projects List, from which you drill down to the desired project and select the IFC model, CAD floor plan, or PDF document to display in the BIM Viewer. For example, the below image shows a CAD floor plan displayed in the BIM Viewer.

Details
Help Topic
View File
-
ab-bim-viewer.axvw
Navigator Paths for the BIM Viewer
-
Maintenance / Corrective Maintenance (Archibus SaaS)
-
Assets / Assets / Asset Manager (Archibus SaaS)
-
Maintenance / Corrective Maintenance / Supervisor
-
Assets / Assets / Asset Manager
-
Assets / Enterprise Assets / Facility Asset Manager
BIM Viewer: UX Improvements
We have made several UX improvements that minimize the number of pop-ups and offer a consistent design for visualizing data. These changes include:
-
The Equipment Details, Room Details, Settings, and Query Model forms have been moved to a new right-side panel.
-
The right-side panel appears contextually, depending on the action.
-
The left-side panel is narrower and can be collapsed to offer more space for the Viewer. This is especially convenient when the right-side panel is open.
-
We have made improvements to the Equipment Details panel, the Query Model command, and the Settings command.
-
We have redesigned the icon for the Search for Equipment Standards command.
The below image shows the collapsed left panel, the new Search for Equipment Standards icon, the Equipment Details panel on the right, and new buttons on the Equipment Details panel for accessing maintenance information and documents in pop-up forms.

Details
Help Topic
View File
-
ab-bim-viewer.axvw
Navigator Paths for the BIM Viewer
-
Maintenance / Corrective Maintenance (Archibus SaaS)
-
Assets / Assets / Asset Manager (Archibus SaaS)
-
Maintenance / Corrective Maintenance / Supervisor
-
Assets / Assets / Asset Manager
-
Assets / Enterprise Assets / Facility Asset Manager
BIM Viewer: Work with Furniture Assets
The BIM Viewer now presents information about tagged furniture -- furniture that is stored in the Archibus Tagged Furniture (TA) table -- so that you can interact with furniture when viewing the BIM model.
For tagged furniture that has been cataloged in BIM, you can now:
-
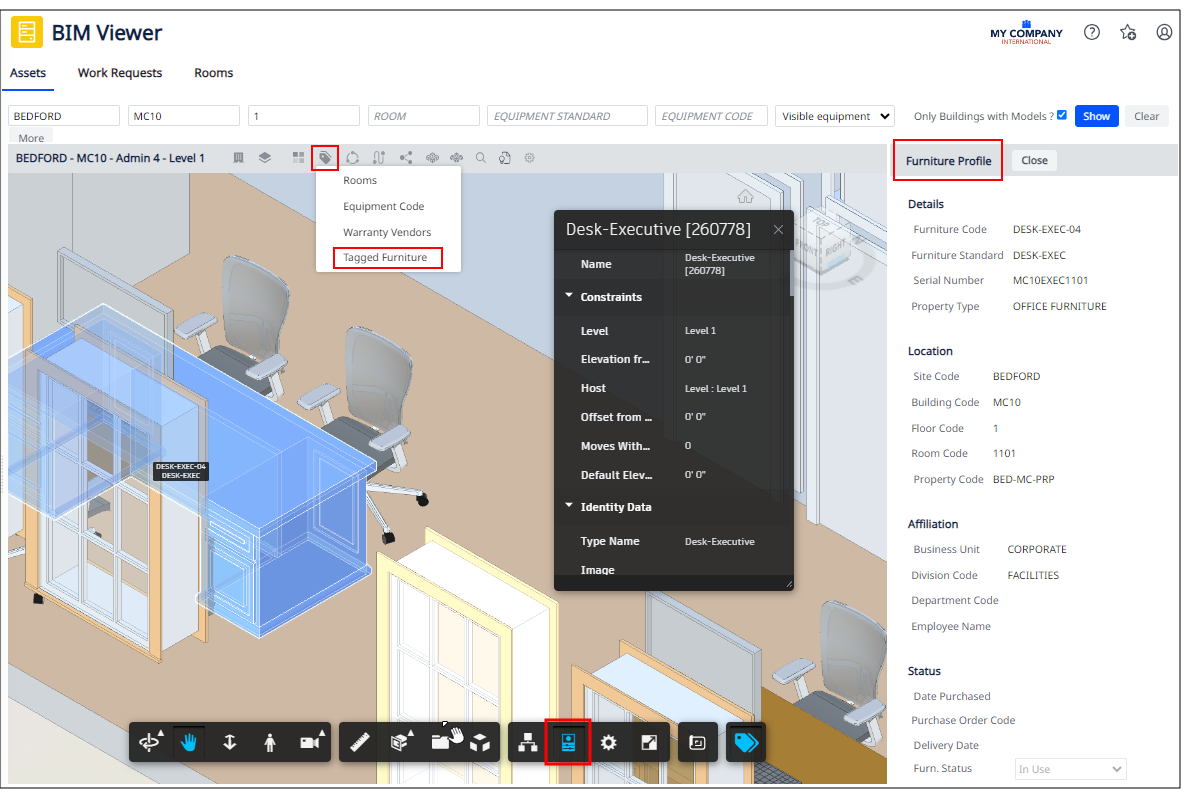
display labels for these items. To do so, select Tagged Furniture from the Labels command on the BIM Viewer's menu ribbon.
-
display the Furniture Profile in the BIM Viewer's right pane. To do so, select a tagged furniture item, right-click, and select the More Actions / View Details command.
For furniture that is not yet cataloged in BIM, you can select the item and invoke the Model Properties command to view its Autodesk Revit properties.
For example, in the below image, the user has displayed the Tagged Furniture labels, selected the DESK-EXEC-04 item, and invoked the View Details command to display the Furniture Profile pane. Additionally, the user ran the Model Properties command to view the desk's Revit properties.
Note : At this time, you cannot use the BIM Viewer's filter to search for individual furniture assets.
Details
Help Topic
View File
-
ab-bim-viewer.axvw
Navigator Paths for the BIM Viewer
-
Maintenance / Corrective Maintenance (Archibus SaaS)
-
Assets / Assets / Asset Manager (Archibus SaaS)
-
Maintenance / Corrective Maintenance / Supervisor
-
Assets / Assets / Asset Manager
-
Assets / Enterprise Assets / Facility Asset Manager
Cloud Cataloging: Map BIM Parameters
BIM Managers can now configure the mapping between Revit Parameters and Archibus fields directly in Archibus Web Central by using the new Map BIM Parameters to Fields task; it is no longer necessary to switch to the Smart Client or Smart Client Extension for Revit to perform this mapping.
This enhancement creates an end-to-end cloud onboarding process for Revit models and delivers full control over how the data is transferred from Revit into Archibus.
With the addition of the Map BIM Parameters to Fields task, V.2023.03 enables a full cloud workflow for cataloging rooms and assets.

Details
Help Topic
View File
-
ab-def-bimparams-flds-map.axvw
Navigator Path
-
System / CAD and BIM Manager / Map BIM Parameters to Fields
OnSite V6
OnSite V6 offers the following new features:
-
Self-assign team work
-
Use the timer to log labor hours
-
Input diagnosis and other cost data
-
Security and UX
Compatibility
OnSite V6 works with:
-
Archibus V.2023.03
-
Archibus V.2023.02 Update Release (Archibus V.2023.02.01.106)
-
If you have V.2023.02 (build number V.2023.02.01.105), you must upgrade to V.2023.02.01.106 (the Archibus V.2023.02 Update Release) to see the new OnSite V6 features.
-
V.2023.02.01.106 uses the same schema and database as Archibus V.2023.02; there were no schema or database changes made for this update.
-
Your OnSite version must match your Apollo version. If you do not have the proper Apollo version, OnSite will alert you that OnSite is incompatible with your version of the Apollo server.
For OnSite V6, you must have Apollo 6.

OnSite V6: Self-assign Team Work
OnSite V6 enables technicians to self-assign work requests and return requests, making it easier to balance technicians’ workloads without constant oversight and manual dispatching. This feature is available for sites that have implemented work teams with the ability for technicians to self-assign (the "Craftsperson assign themselves?" field in the Work Teams table is set to Yes).
Note : OnSite V6 does not support self-assigning when offline. When online, OnSite downloads only the My Work page.
Self-assign a Work Request from the Work Team Queue
Technicians who belong to teams that have permission to self-assign can view a list of unassigned work requests for their team and pick a request to work on. They can sort the list of the team's work by priority, location, or due date and choose a job that makes sense for their current situation. For example, to save travel time between buildings, they can choose a request whose work is located in their current building.
The below set of images illustrates a typical scenario. The technician uses the Team Work tab to examine the work requests assigned to their team. They see that there are four Emergency requests, and they open the list of requests. For a request that they think they can handle, they use the Assign to Me option to assign this requests to themselves. (If upon examining the work request details, they find that they cannot handle the request, they can return it as described below.) Once the technician self-assigns a work request, it is added to their queue and removed from the Team Work queue.

Self-assigning is available for work requests that:
-
have no active assignment
-
have a status of Assigned to Work Order
If there are no work requests that meet these conditions, the Team Work tab presents a message indicating that there is no team work ready to be assigned.
Return a Work Request
Technicians might self-assign a work request and once they review all its details, they might realize that the work requires a different skill set or that the request will increase their work load so that they are over-scheduled. In cases such as this, they can return the work request to the team's work queue if they are permitted to unschedule themselves from work (the Unschedule Self? field of the Craftspersons table is set to Yes).

To return work, technicians can choose the Return option on the Work Requests Details page. On the subsequent screen, they can enter a note as to why they are returning this work request.
Once the technician returns the request, it no longer displays in the technician's My Work page and the work request returns to its previous status and displays in the work team's queue. The work request's activity log will show the technician's rejection of the work request.
OnSite V6: Use the Timer to Log Labor Hours
OnSite V6 enables technicians to start and stop a timer for accurate labor hour logging. The timer tracks all the minutes that a technician spends on a job and stores the times and other details in work logs. When the technician completes the job, the system totals the work logs to determine the total hours worked on the job.
Conveniently Enter Labor Hours
With one tap, technicians can start the timer at the beginning of the job and then tap to stop the timer when they finish. If they take a break for lunch or another job, they tap Stop Timer when they stop work and then tap Start Timer when they resume the work. With the time button conveniently located in the OnSite footer, technicians will find that tapping the timer to record labor hours is more convenient than navigating to the Details page, scrolling to the Labor Hours field, and then entering the total labor hours.

If their configuration allows for manual entry, technicians can use the Add Labor Hours and View Labor Hours options to adjust recorded work hours if necessary or manually enter hours if they forget to set the timer.
Once they start the timer, technicians can view the time spent on the job. If they stop and start the timer when they take breaks from the job and then resume work, they can view the individual work logs.

Accurately Record Hours Worked on a Job
With OnSite calculating the total hours worked on the job based on work logs, technicians do not have to estimate the time they spent on the job. This is particularly helpful if they take breaks from a job or switch between multiple jobs during the day. By using the timer, technicians ensure an accurate accounting of labor hours. With this accuracy, managers can better plan and budget for future jobs.
Receive Alerts
In some situations, a technician is allotted a certain number of hours of work each day. With the timer system, OnSite can send alerts to the technician when they reach a maximum daily limit or allowable working hours. If the technician needs to continue on the job, remaining hours can be tracked as overtime. Additionally, OnSite prompts the technician if they attempt to log out while the timer is still running.

Configuring Timer Behavior
The OnSite administrator can control aspects of the timer's behavior for the site. The administrator can enable manual entry only, timer entry only, or both timer and manual entry. When both timer and manual entry are available, the technician can manually adjust the work logs in case they forget to set the timer.
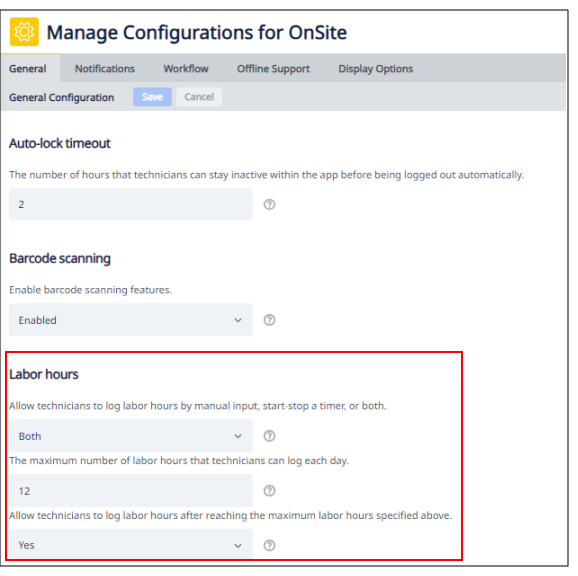
The administrator can also set the maximum daily work limit, which triggers an alert when the technician meets this limit. The administrator can also control if technicians can continue to log hours after meeting this limit.
Help Topics
OnSite V6: Input Diagnosis and Cost Data
OnSite V6 supports technicians entering diagnosis, equipment, and cost data during the job or as part of work completion. Technicians entering this data themselves while working on the job leads to more efficient practices and greater data accuracy as compared to having a manager enter the data after the job is completed.
Once the data is entered, a manager can immediately review and report on this data, and the data is easily accessible for budgeting, planning, equipment performance review, and compliance reporting.
Enter Costs and Diagnostic Data
During the process of working on the job, technicians can use OnSite's footer actions to enter cost data as well as enter diagnostics including:
-
Cause Type
-
Repair Type
-
Equipment Down Hours
-
Equipment Meter Reading
From the Work Request Details footer, they select the Edit icon, which presents the below menu (left image) with options for adding these details.
Entering the data while in the process of working on the job leads to data accuracy and completeness. As expenses occur -- such as the need for a permit or a special part -- the technician can immediately enter the cost. Likewise, entering equipment diagnostic data -- such as equipment meter readings and equipment downtime -- while these events are occurring ensures accuracy.

If technicians have not completed the information using the above screens while working on the job, they have the chance to do so when completing the work order. When the technician begins the process of completing the work, they are presented with a screen for entering or reviewing diagnostic details (left image, below), cost data and their work hours (middle image), and adding any explanatory notes (right image).

Configure Work Completion Behavior
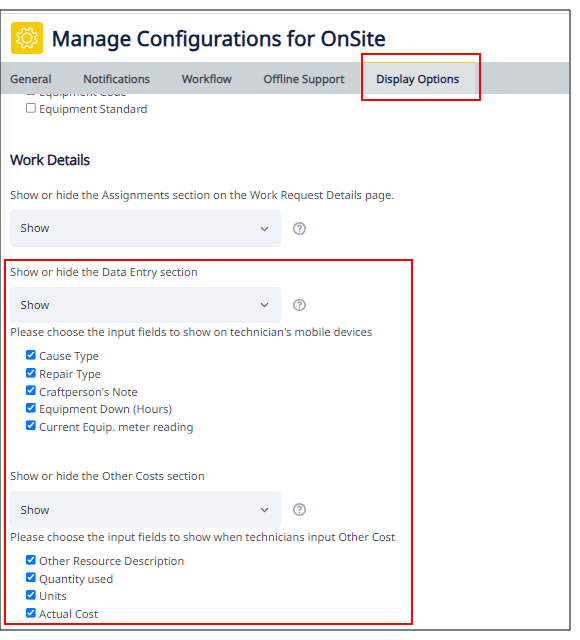
Using the Manage OnSite Configurations task, managers can configure if the diagnostic, labor hours, and comments fields are available to the technician when completing the work.

Managers can also configure which of these fields are editable while work is in progress.
Configure Offline Support
OnSite offers offline support so that technicians can work in remote locations without an Internet connection. Offline support might be necessary when technicians service equipment in basements of older buildings where Internet connection is unreliable or unavailable.
When technicians work offline, OnSite follows a default set of rules for syncing data. These can be changed with the Manage Configurations for OnSite task.
For the diagnostic data, OnSite:
-
follows the “general sync priority” rule.
-
detects and resolves conflicts.
For the Other Costs data, OnSite:
-
follows the “Sync work log and other costs?” rule.
-
either overwrites or abandons the OnSite data, depending on the "Sync work logs and other costs" application parameter.

Help Topics
OnSite V6: UX and Security
User Experience
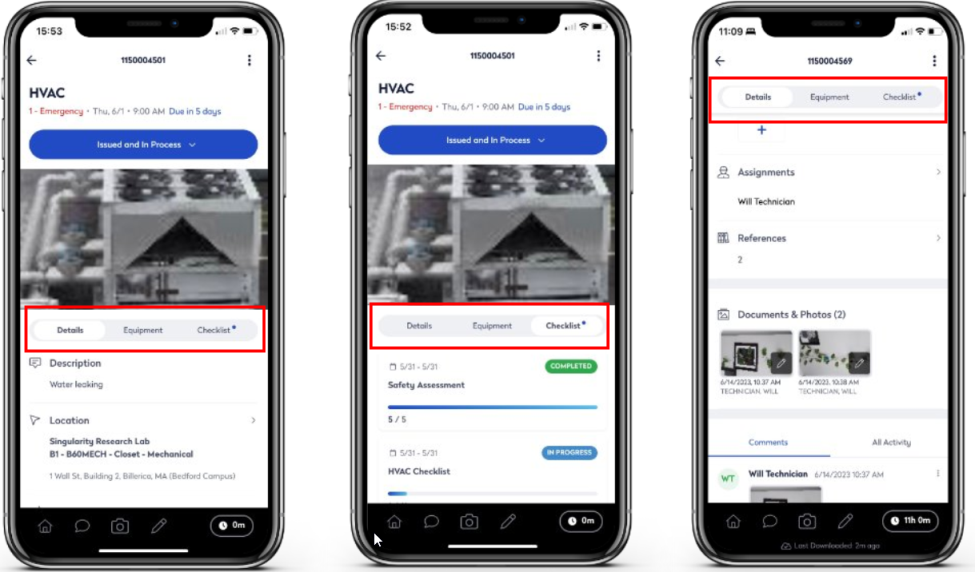
For easy navigation, we have enhanced the work request detail information with a tabbed design.
Security
OnSite is integrated with the Snyk security scan. All critical and high-priority issues have been addressed in this release.
Workplace
Workplace: Meeting Space Bookings (UserVoice Idea)
You can now modify an upcoming single meeting space booking to change the following fields:
-
Room
-
Date/Time
-
Name
-
Attendees
Use the pencil-shaped Edit icon to invoke the edit form

Editing upcoming recurring and continuous meeting room bookings is not yet supported.
Details
Help Topic
Navigator Tasks
-
Workplace Services / Service Desk / Client / Workplace
View Files
-
ab-products/essential/workplace
Workplace: Wayfinding Integration (UserVoice Idea)
We previously worked on a Proof of Concept for integrating Mapsted wayfinding technology with Workplace . With V.2023.03, we have finished all integration and this feature is now fully functional.
You will find wayfinding handy in situations such as:
-
For booked working spaces and meeting rooms, employees can follow directions that guide them to the location so that they can easily find the room.
-
For planning purposes, employees can see the fastest path to a working space that they booked or a meeting that they must attend. This will help them arrive on time.
-
When Workplace is deployed on a lobby kiosk, building visitors can access routes to locations in an unfamiliar building.
With a Mapsted integration, the Wayfinding icon appears on the following Workplace pages:
-
Find People and Places
-
Meeting Space Booking Detail
-
Workspace Booking Details
![]()
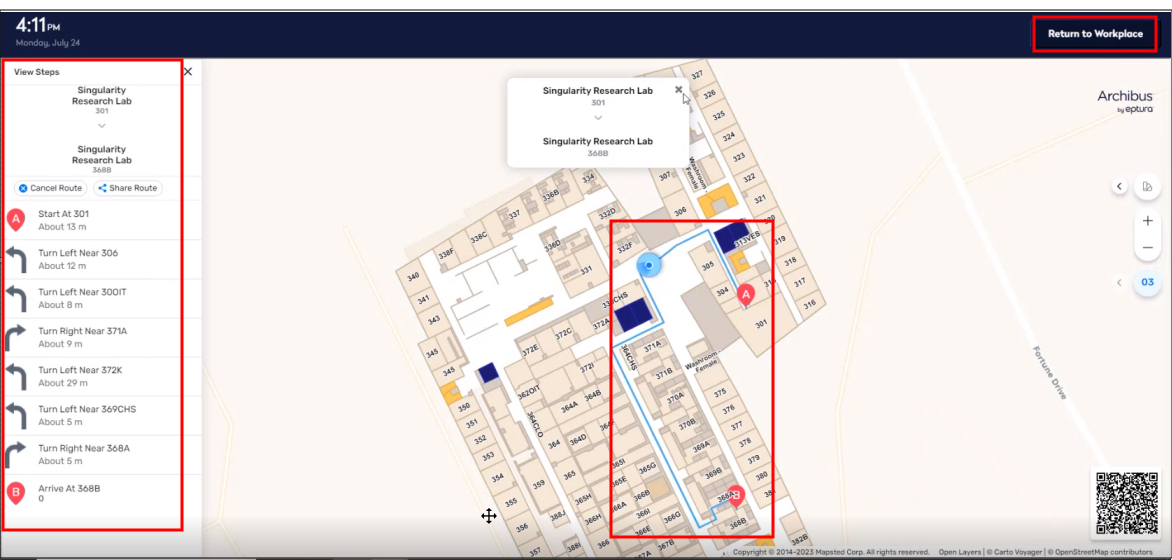
Selecting the Wayfinding button brings you to an embedded Mapsted interface where you can request directions between two locations. The Wayfinding feature supports mapping locations within a building as well as between buildings (if both buildings are part of the same property in Mapsted).
Locations can be displayed in the Mapsted interface, with point-to-point and step-by-step navigation features. For the Workplace mobile app, navigation is supported through QR code scanning. Application parameters define how to redirect to Mapsted's Wayfinding feature and how to find the Mapsted attributes for a specific room.
The Workplace wayfinding features require:
-
an Archibus Wayfinding license
-
a license to access or use Mapsted services during the current subscription term
-
wayfinding application parameters
-
digital maps stored in Mapsted.
The maps must have room-level attributes including "entityId", ”floorId", "buildingId", and "propertyId." These attributes enable the Mapsted API to display the location in the Workplace Wayfinding page.
Details
Help Topics
Navigator Tasks
-
Workplace Services / Service Desk / Client / Workplace
-
System / Archibus Administrator - Application Configuration / Configure Application Parameters
View Files
-
ab-products/essential/workplace
-
ab-activity-params-edit.axvw
Workplace Mobile App: Landing Page
For the Workplace mobile app, we have redesigned the landing page.
To reflect the Eptura rebranding and design, the landing page now has updated fonts and colors, and now uses the updated Archibus logo

Additionally, after initially signing in, you can now select a previously-entered URL.

Workplace: Google Workspace Calendar Integration (Beta) (UserVoice Idea)
We are continuing our work with integrating Google Workspace Calendar with Archibus. For V2023.03, the working beta includes automatic sync of reservations created prior to go-live.
Integration with Google Calendar requires configuration tasks in both Archibus and Google Workspace. These tasks include:
-
updating the reservations.properties file
-
user configuration
-
Google Workspace configuration
Because of these required updates, the integration with Google Workspace Calendar is not an open beta. We are recruiting beta sites. If you are interested in participating in this beta, please contact Product Management at ArchibusBeta@eptura.com.

Housekeeping
-
The Smart Client Extension for Revit now supports Revit 2024.
-
In order to rebuild Workplace after customizing it, you need to download from AllBound the node_modules.zip file. This addresses a problem with Yarn. For details, see Workplace Build process (System Management Help) .
Notes
You can find the latest release downloads at https://eptura.allbound.com/learn/archibus-v-2023-03-download-links/ .
-
The Web Central release build number is V2023.03.01.105.
-
The Workplace mobile app is being released to the app stores at this time.
-
The OnSite V6 mobile app is being released to the app stores at this time. There is a new Apollo 6 server for integrating OnSite with a non-SaaS deployment.
-
Smart Client and Outlook Plugin Installers are now available.
-
Single-byte (German, Spanish, French, Dutch, Italian ) translations for V.2023.02 and V.2023.03 are available for this release.
-
The project and schema databases for double-byte translations (Japanese and Simplified Chinese) do not include the translations for the UI strings added in V.2023.02 and V.2023.03.
-
There is no Eclipse distribution for V.2023.03.
-
Mobile Client (Sencha) does not have any updates for V.2023.03.
Other Release Documentation
You will also want to consult this release documentation:
| Help Topic | Description |
|---|---|
| A listing of V.2023.03 fixes, changes, and outstanding issues. | |
| Database Schema Revision History | A list of changes to the database schema for each release. This topic is useful for users who upgrade the database. |
