Eptura Knowledge Center

Set up your Display Options

Archibus OnSite

Your administrator can configure the OnSite app for all users across the organization, see Set up the OnSite app for all users. Technicians and users of the OnSite app can change the following to suit their needs:

  • Set the display options for the Work List Summary Screen
  • Set the display options from the Account Settings menu
  • Set the fields for the Work List 
  • Set the Work Details Screen
  • Hide or Show the Group By Options

 Set the display options for the Work List Summary Screen

You can control the information that is displayed on the Work List summary screen.

  1. Tap the Maintenance tile.
  2. Tap the More Actions icon in the top right corner.
  3. Tap the Display Options, in the pop-up menu.
clipboard_584fd495-5ebe-43f8-b79c-453f04e6c9e9.png
  1. For the display options you want to see in your work list.
  • Tap to check the Equipment Code check box.
  • Tap to check the Equipment Standard check box.
clipboard_0291e40b-1af2-4e72-a151-4da8b8e35186.png

Set the display options from the Account Settings menu

  1. Tap the Account icon in the footer.
  2. Tap Settings.
  3. Tap Display Options and the Display Options form displays.
clipboard_5a030e4a-0529-48c0-aa9e-85fdfe963b4c.png
Display Site Name or Code
A site can have a descriptive name such as Bedford Campus (Site Name field) and an identifying code, such as BEDFORD (Site Code field).
  • Tap either Site Name or Site Code you want the app to display.
Display Building Name or Code
A building can have a descriptive name such as Boston Medical Campus (Building Name field) and an identifying code, such as BOSMED (Building Code field).
  • Tap either Building Name or Building Code you want the app to display.
Show Building Address
As the building address can take up space on the app screen, you can hide the building address. This is useful if your company has only one building and the technicians do not need to travel between buildings.
  • Tap the Show building address toggle to turn it OFF.
clipboard_b209747e-b050-4001-9941-f3198b0a735a.png

Set the fields for the Work List


The work list (the screen you access after you select the options by which work is grouped) includes a summary with key details about each job, such as priority and building. It can optionally include the Equipment Code and Equipment Standard if you select these fields with this option.

To make the work list easier to read, you can to hide the Equipment Code and Equipment Standard from the work list. You can then access this information once you drill into the work request details.

  1. Open OnSite, log in, and you come to the opening screen in which work is grouped by a category, such as priority.
  2. Tap the three vertical buttons in the upper right corner.
  3. In the resulting pop-up, tap Display Options.
  4. Clear or activate Equipment Code and Equipment Standard by tapping their checkboxes.
  5. When you display the work list, it will reflect these settings.  For example, the below image shows the work list when the OnSite user shows the equipment fields.
config_eq_user.png

Set the Work Details screen


You can control whether or not to show the “Assignments” section on the Work Request Details screen.

You can to set this option to Hide if you typically assign only one technician to a work request. In this case, the Assignment section will list only the current technician, which is obvious information.

If you typically assign multiple technicians to a request, the Assignments section holds useful information which you may want to display.

configure_assignment.png
  1. Open OnSite, log in, and you come to the opening screen in which work is grouped by a category, such as priority.
  2. Tap a category, and tap a work request within the category.
  3. On the next screen, the Work Request Details screen, tap the three vertical buttons in the upper right corner.
  4. Tap "Display Options."
  5. Toggle off or on "Show Assignments section."
  6. Return to the work request details and you will see the Assignments section, if selected.
config_assignments_result.png

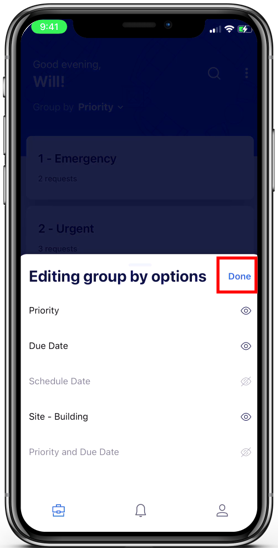
Hide or Show the Group By Options


After the technician signs in, they see a screen that groups their work requests by priority, due date, schedule date, building . The technician can then change how work requests are grouped by tapping Group By.

All of the Group By options may not be appropriate to operations at your site. For example, if a technician works only in one building, they do not need to set Group by Building, so you hide the Group by Building option.

  1. Open OnSite, log in, and you come to the opening screen in which work is grouped by a category, such as priority.
  2. Tap the Group By <xx> option, such as Group by Priority.
  3. The Group By screen shows your current settings, such as Group by Priority, below. Tap the pencil-shaped Edit icon.

geoup_by_edit.png

  1. On the resulting Editing Group By Options screen, tap the options to activate or deactivate group by options that will appear in the Group By drop-down. Activate as many as apply for operations at your site. You can choose:

    • Priority

    • Due Date (Overdue, Today, Due Later)

    • Schedule Date (Past Scheduled, Today, Scheduled Later)

    • Site - Building

    • Priority and Due Date (Emergency, Overdue, Today, Due Later, PM)

  2. Click Done.

  3. The Group By drop-down will display the options that you selected.

geoup_by_edit_done.png