Adding a Building and Importing its Data to the Scenario
Real Property / Forecasting / Portfolio Forecasting / Portfolio Forecast Wizard
Adding a Building and Importing its Data to the Scenario
You can add a building to your forecast as you work from the Stack Chart or from the Allocation Events > Locations tab. When you add a building to the scenario, you can:
- import the current floor space allocations
- set a start and end date for the allocation
- specify the organizational unit to which you want to allocate the space
- enter a percentage growth or reduction for employee head count and allocation area to test out how these factors would affect space allocation.
Note : Using the Add Building action, you import either lease information records, or floor areas based on rooms. If you have developed a CAD group inventory, you import these areas using the Copy from Group Inventory action. See Copying your Group Inventory to a Scenario.
The Add Building action is used to import both the departmental records and the lease information records if they exist.
- When you add a building, the action creates allocation groups based on the floor areas and their departmental assignments for the building you are importing.
- If the floor has leased space, lease information records are imported. In this case, the available space is based on the sum of the suite areas for the floor.
- When you add the building to the scenario, although a measured area, if it exists, is used to get the floor area value (the sum of the rm.area), the Manual Area (gp.area_manual) field is populated when the application creates the allocation groups.
- When a department is imported into the scenario, it is assigned the name DIVISION-DEPARTMENT. If departments do not exist in the building, a single default group record is created on the first floor of the building.
- If floors do not exist in the building, you will receive a message informing you that the building cannot be imported.
Checking the lease expiration date
Leased area is considered available area for the duration of the lease. When you add a building that has leased space into the scenario, the leases are imported as LEASE INFORMATION records that appear in the Events by Start Date and Group pane. To check on the lease's expiration date, expand the LEASE INFORMATION section, click on the lease to see its Date End in the Edit Lease form. Leased space is no longer included in a scenario after the lease Date End. You can create allocation groups for scenarios that use different lease expiration dates to see how lease renewal affects space allocation.
Procedure: Adding a building to the forecast
-
Do one of the following:
- From the Stack Chart, click Add Building.
-
From the Allocations Events / Locations tab, click Add Building.
The Buildings form shows the list of buildings for your deployment. If needed use the smart search console to locate the building.
- You can also add a building when you start a new scenario using the Select Scenario tab .
-
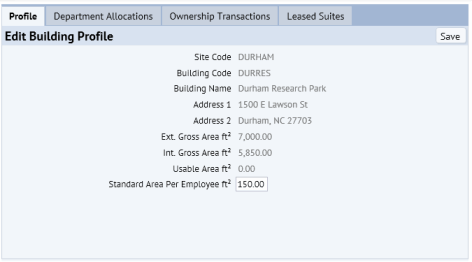
To review the building profile, ownership transactions, current departmental allocations, or leased suites, click Details in the row for the building. You can also edit the Standard Area Per Employee.
The Edit Building Profile form appears.
Note :
-- The Department Allocations tab shows the departments which will be imported along with the building.
-- The Employee count for the department is derived from the Employees table. The department's Floor Area is derived from the Rooms table.
-- The Leased Suites tab appears only if the building is associated with a lease.
-- If departments do not exist in the building, a single default group record is created on the first floor of the building. - If this scenario uses a different value for the Standard Area Per Employee, enter the adjusted value and click Save.
- Click Close on the Edit Building Profile form.
-
From the Buildings form, select the check box for the building you want to add to the forecast, and click Continue
The Import tab appears.

-
Review the selections in the Import form and make changes as necessary.
-
To import the building's current floor space allocations into the scenario, keep the option button set to Yes. This means that the departments and employees that are assigned to rooms on each floor of the building are also imported. Typically, you would select Yes.
Note: If you select No, a default group is created on the first floor of the imported building. This default group will have a Manual Area of 0 and so will not appear in the Stack Chart. In this case, you will need to edit the record and/or add new allocation group records for the building.
- The Start Date is the date to begin the departmental allocation. This determines the date on which the department begins to appear in the scenario's stack chart. The workflow rule assigns all imported groups the same initial start date; if you want to use different start dates for different groups, you can edit the groups after they are imported.
- Choose whether to allocate the space on the business unit, division, or department level.
- If you enter a Percent Growth or Reduction value, the initial employee count and group allocation area will be calculated using the percent growth or reduction value.
-
To import the building's current floor space allocations into the scenario, keep the option button set to Yes. This means that the departments and employees that are assigned to rooms on each floor of the building are also imported. Typically, you would select Yes.
-
Click Finish to complete the import.
The application creates allocation groups or lease information records for this scenario. You can review and edit these groups or lease information records in the Allocation Events tab .