Creating Complex Filters
Archibus Smart Client
Creating Complex Filters
The Filter Editor enables you to build complex filter criteria with multiple filter conditions combined by logical operators. You can group conditions so that the same operator is used between all the conditions in that group. To add a condition using a different operator, you add a new group. Using the Filter Editor you select from menus, or click an icon to build the filter expression.

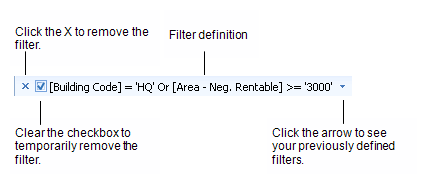
The filter conditions you create are available until you select another task. The filter currently applied to the view is shown at the bottom of the grid. You can select the arrow at the bottom to see a list of your previous restrictions. Select a previously defined restriction from the list to reapply it to the view.
If you want to save a restricted view so that it is available in later sessions, add the restricted view to your Favorites. See Working with Favorites.
How to Access
You can access the Filter Editor from Smart Client grid views by:
-
Selecting the Filter/Filter command from the Ribbon.

- Right-clicking a column and selecting Filter Editor from the context menu.
- The Filter Editor is also available from some Smart Client forms that offer a filtering features, such as the Select Fields form or the Views tab on the Navigator. In these cases, you enter a few characters in the row filter, and the system activates the Edit Filter button which presents the Filter Editor. For example, to search for a field that you want to display, you can enter a value in the filter row of the Select Fields form to activate the Filter Editor. You can then enter a complex filter in the Filter Editor to find the field to display.
How the Application Determines the Operators Available in the Filter Editor
When working from the Filter Editor, you might notice that the available operators differ depending on the column you are working with. You might also notice that sometimes the editor presents different operators for the same column when working from different grid views. There are several factors that determine the available operators for a column:
- Does the column accept Null Values? : If a column does not accept null values, the operators IS NULL and IS NOT NULL are removed from the operator list, as, in this case, these operators do not make any distinction. Whether or not a column accepts null values depends on the column's role in the table it appears in. For example, if the column is a primary key or part of a multipart primary key for the table, the column cannot accept null values. A Room Type column is a validated value in the Rooms table, and it usually allows a null value, but in the Room Type table itself, this column is a primary key and thus it cannot be null. Therefore, any column might or might not accept null values depending on the column's context.
-
How do you enter the value for the column?
When you click "enter a value" in the Filter Editor to specify a value, the Filter Editor presents different ways to enter a value, depending on the column's role in the table:
- Enumerated lists: Some columns present an enumerated list, that is, a predefined list of values. In these cases, the Filter Editor presents all operators except 'BEGINS WITH' and 'ENDS WITH.' If the column allows null values, the 'IS NULL and 'IS NOT NULL' values are available; otherwise, they are not.
- Validated Values: If the column allows only a validated value, that is, a user-defined value from another table, the Filter Editor presents the list of validated values and all operators, including "BEGINS WITH" and "ENDS WITH." If the column allows null values, the 'IS NULL and 'IS NOT NULL' values are also available; otherwise, they are not.
- Free-text columns : For columns that use free-text for entering the value (that is, you can enter text directly without selecting from a list), the column has all operators available. If the column allows null values, the 'IS NULL and 'IS NOT NULL' values are also available; otherwise, they are not.
-
Is the column a primary key in the table?
The Smart Client uses the following convention to determine the available operators for columns when they are
primary key
s or
multipart primary keys
.
- Simple primary key . When a table has a simple primary key (meaning the primary key is one single column), the allowed filter operators for that primary key column is the full set of operators.
-
Multipart primary key
. When a table has a composite primary key (meaning the primary key is the combination of two or more columns), the allowed filter operators for the most specific column is the full set of operators, but the allowed operators for the other columns is limited to the operators for enumerated fields.
Therefore, in the Buildings table, the Building Code column is treated differently than that same column when used in the Rooms table. In the Buildings table, the primary key is the single column Building Code, and that column is allowed to use all the filter operators. In the Rooms table, the primary key is the combination of the rm.bl_id + rm.fl_id + rm.rm_id columns (Building Code + Floor Code + Room Code). The most specific column – Room Code – is allowed all the filter operators, but the less specific columns – Building Code + Floor Code – are limited to the enumerated field operators.
Creating a Filter with One Group of Conditions
You can create a filter condition that has one group (that is, all the conditions are connected using the same operator). For example, you can create a filter that restricts the view to show leased areas of a certain size range in a particular building.
To create a filter with one group:
- Run the Filter command from the View group on the Ribbon Toolbar.
-
On the Filter Editor, click the plus sign.
A default condition appears for you to customize.

- Select the field in the default condition and a selection list of all columns shown on the screen appears. Select the field you want to restrict by.
- Select the operator to select an operator from the list.
- Select the operand value to specify the value you want to use. If the field you selected is validated or is associated with a list, the operand value field has an arrow after you click on it; click the arrow and select the value from the list.
- To add another condition, repeat steps 2 through 6.
-
Click Apply.
The view is shown using the restriction.
The following image shows the Filter Editor with a filter that uses one group with two conditions:

Creating a Filter with Two Groups of Conditions
You can create a condition that has two groups of conditions. For example, if you want to see leased areas of a certain size in either of two buildings, you would do so by creating two groups of conditions - one for each building- and connecting the groups with an Or operator.
To create a filter with more than one group:
- Run the Filter/Filter command from the Ribbon.
-
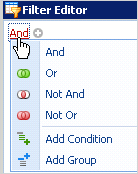
On the Filter Editor, select And, and select the filter operator used to combine the two groups. For example, select Or so that records that meet either of the condition groups well be included.
-
On the Filter Editor, click the operator again, and select Add Group.
A default condition appears for the first group of conditions.

-
Add conditions for the first group:
- Select the operator (Add) that is directly over the first group, and select the operator to be used for this group. For example, keep the selection as And to create a group that selects records that meet all the conditions you define.
- Select the field and a selection list of all columns shown on the screen appears. Select the field to restrict by. For example, select Building Code.
- Select the operator to select a different operator from the list. For example, keep the selection at equals to select records for a specific building.
- Select <enter a value> to select the operand value that specifies the value you want to filter by. For example, select the specific Building Code from the list to select records for a specific building.
-
Select the plus sign next to the operator that is just above this group of conditions.
The default condition for the second condition appears.
- Repeat steps 4 b through 4 d to create the second condition for this group. For example, select Area- Neg. Rentable for the field, greater than or equal to for the operator, and 3000 for the operand value to restrict to leased areas of this size in the specified building.
- Add the second group by clicking the operator at the top of the Filter Editor, and select Add Group.
- Add Conditions for the second group by following step 4 above.
- In the Filter Editor, click Apply.
The following image shows the Filter Editor with a filter that uses two condition groups:

Clearing Restrictions
You can clear filter restrictions (restrictions set using the Filter Editor) in the following ways:
-
Run the Filter/Clear command from the Ribbon.
Note: If there is both a filter and a view restriction set for this view, the first click clears the filter restriction, and the second click clears the view restriction. See Clearing View and Filter Restrictions.
- To remove the filter, click the X by the filter definition at the bottom of the grid.
-
To temporarily remove the filter, clear the check box from the filter definition that appears at the bottom of the grid.

See Also
Clearing Filters (for information on clearing filter restrictions and view restrictions)