Archibus V.2023.01 Product Release
Archibus V.2023.01 introduces several enhancements, as listed below.
BIM Viewer
BIM Viewer Onboarding: Cloud Cataloging of Assets
Archibus V.2022.04 introduced the Catalog BIM Models tool to catalog locations ; Archibus V.2023.01 extends the cataloging functionality to furniture and equipment assets.
For models that are stored in an Autodesk repository (Construction Cloud, BIM 360, Forge) and for which assets are assigned a level, you can now use the Catalog BIM Models command to register your Revit assets in Archibus. Cataloging assets requires that you have first cataloged the rooms housing these assets. The Catalog BIM Models command simplifies onboarding as you work directly from Web Central and do not need to access the Smart Client Extension for Revit.
The Catalog BIM Models task also includes the new Query Model command , which enables you to search the model by Revit properties. For example, in the below image, the user has first run the Query Model command to locate furniture items on Level 1 and then cataloged these items.
With the extended functionality of the Catalog BIM Models task, you can now completely onboard a Revit model -- its building, floors, rooms, and assets -- directly from Web Central. This greatly simplifies the onboarding process.

Details
Help Topic
View File
-
ab-bim-forge-onboarding.axvw
Navigator Path
-
Technologies / Innovative Solutions / Forge Integration / Catalog BIM Models
BIM Viewer: Explore the Space Inventory
Archibus V.2023.01 continues the expansion of BIM Viewer functionality by adding a new Rooms tab for working with the rooms of your Revit model.
In previous versions of the BIM Viewer, you could click on a room in the model and receive the Room Details form, listing vital facts about the room. With V.2023.01, you can now access extensive information about the rooms in your BIM model.
From the Rooms tab, enter a building in the filter and you can select a set of rooms from the room list and see their location on the floor. Click on a room in the model and you access the comprehensive Room Details form for viewing or changing the room's properties, including user-defined fields (the Configure Fields button). For example, the below image shows that the user has selected rooms 1001 and 1003 from the room list and the BIM Viewer has highlighted those rooms on the floor plan. The user then clicked on room 1003 to access its details.
In addition to locating specific rooms and accessing their details, you can highlight rooms in the model by Room Category, Room Type, Division, Department, and Hotelable status by using the Highlights menu.

Details
Help Topic:
View File
-
ab-bim-viewer.axvw
Navigator Paths
-
Maintenance / Corrective Maintenance (Archibus SaaS)
-
Assets / Assets / Asset Manager (Archibus SaaS)
-
Maintenance / Corrective Maintenance / Supervisor
-
Assets / Assets / Asset Manager
-
Assets / Enterprise Assets / Facility Asset Manager
BIM Viewer: Equipment System Highlights
Archibus V.2023.01 includes improvements to integrating space into your equipment system queries.
Highlight Rooms Served Command
When planning maintenance work on an equipment system, it is useful to know the rooms that an equipment system impacts. For example, if you need to take a system offline for maintenance, you will want to see which rooms in the building will be impacted.
To meet this need, the Trace menu now includes the Highlight Rooms Served command so that you can visually identify the rooms that an asset or its equipment system is serving. The relationship between the asset and the rooms is set by the existing Assets / Background Data / Define Space Served by Equipment task.

Apply the System Trace to a Selected Level
Once you trace an equipment system, you may wish the highlight to remain active if you load a specific level. An enhancement to V.2023.01 supports this need by retaining the trace highlight as you zoom into various levels in the BIM model. For example, suppose you run Trace Equipment System for the cooling unit CNDS-008 in building NB and the Trace command highlights in green two dependent pumps on Level 00 (Foundations Level). Next, you choose Level 00 from the Levels list; the model will zoom to Level 00 and will show only the two dependent pumps. The pumps retain their trace highlight color.

Details
Help Topics:
View File
-
ab-bim-viewer.axvw
Navigator Paths for the BIM Viewer
-
Maintenance / Corrective Maintenance (Archibus SaaS)
-
Assets / Assets / Asset Manager (Archibus SaaS)
-
Maintenance / Corrective Maintenance / Supervisor
-
Assets / Assets / Asset Manager
-
Assets / Enterprise Assets / Facility Asset Manager
BIM Viewer: Search for Assets by Revit Properties
Through the BIM Viewer's filter, you can search a model for assets, rooms, and assets with active work. However, you might encounter situations in which you need to search for assets by their Revit properties, such as their Revit level, category, family, or type. For example, you might wish to find all mechanical equipment that has 220 volts. Searching for by Revit property is particularly useful when you want to find any element in the model, even if the item is not cataloged.
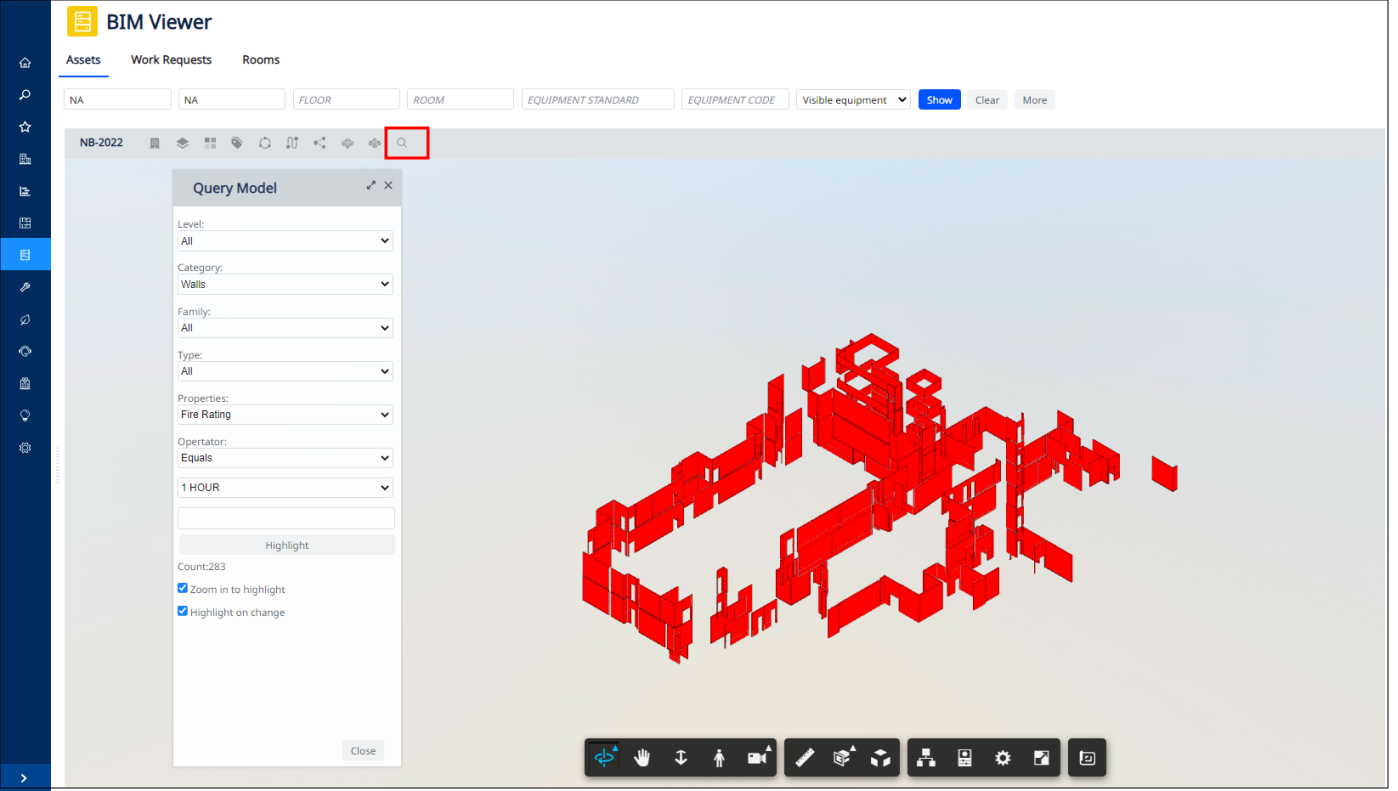
To enable you to search by Revit property, V. 2023.01 adds the Query Model feature to the BIM Viewer. From the Viewer's toolbar, select the Query Model command and complete the resulting Query Model form with the desired Revit properties.
The Query Model command is also available from the Catalog BIM Models task , and is handy for locating items that you might need to catalog.
Details
Help Topic:
View File
-
ab-bim-viewer.axvw
Navigator Paths
-
Maintenance / Corrective Maintenance (Archibus SaaS)
-
Assets / Assets / Asset Manager (Archibus SaaS)
-
Maintenance / Corrective Maintenance / Supervisor
-
Assets / Assets / Asset Manager
-
Assets / Enterprise Assets / Facility Asset Manager
BIM Viewer: Examine Revit Sheets and Views
As part of your Revit modeling procedures, your site might develop 2D sheets for 3D models. In Revit, you can create a sheet view--composed of project view, schedule, and title block sections--for each individual page of a construction document set. You can then place multiple drawings or schedules on each sheet view. In Revit, you can print sheets or publish them for electronic sharing and review.
If your Revit models have associated sheets, you can now view the model's sheets in the BIM Viewer. You will find it handy to access the 2D sheets in the BIM Viewer without having to move to the Autodesk BIM 360 website in order to see them.
With the 3D model and a 2D sheet displayed side by side in the BIM Viewer, you can interact between the two. Select an element in the 2D sheet and the 3D model highlights the same element; likewise, selecting an item in the model highlights it in the sheet (if it exists in the sheet). For example, the below image shows loading the First Floor Reflected Ceiling Plan sheet, selecting the ceiling in the sheet, and the BIM Viewer highlighting the corresponding item in the 3D model.
Use the ribbon's Sheets & Views command to access the Sheets & Views form, from which you can load sheets associated with the model. In the sample HQ project, the model for building MC10 has associated sheets.

Details
Help Topic:
View File
-
ab-bim-viewer.axvw
Navigator Paths
-
Maintenance / Corrective Maintenance (Archibus SaaS)
-
Assets / Assets / Asset Manager (Archibus SaaS)
-
Maintenance / Corrective Maintenance / Supervisor
-
Assets / Assets / Asset Manager
-
Assets / Enterprise Assets / Facility Asset Manager
BIM Viewer: Other Improvements
The BIM Viewer also includes these additional enhancements:
-
View models from the European Autodesk Construction Cloud/ BIM 360 data center.
-
Room labels now hide empty values.
-
Equipment Profile shows diagnostic history older than 30 days.
-
Faster rendering of models.
-
Upgrade to Autodesk Platform Services Viewer v7.81.0.

Web Central
Improvements to Archibus Asset Data Model
For V.2023.01, we have made additions to the Archibus schema to better support integration with Revit. For this release, these changes are available only in the schema and have not been exposed in the user interface .
The V.2023.01 schema:
-
adds flexible, custom attributes for Equipment Standards, without having to add new fields to the Equipment Standards table
-
introduces the concept of Archibus Asset Families as parents to Equipment Standards. This enables support of a multi-level asset hierarchy.
-
links the BIM Categories table to the BIM Families table, through the Archibus Asset Families table.
-
introduces the concept of Archibus Asset Classes, a super-category to Asset/BIM Categories. For example, Archibus Asset Classes will enable you to categorize equipment into Mechanical Equipment, Plumbing Equipment and Electrical Equipment. Asset Classes will be used for out-of-the-box reporting, workflows, and in synchronizing asset logic with other Eptura applications. The data in this table will ship with Archibus and customers will not modify it because it will be used in application logic.

Integration with Vergesense Occupancy Sensors (Proof of Concept) (UserVoice Idea)
We have continued our work on sensor integration by working with occupancy sensors from Vergesense. This integration enables you to analyze the utilization of a floor based on data that the Vergsense sensors record, providing insight into how rooms are utilized for a date and time range.
With integrated sensor data, the IoT Utilization Report enables you to:
-
report on the actual, physical utilization of space
-
view a “heat map” of rooms by their average utilization percentage, for a date and time range
-
track room-by-room average and peak utilization metrics
For V.2023.01, the integration is for demonstration purposes only. We have developed a scheduled workflow rule that can run at a specified time and import demonstration utilization data from Vergesense using the Vergesense API. The data is mapped to rooms on floor NC05-01.
The sample Vergesense data has already been added to the iot_space_util table in the sample HQ database, and can be viewed with the Technologies / Innovative Solutions/ Integrations - IoT/ IoT Space Utilization task.

Details
ViewFile
-
ab-iot-sp-analysis.axvw
Navigator Path
-
Technologies / Innovative Solutions/ Integrations - IoT/ IoT Space Utilization
Vergesense
Workplace
Workplace: Support for Service Request Questions (UserVoice Idea)
Archibus V.2023.01 upgrades Workplace to include some of the same functionality that is available when you access service requests in Web Central using the Service Desk / Client / Create Service Request task. These improvements include supporting an expanded set of supported documents , and the ability to access and respond to service request questions from Workplace.
From all forms of Workplace -- Desktop, mobile browser, and the Workplace mobile app -- you can now access and respond to questions that are defined for the service request type.
For example, setting up these questions for the COPY SERVICE request type:
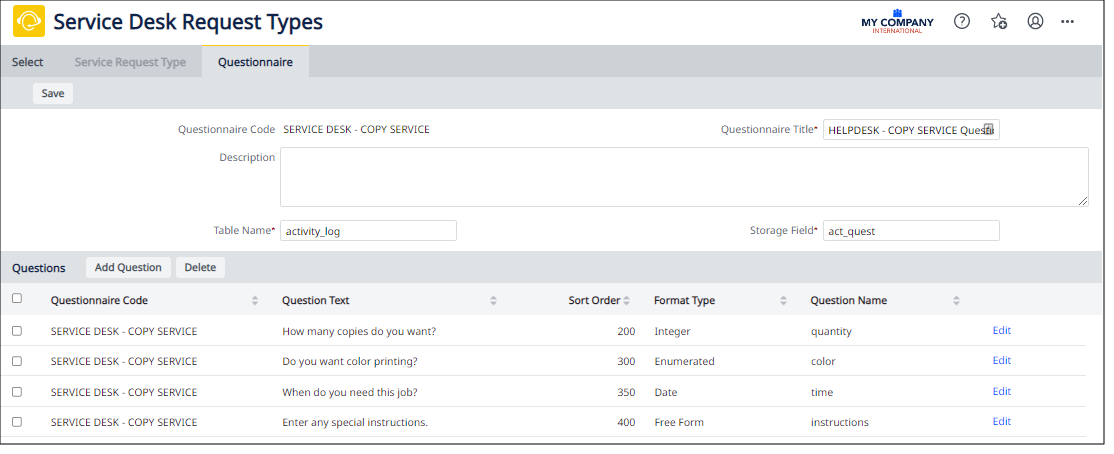
results in Workplace displaying these questions when you choose COPY from the Workplace Service Catalog.

Workplace supports the same question types as Web Central's Service Desk / Client / Create Service Request task: Date, Enumerated, Freeform, Integer, Look Up, and Number. It also supports optional and required questions.
The user's responses are stored as XML in the Questionnaire Results field of the Action Items table (the activity_log.act_quest field) and can be viewed in the Description field of the Service Desk / Client / View Service Requests task.
Limitations
-
Only questions configured in Web Central using the Service Desk / Service Desk Manager/ Manage Request Types task appear in Workplace.
-
If you are defining a new request type to display in Workplace, first define it with the Service Desk,/ Service Desk Manager / Create Service Catalog task; then use Service Desk / Service Desk Manager/ Manage Request Types task to add the questions.
-
This feature applies only to Request Types that use the standard service request process; they do not apply to Move Requests.
-
Once you enter your responses, you cannot see them on subsequent Workplace screens.
Details
. Help Topics
Navigator Tasks
-
Workplace Services / Service Desk / Client / Workplace
-
Workplace Services / Service Desk / Service Desk Manager / Manage Request Type
-
Service Desk / Client / View Service Requests
View Files
-
ab-products/essential/workplace
-
ab-create-activitytype-tabs.axvw
-
ab-helpdesk-request-view-tabs.axvw
Workplace: Review and Upload Additional Document Types (UserVoice Idea)
As part of our efforts to extend Workplace functionality to match the service request functionality in Web Central, we have improved Workplace so that you can now upload additional document types to your service requests. Previously, you could upload only photos; with V.2023.01, you can upload any type of document that your site has configured in the Archibus configuration file (the afm-config.xml file). You can also download documents attached to a service request.
When performing such tasks as reporting maintenance issues, requesting copy services, and requesting furniture, you will encounter the below screen for uploading files.

When you review a request from the My Requests form, you can download any attached documents, including those documents attached by others. This is particularly handy when you are checking on a reported maintenance problem; you can access documents that the technician might have added to the request while addressing the problem.

The properties of the underlying Request Type determine the number of documents you can attach to a request.
Limitations
-
Maximum file size of 2 MB per attachment
-
Downloading is not available on the Workplace mobile app.
Details
. Help Topics
Navigator Task
-
Workplace Services / Service Desk / Client / Workplace
-
Workplace Services / Service Desk / Service Desk Manager / Create Service Catalog
View Files
-
ab-products/essential/workplace
-
ab-ess-manage-activitytype.axvw
Workplace: See Meeting Attendees
When checking the details of a meeting in Workplace, you can now see a list of other staff and guests who were invited to the meeting. Workplace displays all parties who were invited; it does not report on their acceptance status.
With this change, Workplace better corresponds with the features of Web Central's Reservations Calendar Console, from which you can select a reservation and access the Details command to see a list of meeting attendees and their acceptance status.

Limitations
-
The response status is not displayed, as it is with the Reservations Calendar Console
-
In order to appear in the list, each employee and guest must have a unique email address configured.
Details
. Help Topic
Navigator Task
-
Workplace Services / Service Desk / Client / Workplace
View File
-
ab-products/essential/workplace
Workplace: Search for Meeting Spaces by Room Type (UserVoice Idea)
Workplace's Meeting Space Booking page now includes a Room Type filter. If your site has defined various types of meeting rooms -- such as conference rooms, classrooms, and auditoriums -- you can now search for these specific types of meeting rooms.

Workplace: Wayfinding (Proof of Concept) (UserVoice Idea)
Wayfinding -- guiding people through your space with turn-by-turn navigation -- can help to welcome guests to your buildings and enable employees to find unfamiliar locations.
Integrating wayfinding into your Archibus deployment can have several uses. For example:
-
For booked working spaces, employees want directions that guide them to the workspace so that they can easily find the booked room.
-
For meetings, employees want directions that guide them to the meeting room so that they can find it and arrive on time.
-
For planning purposes, employees want to see the fastest path to a working space that they booked or a meeting that they must attend.
-
When Workplace is deployed on a lobby kiosk, building visitors can access routes to locations in an unfamiliar building.
To support these types of scenarios, V.2023.01 integrates Mapsted into Workplace as a proof of concept. On the People & Places page and on the Meeting Space Booking Detail pages for the SRL building, you can use the wayfinding icons to receive point-to-point and step-by-step navigation.

Limitations
-
In V.2023.01, the wayfinding features are for demonstration purposes only; wayfinding cannot be used in a customer environment.
-
The integration with Mapsted is limited to building Singularity Research Lab in the sample HQ project.
-
You must manually install the required files that demonstrate this proof-of-concept. The files are available on Allbound on the Dashboard › Training & Pre-Sales › Archibus | V.2023.01 Download Links page.
OnSite V5
OnSite V5: Compatibility for Non-SaaS Deployment
OnSite V5 is fully compatible with Archibus V. 2023.01.
UX features, such as the footer redesign and Eptura rebranding, work with earlier releases.
Archibus non-SaaS customers need to upgrade their Apollo server to V5 in order to use OnSite V5.

OnSite: UX Improvements
Eptura Rebranding
OnSite V5 reflects the new Eptura-endorsed branding found throughout the Archibus V.2023.01 products.
Footer
For OnSite V5, we have enhanced the user experience by adding a footer with buttons that perform common actions.
To improve navigation, we have included a Home button on the footer so that technicians can return to the home hub easily by directly moving to the top-level Work Queue page. With this change, technicians can easily access the page that lists all their tasks without multiple screen selections and scrolling.
The footer also contains buttons for frequent actions: accessing the camera and sending messages. These buttons save you time navigating between screens and scrolling.
The footer appears on the following screens:
-
Work Request Details
-
Asset Info
-
Work Logs
-
Checklists
-
Assignments
-
References
-
Linked Requests

OnSite Offline Support: Overview
OnSite V5 provides offline support so that technicians can work in remote locations without an Internet connection. Offline support might be necessary when technicians service equipment in basements of older buildings where Internet connection is unreliable or unavailable.
OnSite V5 offline support is built on a behind-the-scene automated process that minimizes disruption to the technician’s work. The solution enables technicians to access their work queue offline with minimal effort and complete their work the in same way as they do as when online.
When the local data has not been refreshed within a specified time, OnSite clearly alerts the technician that they need to refresh to obtain the latest data. In situations when sync errors arise, OnSite's error prompts and error logging features enable the technician to easily understand the conflict and recover from unexpected situations.
OnSite Offline Support: Automatic Data Download
With offline support active for their site, technicians download background data upon opening OnSite for the first time. This way, they have the background data available if they later encounter a situation in which they will not have Internet access. Once the background data downloads, the technician's assigned work requests download. The footer apprises technicians of the download status. As the data downloads in the background, they can browse their work queue and plan their day.
In addition to the background data download at startup, technicians can manually download the background data at any time by invoking the “Prepare Offline Data” action, available from the More (three vertical dots) menu on the Work Request List screen.

OnSite Offline Support: Automatic Data Refresh
Once data is initially downloaded, OnSite keeps the data current by detecting changed data on the server and automatically downloading updates to the technician’s local data.
Refreshing the downloaded data happens in the background and the OnSite footer conveys the refresh status. Technicians can continue using the app to browse their work queue and update requests.
Administrators control the frequency at which changed background data and work request data is refreshed using the System / Mobile Apps Manager / Manage Configurations for OnSite task. Since work request data changes more frequently than background data, managers can set different intervals for each.
In addition to the automatic refresh, technicians can manually pull-to-refresh data at any time.

Details
Navigator
-
System / Mobile Apps Manager / Manage Configurations for OnSite
View File
-
ab-onsite-mng-params.axvw
Help Topics
OnSite Offline Support: UX and Refresh Alerts
When technicians are working offline, they will find that OnSite displays the same pages and work request information as they encounter when working online. While offline, technicians can search and sort the offline data, access their work requests, access checklists, and so on. They can update work requests and the data will be stored locally on their devices.
Offline Use Differences
There are a few differences between online and offline use. When offline:
-
All checklist questions are loaded at once; the questions are not downloaded sequentially as the technician completes each one.
-
If the technician creates a new work request for work that they notice while on the job, the new request will be in read-only mode until the sync. If they assign it to themselves, it will be editable while offline.
-
The following work request details do not show when operating offline:
-
floor plans
-
photos display as thumbnails only, and you cannot zoom them.
-
reference docs
-

Data Refresh Alerts
To avoid offline OnSite technicians working with out-of-date data, OnSite can alert technicians that they should refresh. If data has not been refreshed within the specified time frame, OnSite displays clear and noticeable messages reminding the technician of the need to refresh. For example, if the manager configures that data must be refreshed every hour, OnSite displays the below alerts as soon as one hour since the last refresh passes. With these reminders, the technician can go to an area where they can access the Internet to refresh the data. The technician can then see data changes that were made by others while the technician was offline.

Details
Navigator
-
System / Mobile Apps Manager / Manage Configurations for OnSite
View File
-
ab-onsite-mng-params.axvw
Help Topics
OnSite Offline Support: Syncing and Conflict Resolution
While offline, technicians can edit their work requests with details about the job; the data is saved locally on their device. Once the technician enters an area where they can access the Internet, OnSite detects the changes and automatically syncs behind the scene. While syncing is in process, technicians can continue browsing and editing work requests, except the request that is currently syncing.
Data Conflicts
With other online users able to update data while a technician is offline, there is potential for data conflicts. For example, suppose a maintenance manager receives a call about a request and uses Web Central's Maintenance Console to change the work request status from "Issued and In Process" to "On Hold" during the time that the technician is entering updates on this request while offline. When the technician goes to a location with Internet access, the data syncs and the technician sees the On Hold status for this request. The technician can then check OnSite's Activity screen and review the maintenance manager's notes explaining the status change.
In this case, the maintenance manager's change to On Hold status took priority over the technician's locally-stored status (Issued and In Process) based on per-site settings made with the System / Mobile Apps Manager / Manage Configurations for OnSite task. With this task, an administrator can control whether Web or OnSite data is source of truth. When conflicts happen, OnSite automatically syncs or discards mobile data based on these preferences. See OnSite Configuration.
Thus, technicians do not need to make choices on data conflicts, unless there is a sync error, as described below.

Logging
All server errors are logged, including sync errors. Errors are logged to the mobile_logs table on the server and managers can review the errors in Web Central using the System / Mobile Apps Manager / View Mobile Log task.
Error Handling During Sync
Due to an Internet connection error, power outage, or unavailable server, the syncing process might be interrupted.
The OnSite user receives notification and can opt to abandon their changes or try again. Additionally, the sync error is logged to the mobile_logs table.

Details
Navigator
-
System / Mobile Apps Manager / Manage Configurations for OnSite
-
System / Mobile Apps Manager / View Mobile Log
View Files
-
ab-onsite-mng-params.axvw
-
ab-mobile-log.axvw
Help Topics
OnSite Offline Support: Configuration
As with other aspects of OnSite deployment, the administrator can control how offline support works across the organization for all technicians. Additionally, individual technicians can control some aspects of operation from their device.
Per-Site Configuration
Since each company has different offline needs, administrators can configure OnSite downloading and syncing to meet the particular operating practices at their site. Administrators use the options on the Offline Support tab of the System / Mobile Apps Manager / Manage Configurations for OnSite task to set behavior that applies to the devices of all technicians in the organization.
First, specify that you do indeed want your site to take advantage of offline support by setting the Offline Support option.
You can also set the time frames for refreshing both background data and work request data.
Use the "source of truth" options to define how conflicts are resolved by specifying if Web Central data or OnSite data takes priority for various situations:
-
Active work requests no longer in the technician's queue
-
Active work requests in the technician's queue
-
Inactive work requests (those that are Completed, Closed, or Canceled)

Per-User Configuration
Even if an administrator sets up offline support for the site, individual technicians can turn off the offline support feature from their devices. For example, if a technician always works in a location with a connection, they can choose to opt out of offline support by turning off the option from their device.

Details
Navigator
-
System / Mobile Apps Manager / Manage Configurations for OnSite
View File
-
ab-onsite-mng-params.axvw
Help Topics
Other Changes
V2023.01 also includes the following changes.
Healthcare is Now Part of the Standard Deployment (UserVoice Idea)
When it was first released in Archibus V.26.2, Healthcare was not part of the standard deployment and required that you run scripts to update the sample data, schema, and home pages with its features.
For V.2023.01, we have integrated the Healthcare application into the standard deployment and it is no longer necessary to run scripts to update the database. The Healthcare application appears on Navigator and receives the benefits of quarterly updates.
Several Archibus applications include healthcare-related fields; these fields are hidden for non-healthcare customers. Administrators can promote or hide healthcare-related fields using the System / Archibus Administrator - Application Configuration / Configure Healthcare Application task.

Details
Navigator Path
-
Healthcare (at root level of Navigator)
-
System / Archibus Administrator - Application Configuration / Configure Healthcare Application
View File
-
ab-hc-configure-healthcare.axvw
Help Topics
Out-of-the-box Support for Japanese
For V.2023.01, we have added Japanese to the set of languages that Archibus supports without customization. Simply set your mobile device and Web Central and Smart Client locales to Japanese, and the Archibus user interface will appear in Japanese.
Japanese is supported for Web Central, Smart Client, OnSite, and the Archibus mobile apps; Japanese is not yet available for the Smart Client Extensions for AutoCAD and Revit.
Eptura Rebranding
In October 2022, Condeco and iOffice + SpaceIQ merged to create a new company: Eptura™.
The new brand, Eptura™, represents "the epicenter of the future at work." This brand underscores the company’s ability to accelerate the development of new worktech solutions and enhance the user experience.
Throughout the Archibus V.2023.01 user interface, you will see that the legacy "Archibus" logo has been replaced with "Archibus by Eptura." For example, the Navigator, the sign-in page, online help, and Workplace all use the new logo.
Adobe LiveCycle
Adobe has changed their data integration PDF generation tool from Adobe LiveCycle to Adobe Experience Manager. Existing Archibus views that use the LiveCycle functionality, such as Sustainability & Risk / Health & Safety / Management Reports / Incidents Log , still work. We have not changed these views and their documentation. We will assess integration with Adobe Experience Manager based on customer feedback in our UserVoice forum.
Since Adobe LiveCycle has been replaced by Adobe Experience Manager Forms, we have removed the Technologies / User Interface Add-Ins / LiveCycle Pdfs process and its tasks from the Navigator. We have also removed references to this integration feature from the System Management Help. If you require the LiveCycle integration topics, you can access them in Archibus V2022.03 online help at https://help.archibus.com/system_v2022.03/sysman.htm#wc_views/Adv_Views_Techniques/pdf_forms/PDF_forms_introduction.htm .
Other Release Documentation
You will also want to consult this release documentation:
| Help Topic | Description |
|---|---|
| A listing of V.2023.01 fixes, changes, and outstanding issues. | |
| Database Schema Revision History | A list of changes to the database schema for each release. This topic is useful for users who upgrade the database. |