Publish 3D
Archibus Smart Client Extension for Revit
Publish 3D
This command has two functions, depending on how it is configured.
| Behavior | Output | Configuration |
|---|---|---|
|
Publish a Revit model to Forge for use with the BIM Viewer . This is required if your site does not have an Autodesk Construction Cloud or Autodesk BIM 360 account. |
SVF2 format |
Default behavior.
In the
|
| Publish a Revit model for use with the Web Central 3D Navigator | enterprise graphics |
In the
smartclient.common.dll.config
file, you must set
<Forge Enabled="false"/>
|

Note: The 3D Publish features are licensed separately from the Extension for Revit.
Publish to a Revit Model to Forge
Out-of-the box, the Publish 3D command publishes your Revit model to Forge (also known as APS or Autodesk Platform Services) for use with the Forge Viewer and BIM Viewer. The output is in SVF2 format.
This step is required if your site does not have an Autodesk Construction Cloud or Autodesk BIM 360 account. For information, see Forge Viewer: Onboarding (System Management Help) .
The Publish to 3D command immediately publishes the Revit model and uploads it to the Forge repository; there are no user interface options. When the process is complete, you will see the following:

The command's actual translation phase is purely an Autodesk APS (Forge) process that occurs in the Cloud. The publishing process is not controlled by Archibus.
The smallest Revit models will take a few minutes to process. We have seen larger models take 30 to 60 minutes to process. Since the publishing process occurs in the cloud, it does not tie up your experience in Revit.
Generate 3D Enterprise Graphics for Use with the 3D Navigator
The command can also generate enterprise graphics for use with the Web Central 3D Navigator .
If you wish to publish 3D enterprise graphics for use with the 3D Navigator. you must make the following change to the
smartclient.common.dll.config
file:
<EnterpriseGraphics>
<!-- Existing node -->
<Forge Enabled="false"/>
With this setting, the Publish 3D command generates these outputs:
| File | Description |
|---|---|
| bin | A customized binary format that contains only geometry |
| .bin.json | All other contents which includes materials, objects, and user data |
The command uses this naming convention for each of the target files:
| Target | Description |
|---|---|
| Per-floor targets | DB-DWGNAME.bin and DB-DWGNAME.bin.json |
| Per-discipline targets | DB-BuildingId-Discipline.bin and DB-BuildingId-Discipline.bin.json |
where:
- DB-DWGNAME is the value of the 'dwgname' as used in the database that corresponds to the floor being published.
- DB-BuildingId is the Building Id value for the current model.
- Discipline corresponds to the Super Category.
Command Operation
When choosing which objects to publish and what color to publish the objects with, the command obeys the visibility graphics setting of the view.
The command publishes drawings and all associated BIM Parameter data to files in \Archibus\projects\projectName\enterprise-graphics . If you wish to publish only the parameter data and publish it to a database for convenient review, use the Publish Parameters command.
Procedure
- Load the model you want to publish.
-
Click on the Publish 3D button from the Archibus ribbon.
- The command publishes the files to \Archibus\projects\projectName\enterprise-graphics
Note on model versions :Before running the Publish 3D command, be sure that the model is saved in the Revit version from which you are running this command. For example if a model was created with Revit 2019, and you load it using Revit 2022, before running the Publish 3D command you need to save the model on your machine (which will save it under Revit 2022), close the model, and reopen it. You can now run the Publish 3D command to publish the model for use with the BIM Viewer.
Setting advanced options
Before publishing, you may wish to set advanced options. After step 2, above, click the Advanced button on the Publish 3D form.
-
The Advanced button presents a form similar to the following. The items on the left, super-categories, organize the categories in the view.

-
Choose the super-categories to publish by selecting their check boxes. You can use the All, None, "+" and "-" buttons, located above the super-categories list, to set the check boxes.
-
If you want to edit the properties of a super-category, select it and choose the Edit button. The command presents the following form:
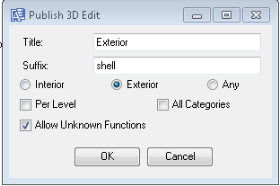
- Suffix: A suffix that will be appended to the file name for this output. Note: Suffix typically corresponds to the Super Category it is associated with.
- Int/Ext: Specifies if the contents of this output will be Interior, Exterior, or Any
- Per Level: Indicates whether or not this configuration will generate a separate output for each level, or one output for all levels in the current 3D View.
- All Categories: Publish all categories in the specified 3D View. In the default implementation, this output configuration is not supported.
- Press OK to return to the Publish 3D Advanced form.
- You may want to fine tune the list of categories in a super-category. You can both add and remove categories from a super-category.
- Select a super-category. In the Categories to Publish pane, the form shows all categories in this super-category. You can remove categories from the super-category by unselecting categories that you do not wish to publish.
-
You can also add categories to the super-category. Choose the right arrow at the bottom of the form to expand the form to show the Categories in View panel, which lists all the categories in the view. (The above image shows the expanded form with the Categories in View list.)
- The Categories in View list may differ from the defined Categories to Publish list, which is a default set of typical categories that you may want to publish.
- To set additional categories to publish, drag and drop categories from the Categories in View panel to the Categories to Publish list.
-
On the Advanced form, you can also set these options:
-
View to Publish From: The system completes this with the option that you selected in Step 2 in the first procedure. If you now decide that you want to work with another view, you can select it here and then use the form to set its options.
- Wall functions: Specify which Wall Functions will be included in the output. (If a non-Wall Category is selected, then the list will be "Functions: Interior or Exterior.")
- Rooms/Spaces: If you want to publish the Rooms and Spaces, check these options. For technical reasons, rooms and spaces are not automatically included in the Categories to Publish list, so you must explicitly choose them using these options.
-
-
From the Advanced form, you can choose Options, which presents the following form.

You should not change the options in the Content and Output sections of the form. They are available for diagnostic purposes only, and serve no purpose for generating normal and usable 3D output. In particular, if you change the output from Binary, the generated 3D files will not be of use to the 3D Viewer.
You can change these options:- Color
- Opacity
- Height
Click OK when you are finished with the Publish 3D Options form. You will return to the Publish 3D Advanced form.
- To save any of the setting you have made so that they are available the next time that you use the command, choose Save on the Publish 3D Advanced form.
- When you are through setting options, click OK on the Publish 3D Advanced form. You will return to the Publish 3D form (as shown in Step 2 in the first procedure). Click on the Publish button to publish the view with the settings you have made.