Highlight Rooms in your Floor Plan by One Property
Archibus SaaS / Space / Space Manager / Space Console
Space / Space Inventory / Space Manager / Space Console (non-transactional)
Space / Occupancy / Manager / Space Console (non-transactional)
Highlight Rooms in your Floor Plan by One Property
It is often useful to see rooms in a floor plan highlighted by various properties, such as department assignment, vacancy status, or room type. Visually seeing a room on the floor plan, its access to other features of the floor, its adjacent rooms, and so forth, can help you make better decisions about how you use your rooms. The following image shows a room plan highlighted by room category. The legend lets you know the category that each color represents.

The Space Console offers two types of highlights:
- a solid-fill highlight fills in each room with the color associated with the room's value for the property by which you are highlighting
- a border highlight outlines the border of the room with the color associated with the room's value for the property by which you are highlighting
Although both solid fill and border highlights are available, when highlighting by one property it is recommended that you use the solid fill highlight. Use the border highlight when you want to highlight by two properties; that is, highlight by solid fill and then highlight by border highlight to show a second property.
Use the following buttons to access the highlight and legend features.
![]()
Note : In addition to the following Space Console procedures for highlighting floor plans, occasional users might want to highlight floor plans using a simpler view with fewer options. These users can run the View and Print Floor Plan task.
Note : If you have made a restriction with Advanced Search, the highlights apply only to the rooms meeting the restriction. See the example in the Advanced Search topic .
Defining the Highlight Colors
In order to highlight floor plans by a property, you must associate highlight colors with each department, division, room standard, room type, and room category. Other highlights, such as occupancy or status, use default highlight colors.
With these highlight colors defined, the highlight command can consult the table to see the color by which it should highlight the room.
For example, edit the Divisions table to assign green to the Executive division by completing the Highlight Pattern - Acad field. Then, when you highlight by division, Archibus can check the rooms' division and consult the Divisions table to see the color to highlight each room. For information, see Background Data and Defining Highlight Patterns .
Show the Legend for the Highlight Color
To determine the value that each color represents, you must display the legend, using the Legend button. Click the Legend button, and the system displays a legend listing each value and its associated color. You can move this legend to anywhere on the screen, as shown in the above image.
Additionally, for properties that are listed in the Space Console's tabs, you can make this property the active tab in the left panel. For example, you can show the Room Categories tab when the drawing is highlighted by Room Category. You can consult the tab to see the values that the highlight colors represent, as well as see information such as room count or total area for each category.
Procedure to Highlight by One Property and Include a Legend
- Load the Space Console and set a filter as desired.
- Click the selection boxes for the drawings you wish to load.
-
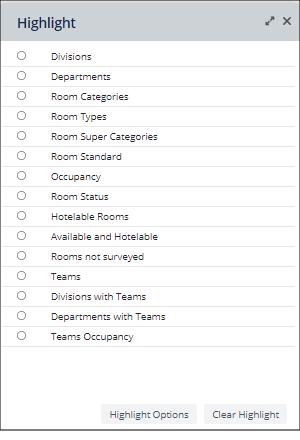
Set the property for which you want to highlight by selecting the Highlight option in the floor plan ribbon and choosing an option from the list.

- On the floor plans, the system solid-fills rooms according to the colors associated with the values of this property. Areas without colors do not have a value for this property.
- Show the legend by selecting the legend button from the ribbon. Place the legend at your desired position on the screen.
Note : The Highlight Options button at the bottom of the form accesses fields that you created with the View Configuration feature .
Next Steps
- You may want to highlight the drawing by an additional property, such as showing department assignments and vacancy status on one query. For information, see Highlight a Rooms in your Floor Plan by Two Properties.
- You may want to provide labels for each room. See Label the Rooms on the Floor Plan.
- For examples of typical one-highlight queries, see Review Rooms on a Floor Plan by Division or Department and Review Rooms on a Floor Plan by Use.
- You may want to export the highlighted floor plan and legend to Word or PDF so that you can share it with others. See Export Floor Plans to Word or PDF and Export and Print Floor Plans
- You may want to highlight by just one value of a property (such as a highlight by a particular division). See Highlight Rooms by Selecting Records in the Grid .
- You may want to apply the same highlight to another floor plan. If you load
-
When users select a new floor, it will check to see if the specified restriction has any matches on the floor, then update the status accordingly:
-
If no match, the status bar will hide
-
if there is a match, the status bar will show and the “[number] selected” label will be updated accordingly. The matched rows will be highlighted.
