Output Views to Word (Paginated Reports)
Archibus Smart Client
Archibus Web Central
Some Web views and all Smart Client grid views include the ability to generate the view as a report that is output to a Word DOCX file.
Paginated reports include headers, footers, page numbers, multi-level parent report bands , multiple data report bands , memos, and logos. You also create your own paginated reports using Web Central's System / Add-In Manager / Run View Definition Wizard
You can use paginated reports to:
- Present information offline, such as when sharing information with those that do not have access to Archibus Smart Client or Web Central, or when performing reviews of equipment in the field.
- Generate complete listings of your data that meet a certain restriction.
- Archive information for a specific time period that serves as an easily-accessed reference of that data.
- Edit your data in Excel or Word before presenting it.
- Generate reports that include both text and drawings. Drawings can include
- highlighted drawings that use a restriction to show one value highlighted (such as a drawing showing rooms assigned to a particular department)
- thematically highlighted drawings that show many values color-coded to distinguish them (such as Rooms by Room Standard).
The following shows a paginated report in Microsoft Word that was generated from the Space / Space Inventory /Space Manager /Remaining Area view. This report includes two parent data bands that organize the data by building and by floor, and a child data band that shows the remaining area data.

Controlling Report Appearance
You are able to change the appearance of the report by changing the paper, table, or paragraph styles in Word. You can also save your own style sheets and apply them in one step to the generated report. Your System Integrator can change the default style sheet for the report by replacing the default style sheet.
When working with paginated reports, be advised that when reports contain many columns or long column titles (such as in German, Dutch or some Latin languages), you may need to adjust the paper size or remove unnecessary columns in order for the text to fit properly. Other solutions are to reduce the font size after downloading the report or editing the column titles to use shorter words or abbreviations.
Generating Reports
You can generate reports in the following ways:
- From Web Central Views that can be output to Word include a DOCX or Paginated Report button. Once you load the view, click the DOCX or Paginated Report button to generate the report.

- From Smart Client . Open any grid view and run the Report command from the View group on the Ribbon toolbar.
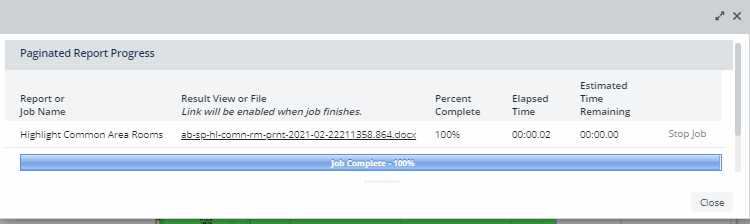
These actions open a view that enables you to preview the status of the report generation and to view partial results. Viewing partial results enables you to ensure that the report is generating correctly. When the report generation is completed, you are able to click a link to load the report.
Paginated reports are in Word 2007 DOCX format, and can be viewed using Open Office or Word. There is a free viewer for those who do not have Word, and a free plug-in for those who are not running Word 2007.
Note: If you wish to view your report in Apache Open Office, be aware that you might encounter a few minor formatting issues: Open Office might omit the logo image and might use different border lines and line spacing than does Microsoft Word.
Previewing Report Generation and Accessing the Results
Paginated reports are a batch job for which you are able to view the progress of the job as it generates. For example, you can view the percentage of the job that has completed, and the estimated time remaining to complete the job.
The batch job gives access to previews of partial results if the report is very long. As each section of the report is completed, the report job adds the link for the partial result file to the list of files that the job has available. You can click the link to see the partial results. When all sections are completed, the report assembles all of the results into one file, and makes this file available in the Results section.
You can stop a job from the preview screen at any time until the job completes. See Stopping Jobs.
By default, you must click the link (the report title in the Result View or File section) to load the report. For smaller reports, such as a print out of a single work request or invoice, your System Integrator can change this so that the report automatically loads in a new browser tab when generation is complete.
Viewing a Single Job
You can view the progress of the report generation for a single report from the Paginated Report View that is shown while the report generates. When you click the Paginated Report or DOC button, this action initiates the report generation, and provides information as the report is generated and a link to the finished report.
Viewing All Jobs
You can view the progress for all your jobs from the My Long Running Jobs screen accessed by clicking the My Jobs button from the Web Central main toolbar. These jobs can include reports and other actions that run as batch processes. You do not generate the reports from this view.
The first part of the screen lists the jobs, with the most recent jobs listed at the top. Information on completed jobs remains on the server for the duration of your user session.

Viewing Restrictions Used to Generate a Report
Many views include the ability to restrict data so that you can target the specific data you want to work with. To aid your data analysis, some paginated reports generated from a restricted view include a panel at the top of the report that provides details for the restriction used. This feature is not included in a view by default, but can be added. See Display Restrictions in Paginated Reports (System Management Help) .
The restriction is printed as a formatted table placed at the top of the reports, as shown below:

Report Location
For Web Central. you should create a folder for paginated reports called "pagereports" anywhere in the schema subfolder. Archibus searches for the AXVW file first in the application subfolder, and then in the rest of the schema subfolders. The "pagereports" subfolder ensures that Archibus loads the report as a paginated report.
For example, to load a report from the browser address bar, you must include the reports subfolder. A sample address would be:
http://localhost:8080/archibus/pagereports/ab-rm-by-fl-and-dp.axvw
About Report Deletion from the Server
Files, such as paginated reports, data transfer files, and data transfer log files (Comparison reports) remain on the server until they are deleted by the
PerUserFileExpirations
application parameter edited via the System / Business Process Owner / Edit Application Parameters view. The application parameter is
AbSystemAdministration>perUserFileExpirations
.
By default, files are deleted every 6 hours. Files are available in later Web Central sessions only if Web Central is not running on a clustered environment.
Note : If you generate the same report on the same day, the previous report is overwritten.
Saving Reports
If you want to archive a report or to work further with it, save the report to your local workstation. When you click the link to open the report, you are given the option to save the report. You can also save a report by right-clicking the report's link in the Result View or File section, and select Save Target As to save the file to your local workstation.