View and Print Floor Plan
Archibus SaaS / Foundations / Space /
Space / Space Inventory / Department Manager
Archibus SaaS / Space / Space Manager
View and Print Floor Plan
While the Space Console is a powerful tool that can manage both space and occupancy, non-facilities management staff -- such as an office administrator needing to print a floor plan -- might desire a simpler and more streamlined tool. The View and Print Floor Plan view is a simplified version of the Space Console and is handy for occasional Archibus users who need to search for floor plans, view and highlight them, and then print their highlighted floor plans.
As with the Space Console, the View and Print Floor Plan view can highlight floor plans to show hotelable rooms, department and division assignment, room type and standard, and so on. You can access a legend of the highlight colors and options for controlling the layers and labels that the floor plan displays.
This topic has the following sections:

Load a Floor Plan
The first step in using the view is to load a floor plan. If you know the floor plan that you desire, you can select it from the list of floor plans in your project.
-
Load the View and Print Floor Plan view.
-
The view displays a list of buildings that house floors for which floor plans exist in the project.
-
The floor list and feature (described below) present only floors that have published floor plans .
-
For example, building HQ has 23 floors defined in the Floors table; however, many of these floors do not have published floor plans. When you expand building HQ or enter building HQ in the search box, the list displays only the eight floors for which floor plans exist.
-
-
Expand the list of buildings to see the list of floors for which floor plans exist in the project.
-
Click on a floor; it loads in the floor plan panel on the right.

Use the Menu to Control the Floor Plan
The left side of the floor plan pane offers a menu with commands for working with the floor plan to zoom, pan, set label size, and so on. See Work with the Floor Plan .
Search for Floor Plans
Sometimes you do not know the floor plan you want to load, but want to see floor plans on which certain departments have space or floor plans that house rooms of a certain type. In this case, you can use the Search box in the upper left corner.
You can search for floor plans with two methods.
Set a Search Type
The Search Type limits your search to a specified property of the floor, such as floors housing rooms assigned to a certain department, or floors of a certain building.
-
From the drop-down menu to the right of the search box, select the Search Type by which you wish to search.
-
In the search box, enter the value for the selected Search Type. For example, select Division and enter "Executive" for search results that shows all floors that have rooms assigned to the Executive division.

-
Expand the list of buildings to see the floors with floor plans that meet the search criteria.

-
Select a floor and it loads in the floor plan panel on the right. If the selected floor pertained to Room or Employee search type, the corresponding room will be highlighted. For example, if you selected a floor for employee Wayne DuBose, the SRL-07 floor plan would be highlighted to show Wayne's room.
The following table summarizes the search types and provides examples. Note that you can enter partial values. Entering partial values is further detailed in the next section, All Search Types, but the partial value behavior applies to specific search types as well.
| Search Type | Description | Enter Partial or Whole Value for these fields | Example |
|---|---|---|---|
| All | See below section, Search on All Search Types . | ||
| Floor | Search for an exact floor within any building | Floor Code or Floor Name | "02" returns BOSMED-02, SRL-02, XC-02, and so on |
| Building | Search for floors within a specific building | Building Code or Building Name | "HQ"or "Headquarters" returns HQ-17, HQ-18, HQ-19, HQ-RF, and so on |
| State, City, Site, Campus | Search for floors whose buildings are located within a State, City, Site, Campus |
State Code, State Name,
City Code, City Name, Site Code, Site Name, Campus Code, Campus Name |
"PA" or "Pennsylvania" returns all floor is building HQ, which is located in Pennsylvania. |
| Room | Search for floors containing this room number | Room Code or Room Name | "101" returns HQ-19-101, HQ18-101, SRL-01-101, and so on |
| Department, Division, Room Category, Type, Employee | Search for floors whose rooms contain this division, departments, room category, or room type, or house this employee. |
Department Code/Name
Division Code/Name Room Category Code/Name Room Type Code/Name Employee Code/Name |
"Executive" returns all floors that house rooms belonging to the Executive division. "LAB" returns all floors that are Room Category of Labratory. |
Search on All Search Types
-
In the Search Type selection drop-down (to the right of the search box), select All.
-
Enter the characters of the State, City, Site, Campus, Building, Floor, Room, Department, Division, Room Category, Type, or Employee associated with a floor.
-
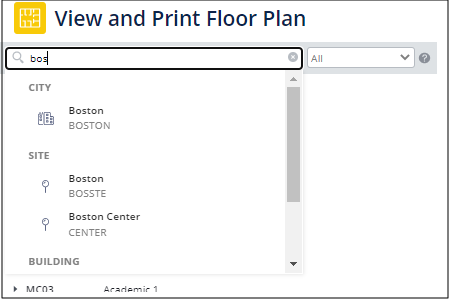
As you type, the search results present the various categories (search types) of items with these letters. For example, typing "BOS" presents the following list of cities, sites, buildings, and employees that contain the characters "BOS" and are associate with a floor or room on a floor. In the below example, if you scroll, you will see an employee Wayne DuBose as this name contains "BOS."
-
Expand a returned entry, such as City/Boston, to see the list of floors. You can then select a floor.
-
Or, once you type Enter after the characters (such as "BOS" + Enter), the search results present the buildings for the categories that contain "BOS."

-
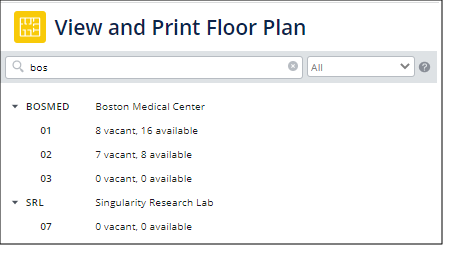
Expand the list of buildings to see the floors with floor plans that meet the search criteria.
-
Select a floor and it loads in the floor plan panel on the right. If the selected floor pertained to Room or Employee search type, the corresponding room will be highlighted. For example, if you selected a floor for Wayne DuBose (step 2), the SRL-07 floor plan would be highlighted to show Wayne's room.
Highlight Floor Plans by Properties and Show a Legend
Once you load a floor plan, you will want to see how the floor is used by departments, the types of rooms located on the floor, the location of hotelable rooms, the location of vacant rooms, and so forth.

To Highlight the Floor Plans by a Property
-
Click Select Highlight, located above the floor plan.
-
In the left panel, the Highlight By drop-down menu appears. Choose the property by which you want to highlight the floor plan.
-
For your selection, the floor plan highlights each room according to the defined colors for its assignment. For example, if highlighting by departments, it highlights the room with the color associated with its assigned departments. See the below "Defining the Highlight Colors" discussion for details.
-
If highlight colors are not defined for the records by which you are highlighting, the room is not highlighted.
-
Similarly, a property might not be defined for a room. For example, a room might not be assigned to a department so will not be highlighted.
-
-
The left pane displays the records and corresponding colors of the property by which you are highlighting. Use this legend to understand the highlights the floor plan displays.
-
You can hide the legend by clicking Hide Legend, above the floor plan.
To Clear the Highlight
-
In the Highlight By menu, click None.
Defining the Highlight Colors
In order to highlight floor plans by a property, you must associate highlight colors with each department, division, room standard, room type, and room category. Other highlights, such as occupancy or status, use default highlight colors.
With these highlight colors defined, the highlight command can consult the table to see the color by which it should highlight the room.
For example, edit the Divisions table to assign green to the Executive division by completing the Highlight Pattern - Acad field. Then, when you highlight by division, Archibus can check the rooms' division and consult the Divisions table to see the color to highlight each room. For information, see Background Data and Defining Highlight Patterns .
Change the Labels that the Floor Plan Displays
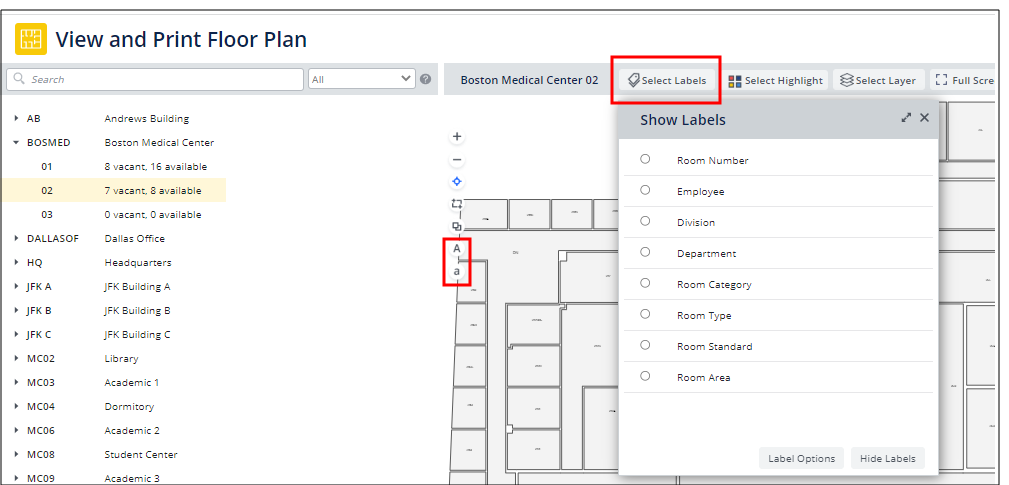
When viewing the floor plan, you may wish to see information such as room number or the name of a department assigned to a room. To choose labels, click the Select Labels button and choose the labels to display and hide from the resulting list. Once the labels display, use the "A" and "a" buttons on the side to increase or decrease the size of the label text.
Displaying and hiding labels operates the same way as it does in the Space Console. For details, see Include Labels on the Floor Plan (Space Console) .
Change the Layers that the Floor Plan Displays
The floor plan has a series of layers, with each layer displaying different types of information such as wall boundaries, equipment, furniture, or doors located on the floor. Click the Select Layer button and hide and display layers by selecting the from the resulting list.
Displaying and hiding layers operates the same way as it does in the Space Console. For details, see Change the Layers Displayed on the Floor Plan (Space Console) .

Export the Floor Plan to PDF
Once you set the floor plan to the highlight, labels, and layers that you want, you might want to share the floor plan with others in your organization. The PDF Export button exports the floor plan as it is currently displayed (highlight, labels, layers, zoom pan, label size, and so on) to a PDF file that you can distribute.
The PDF includes the legend from the left pane and also a footer with information such as the date, file name, and drawing scale. The generated PDF displays in its own window with commands for changing the zoom and downloading and printing the file.

Saving Label Settings
Note that when you set labels and a label size for a floor plan and then export to PDF, Archibus stores the settings so you can use the same settings the next time you access the same floor plan. Thus, you do not need to adjust the size and floor plan labels each time you work with a particular floor plan. When you invoke the PDF Export command, the current label settings and size settings are saved to the
afm_dwg_label_size
table. Since the settings are stored in the database, they apply to both the View and Print Floor Plan view and the Space Console.