Using the Archibus Smart Client Program with a Proxy Server
Using the Archibus Smart Client Program with a Proxy Server
Sites often establish proxy servers for security, performance, and usage tracking purposes. If the Web Central application server is sitting behind a proxy server, that proxy server receives and forwards all requests from the Smart Client to Web Central, and also receives and forwards all responses from Web Central back to the Smart Client.
Connecting through Proxy Servers
In general, if the web browser can connect through a proxy server, the Smart Client should also be able to connect through that proxy server as well.
The Windows operating system contains built-in tools for configuring proxy server settings. If you use these built-in tools, all programs built on the .NET framework -- including the Archibus Smart Client -- will use these proxy server settings.
Depending on your preferred IT practices, you can set the proxy server settings in several ways:
- Using the web browser preferences, if you wish to set proxy settings for the user account
-
Using the Windows
netshutility, if you wish to set proxy settings for the local system - Using the Windows Credential Manager, if you need to store a username and password for the proxy server encrypted in the Windows password vault.
Using the Web Browser to Establish Proxy Server Settings
You can establish your proxy server settings using Google Chrome, or in fact any browser that uses the Windows conventions to store proxy server settings to the Windows registry.
For most networks in which Web Proxy Autodiscovery (WPAD) has been established, the automatically detect settings option will find the proxy server configuration with no other adjustment. Otherwise, you can enter the proxy server settings in the Connections / LAN Connections dialog of the Tools / Internet options command shown below.

Using the Windows netsh Utility
The Windows netsh utility has a number of options under the "
netsh winhttp set proxy
" to configure the proxy server settings for all users of this local system. A typical invocation is below.
netsh winhttp set proxy proxy-server="http=myproxy;https=sproxy:88"
You can use this utility from the command line or in scripts. The utility is also useful for tracing network traffic, and for checking if there is an existing proxy server setting.
For instance, the following command will show if there are any existing proxy server settings.
netsh winhttp show proxy
If you have made proxy server settings in your web browser, you can import them with this invocation:
Netsh winhttp import proxy source=ie
If you wish to clear your proxy server settings, you can do so with:
Netsh winhttp reset proxy
Using the Windows Credential Manager
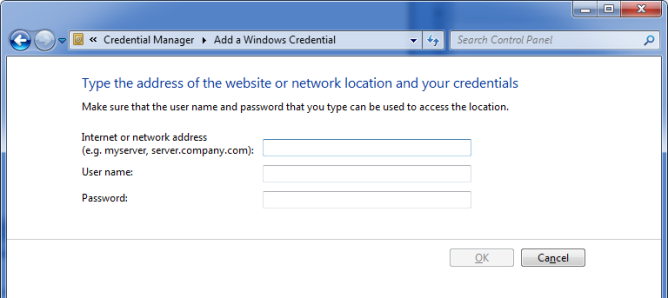
If your proxy server requires a username and a password, you can store these in encrypted form in the Windows Vault. You can access the vault through the Credential Manager in the Control Panel.

In the Credential Manager, choose Add Windows Credentials, and then enter the address of your proxy server and the username and password it requires:
Troubleshooting
Confirm the per-User Settings
You may be able to connect the Smart Client to Web Central perfectly under one account (say the administrator account that you installed with) but not be able to connect under another (say the non-administrator account the CAD specialist is using). In this case, check the proxy settings for the second account, as proxy server setting can change for different users.
Also realize that even within the same user account, you can invoke different settings if you run the Smart Client as a non-admin user, and if you run the Smart Client using administrator privileges in that same account.
You can review the proxy settings with this command line utility:
netsh winhttp show proxy
Review the Network Trace
If you feel you have configured the proxy server correctly but still are not able to connect the Smart Client to Web Central, you may wish to enable network tracing to review the requests and responses and search them for error. For instance, the network trace may reveal the "417 Expectation Failed" error discussed below.
One way to trace network events is to use netsh to enable tracing.
netsh trace start capture=yes
Try your connections. When you are finished, use:
netsh trace stop
The command will tell you the location of the event trace log (etl) file. You can review this file using the Event Viewer, which is accessible via the Windows Control Panel under Administrative Tools.
See also: http://msdn.microsoft.com/en-us/library/windows/desktop/dd569142(v=vs.85).aspx
Some administrators prefer to use an opensource network protocol analyzer WireShark (www.wireshark.org) as being easier-to-use than netsh.
Try the IP Address
If you Sign On to the Smart Client using a server machine name (e.g. http:/mywebcserver:8080/archibus/), and you fail to connect to Web Central via the proxy server, try connecting using the server machine's IP address (e.g. using http://10.1.2.4:8080/archibus/). If this test is successful, check how your proxy server is configured with respect to DNS resolution.
HTTP/1.0 417 Expectation Failed
By default, the .Net framework sets expect100Continue to "true". If in your network trace you see an “HTTP/1.0 417 Expectation Failed” error from your proxy server when you try to connect to it using the Smart Client, you can resolve the issue using the setting below. The Archibus Smart Client will pass the values in the .Net <system.net /> tag to the Microsoft Windows WinHTTP services.
Smart Client
Create a
C:\Program Files (x86)\Archibus\xx.x\SmartClient\SmartClient.exe.config
file with the following content:
<configuration>
<system.net>
<settings>
<servicePointManager expect100Continue="false" />
</settings>
</system.net>
</configuration>