Integrate Outlook Web Add-in with Azure AD for SSO
Integrate Outlook Web Add-in with Azure AD for SSO
This article describes how to deploy the Archibus Outlook Web add-in integrated with Azure AD for SSO.
Before performing these steps, you need to know on which host name Archibus will be running and accessible by users. Web Central and the Outlook web add-in need to be accessible via HTTPS on the same hostname.
Azure AD Configuration
These steps are based on Register an Office Add-in that uses SSO with the Microsoft identity platform - Office Add-ins , and extended to add the optional email claim to the JWT access token. This is to align with the Azure AD configuration for OnSite, so Archibus uses the email address to match the user to Azure.
The Azure AD configuration is split into 5 parts:
-
Register a new application
-
Expose a web API
-
Add a scope
-
Add Microsoft Graph permissions
-
Configure access token version
-
Add email claim
Register a new Application
-
Sign in to the Azure portal with admin credentials to your Microsoft 365 tenancy.
-
Select App registrations. If you don't see the icon, search for "app registration" in the search bar.

-
Select New registration.

-
On the Register an application page, enter a name for the app registration, e.g. Archibus OIDC. Then click Register.

-
Copy the values for the Application (client) ID and Directory (tenant) ID for later use.

Expose a web API
-
From the left pane, select Expose an API.

-
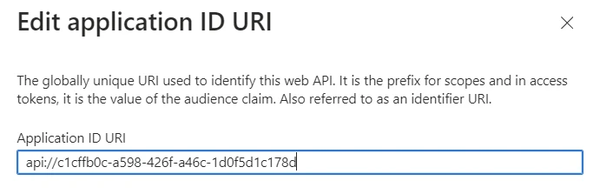
Select Add (or Set) next to Application ID URI.

The Edit application ID URI popup appears. It is prefilled with
api://<app-id>
-
Change the URI from
api://<app-id>toapi://<fully-qualified-domain-name>/<app-id>, then Save.
-
Use the fully qualified domain name where you’ll deploy Archibus Web Central and the Archibus Outlook Web add-in.
-
Include the port number if you are deploying on localhost.
-
Example: api://resexdemo.archibus.cloud/4eb33...4-217bf3807147

Add a scope
-
On the Expose an API page, click Add a scope .

-
Specify the scope attributes in the Add a scope pane. The scope name and state must be set as specified below. The other values can be altered as desired.
| Attribute | Value |
| Scope name | access_as_user |
| Who can consent | Admins only |
| Admin consent display name | Access Archibus from Outlook as current user |
| Admin consent description | Allow the Archibus Outlook web add-in to retrieve room availability for a meeting from the Archibus backend as the current user. Archibus uses the email address to match the user to Azure. |
| State | Enabled |
-
After entering the values, select Add scope.

-
Verify that the new scope is listed. The domain part should match the Application ID URI set previously, with /access_as_user appended to the end.

-
Select Add a client application.

-
In the Client ID enter ea5a67f6-b6f3-4338-b240-c655ddc3cc8e to pre-authorize all Microsoft Office application endpoints.
-
In Authorized scopes, select the access_as_user scope you created before, then click Add application.

Add Microsoft Graph permissions
-
From the left pane, select API permissions.

-
If the User.Read permission is listed, click on the More Actions icon for that permission on the right and select Remove permission .

-
Click Yes, remove if a warning appears to confirm the removal.

-
Select Add a permission.
-
Select Microsoft Graph.

-
Select Delegated permissions.

-
Select the following permissions under OpenId permissions: email, openid and profile. Then click Add permissions.

-
Select Grant Admin consent for <tenant> and select Yes on the confirmation popup that appears.

Configure Access token version
-
From the left pane, select Manifest.
-
Find the accessTokenAcceptedVersion property and change its value to 2.

-
Select the Save button above the manifest editor.
Add email claim
-
From the left pane, select Token configuration.
-
Select Add optional claim.

-
Select token type: Access.
-
From the list of claims, select email. Then select Add.

Archibus OIDC configuration
Configure WEB-INF/config/ oidc.properties with information from the Azure AD App Registration.
Retrieving the required information from the App Registration is described with screenshots for OnSite configuration at Configure Web Central to Use the Azure Identity Provider .
Note: skip setup of configservice.properties because that file is OnSite-specific.
The template below shows how to complete the relevant OIDC properties. Replace <client_id> and <tenant_id> by the appropriate values from the App Registration.
oidc.usernameClaim=email
oidc.audience=<client_id>
oidc.issuer=https://login.microsoftonline.com/<tenant_id>/v2.0
oidc.jwksUrl=https://login.microsoftonline.com/<tenant_id>/discovery/v2.0/keys
Example:
oidc.usernameClaim=email
oidc.audience=4eb33ca-0bd2-421b-b2b4-217bf3807147
oidc.issuer=https://login.microsoftonline.com/63...f117a5db7/v2.0
oidc.jwksUrl=https://login.microsoftonline.com/63...very/v2.0/keys
Archibus Outlook Web add-in configuration
Set deployment location
The manifest file of the Outlook Web add-in contains multiple references to its deployment location. The add-in must be deployed on the same host and port running Archibus Web Central with the OIDC configuration described in the previous section.
Note: HTTPS is required for the add-in to appear in Outlook.
The default deployment location for development is https://localhost:3000/. Replace all instances of this value in the manifest.xml file according to the actual deployment location.
Example:
-
Archibus Web Central is deployed at https://resexdemo.archibus.cloud/archibus/
-
Archibus Outlook Web add-in is deployed at https://resexdemo.archibus.cloud/outlookaddin/
→ Replace https://localhost:3000/ in the manifest.xml file by https://resexdemo.archibus.cloud/outlookaddin/
Link to Azure AD
Information from the Azure AD App Registration must be entered in the manifest file of the Outlook Web Add-in so it can retrieve the appropriate JWT token via the Office SSO API. Near the end of the manifest file, the <WebApplicationInfo> element contains the following child elements to update:
-
<Id> - The client (application) ID of the App Registration.
-
<Resource> - The application ID URI (including the api: protocol) that you set on the ‘Expose an API’ pane when registering the add-in with the Microsoft identity platform. The domain part of this URI must match the domain, including any subdomains, used in the URLs in the <Resources> section of the add-in's manifest and the URI must end with the client ID specified in the <Id> element.
Example:
<WebApplicationInfo>
<Id>4eb33ca-0bd2-421b-b2b4-217bf3807147</Id>
<Resource>api://resexdemo.archibus.cloud/4eb33...4-217bf3807147</Resource>
<Scopes>
<Scope>email</Scope>
<Scope>openid</Scope>
<Scope>profile</Scope>
</Scopes>
</WebApplicationInfo>
Set add-in GUID
The primary <Id> of the Outlook web add-in defined near the beginning of the manifest.xml should be a unique and valid GUID for every deployment. Update the placeholder value to match the application (client) ID of the Azure AD app registration.
<?xml version="1.0" encoding="UTF-8" standalone="yes"?>
<OfficeApp xmlns="http://schemas.microsoft.com/office/appforoffice/1.1" xmlns:xsi="http://www.w3.org/2001/XMLSchema-instance" xmlns:bt="http://schemas.microsoft.com/office/...basictypes/1.0" xmlns:mailappor="http://schemas.microsoft.com/office/...noverrides/1.0" xsi:type="MailApp">
<Id>4eb33ca-0bd2-421b-b2b4-217bf3807147</Id>