Installing Application Extension Environment
Add-In Manager Application Extension Environment
Installing Application Extension Environment
The Archibus application extension environment enables you to extend Archibus forms and business logic.
Note : Web Central or unit tests must connect to the running database server.
Installation Requirements
In order to install Archibus software, you must have administrative rights on Windows.
The hardware requirements are as follows:
-
At least 1 GB of RAM (2 GB is recommended).
-
At least 1 GB of free hard drive space.
-
Dual-core CPU is recommended.
Archibus application extension environment includes:
-
JDK (version 11)
-
Archibus Eclipse distribution
-
MS SQL Server
-
HQ database
-
Tomcat 9
-
Gradle 7
Step 1: Install SQL Server with HQ database
Install SQL Server
-
Install SQL Server 2019 Developer, with default settings: https://www.microsoft.com/en-us/sql-server/sql-server-downloads
-
Install SQL Server Management Studio 18.6, with default settings: https://docs.microsoft.com/en-us/sql/ssms/download-sql-server-management-studio-ssms?view=sql-server-ver15
Enable SQL authentication:
-
In the Object Explorer, right-click the server, and then click Properties.
-
On the Security page, under “Server authentication”, select “SQL Server and Windows Authentication mode”, and then click OK.
Enable TCP/IP protocol
-
In SQL Server Configuration Manager:
-
Expand “SQL Server Network Configuration” and click on “Protocols for MSSQLSERVER”.
-
Right click on “TCP/IP” and choose “Enable”.
-
Click “OK” on the warning that the service will have to be restarted.
-
Click on “SQL Server Services”.
-
Right click on “SQL Server (MSSQLSERVER) and choose “Restart”.
Add SQL Server logins
-
Connect with Windows authentication and run the following:
USE [master] GO CREATE LOGIN [afm] WITH PASSWORD=N'afm', DEFAULT_LANGUAGE=[us_english], CHECK_EXPIRATION=OFF, CHECK_POLICY=OFF GO ALTER SERVER ROLE [dbcreator] ADD MEMBER [afm] GO CREATE LOGIN [afm_secure] WITH PASSWORD=N'afm', DEFAULT_LANGUAGE=[us_english], CHECK_EXPIRATION=OFF, CHECK_POLICY=OFF GO
Restore a BAK file
1. Download the BAK file from Archibus Allbound ( https://eptura.allbound.com )
2. Restore the BAK file
-
Connect with Windows authentication
-
Right click on Databases node and choose Restore Database

-
Click on Device and then … Using Add button select your BAK file and click OK
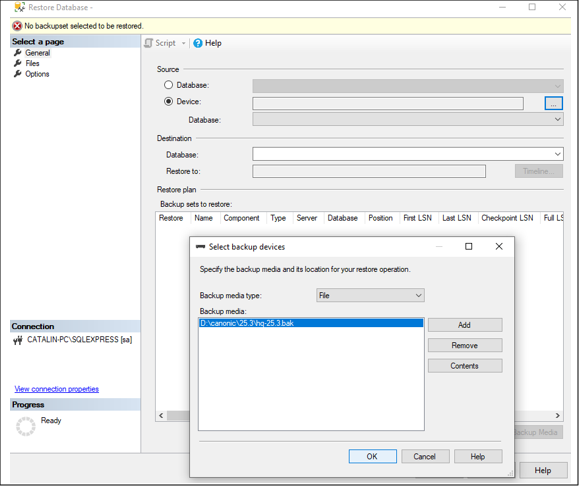
-
In the next step you can edit your db name. Then click OK

-
If everything goes fine, you will see the message: Database <db_name> restored successfully.
Run script:
/* Use this project */
use HQ
go
/* Set this project as the default to use when the user logs in as user AFM. */
EXEC sp_defaultdb 'afm', 'HQ'
go
/* Map the server login of AFM to the database user AFM. */
EXEC sp_change_users_login 'Update_One', 'afm', 'afm'
go
/* Set this project as the default to use when the user logs in as user afm_secure. */
EXEC sp_defaultdb 'afm_secure', 'HQ'
go
/* Map the server login of AFM_SECURE to the database user AFM_SECURE. */
EXEC sp_change_users_login 'Update_One', 'afm_secure', 'afm_secure'
go
/* Allow afm_secure to access the groups and users tables owned by AFM. */GRANT REFERENCES, SELECT ON AFM.AFM_GROUPS TO afm_secure
go
GRANT REFERENCES, SELECT ON AFM.AFM_USERS TO afm_secure
go
Step 2: Install Archibus distribution of Eclipse
-
Download
eclipse-archibus-<version>.zipfrom Eptura Allbound (https://eptura.allbound.com ). -
Unzip the ZIP file to the C:\ folder.
-
Run C:\eclipse-archibus-<version>\StartEclipseForApplicationDeveloper.bat shortcut (not eclipse.exe).
To pin this shortcut to Windows Start Menu, drag and drop the shortcut on the Start Menu.This script:
-
shows workspace on the Eclipse title bar
-
starts Eclipse using embedded JRE
-
starts Eclipse with ApplicationDeveloper workspace
-
uses standard Archibus preferences
-
Step 3: Import the Applications project into Eclipse workspace
-
In the main menu, select: File > Import > General > Existing Projects into Workspace . Click Next:

-
Browse to the application root folder.
-
Check “Search for nested projects”.
-
Click Finish.
The project requires several minutes to build.

Application source code appears in the Package Explorer:

Step 4: Run WebCentral in Tomcat Server from Eclipse
-
Select webcentral.launch in the Package Explorer:

-
In the main menu, select Run > Run As... > webcentral launch .
-
The Tomcat server starts, and Eclipse displays start-up messages in the Console window.
-
When the process is complete, the message “Initializing web application context: OK” appears in the Console.

-
-
To verify that Web Central works, enter http://localhost:8080/archibus/ in the browser, then log in as guest:

To Stop Web Central Jetty Server from Eclipse
To stop the Web Central Jetty server from Eclipse, click the red square Terminate icon in the Console toolbar.
