How to Upgrade Archibus with an SQL Script
How to Upgrade Archibus with an SQL Script
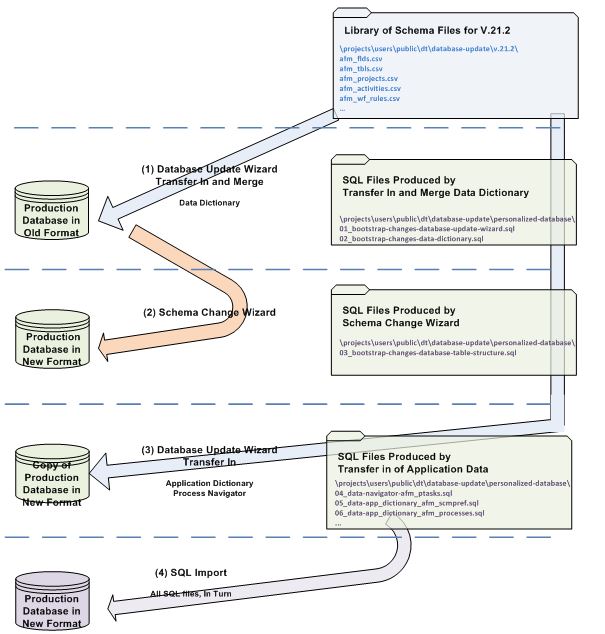
Often it is desirable to create a repeatable process for upgrading to a new version of Archibus. Possibly because you have multiple projects that need to be upgraded, or you may need to provide the process to a system administrator to run on your behalf. The Database Update Wizard and the Schema Change Wizard both provide the ability to send the changes to a SQL script file that can then be executed in a SQL query tool. The overall process is shown below. For step-by-step instructions, follow the steps below the diagram.
Step 1. Database Update Wizard Transfer In and Merge
- First create a working copy of the project to be updated.
- Follow the process described in Performing the Transfer: Merge Data Dictionary Tables choosing the desired version for the upgrade and Data Dictionary as the files to transfer in. Make sure to select both "Execute changes immediately on project database" and "Output changes to SQL Script". The execute immediately option is needed so that the schema change wizard will recognize the updates that have been made.
-
The system will create three files in the folder
...\archibus\projects\users\public\dt\database-update\personalized-database:
- 00_afm_groups.sql
- 01_changes-database-update-wizard.sql
- 02_changes-data-dictionary.sql
-
Copy these files from the personalized-database folder to a location you determine. These will be executed later in the SQL query tool of your choosing.
Note: You must save this instance of the file 01_changes-database-update-wizard.sql to another location, because it will be overwritten with a new version in subsequent steps. The later version will not contain sufficient information for the scripted process to work.
Step 2. Schema Change Wizard
-
Next you will run the Schema Change Wizard as described in
Specifying How the Schema Change Wizard Works
. This should be performed immediately after the Database Update Wizard has completed.
Important: Do not log out or restart the application server between Step 1 and this step. The transformation of the project is incomplete at this point and data needed to login and / or restart the system is missing. Make sure you select "Output changes to SQL Script".
-
The system will create this file in the folder
...\archibus\projects\users\public\dt\database-update\personalized-database
:
03_changes-database-table-structure.sql
Copy this file from the personalized-database folder to a location you determine. It will be executed later in the SQL query tool of your choosing.
- After the job from step 2 finishes, the wizard takes you to the “Re-create Structures” tab. From here, click Start Job. This job will run the .duw scripts from schema/ab-products/common/duw . Notice that the scripts to be executed depend on database type.
Step 3. Database Update Wizard Transfer In
- Next you will run the Database Update Wizard as described in How to Transfer Data In (Import) . In this case you will select the Application Dictionary and Navigator tables. Make sure you select "Output changes to SQL Script".
- The system will create a series of sql files numbered starting at 04 up thorough the number of files needed for each of the tables in the transfer. The file name will also contain the name of the table that it processes. The files will be created in the folder: ...\archibus\projects\users\public\dt\database-update\personalized-database .
Copy these files from the personalized-database folder to a location you determine. These files will be executed later in the SQL query tool of your choosing.
At this point the working database is no longer needed.
Step 4. SQL Import
In this step, you will execute the SQL scripts that you saved from Steps 1-3. Each of the SQL files has a leading number that indicates the order of execution. It is strongly recommended that this activity be performed with all users except the Add-In Manager logged out. And you should make a full backup of the database before you start.
- In a SQL query tool such as MSSM or SQL Developer log into the database with administrator privileges
- Make a full backup of the database.
- Connect to the database as afm (the owner of the tables)
- Run each sql file in the order indicated by the leading number of the file name. Check the execution of the file for errors. If necessary, make data corrections for things like enumeration list values or not null fields that are null.
- Upon successful completion of the last SQL file, the upgrade to the database will be complete.
Database Specific Notes
SQL Server
The file 03_changes-database-table-structure.sql will have a number of drop constraint statements that will fail because the constraint does not exist. You can either run the file till it stops, remove the completed statements and comment out the offending statement and restart the script. This is very tedious, but if you create a 2nd file that excludes the offending statements
Oracle
It is not recommended that you use SQL Plus to run these scripts. You will encounter problems with line length errors and unknown commands
Before running the scripts make sure the first line in the script is:
SET DEFINE OFF;
If that statement is not in the script, edit the script to add it.