Setting Response Procedures for an SLA
Workplace Services / Service
Desk / Service Desk Manager
Workplace Services / Service
Desk / Service Contract Manager
Space / Space Inventory / Service Desk Manager (transaction method)
Space / Occupancy/ Service Desk Manager (transaction method)
Setting Response Procedures for an SLA
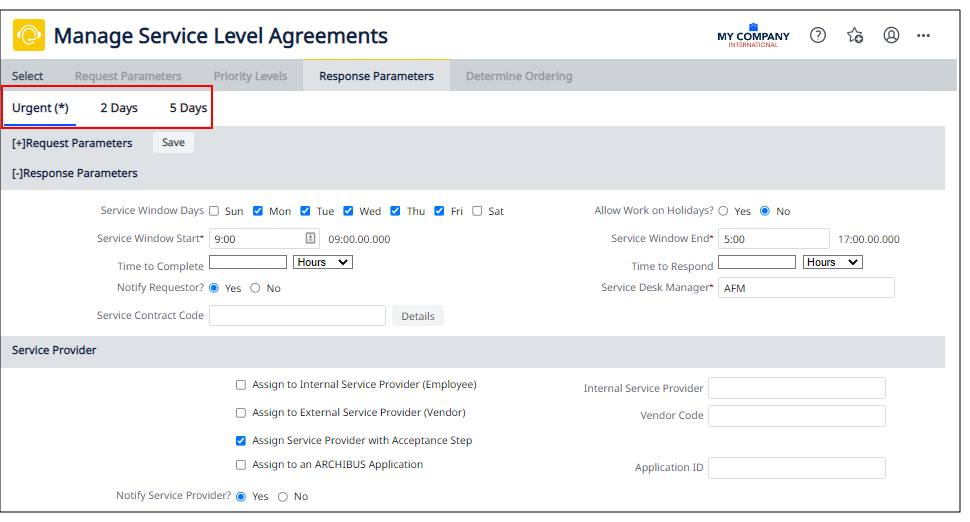
The next step in creating your SLA is to use Response Parameters tab to define the response procedures.

Priority Levels
If you have set priority levels, you will define a response procedure for each priority level. The priority levels that you have defined will appear as a series of tabs beneath the first set of tabs (as shown below). Select each priority level to define its response parameters.
If you have not set priorities, you will have one tab in the priority row: the Default tab (as shown in the above image). In this case, you define response procedures for the SLA as a whole, and not for each priority.
Define the Response
For a selected priority level or for the SLA as a whole, you now define basic information about the response, including the service window, the time to respond, and the time to complete the request.
-
Service window
The service window describes the operating hours for service providers. The service window is based on the Service Window Days (days of the week that work occurs for this type of work), the Service Window Start (the time of day that work for this SLA begins), and Service Window End (time of day that work for this SLA ends).
The service window also depends on whether you select Yes or No for the Allow Work on Holidays? field. If the Allow Work on Holidays? field is set to No, the application does not include holidays as work days when determining the service window for the job. If it is set to yes, holidays are included as work days when determining the service window for work.
Service windows affect when a job is considered to be completed within the commitment defined by the SLA, and therefore when escalations occur. For work that is auto-issued, the service window affects when the craftsperson is scheduled to do the work. When scheduling work from the Labor Scheduler, you cannot schedule work on a holiday if the work is assigned to an SLA that does not allow work on holidays.
For example, suppose a request is made at 4:30 PM on Friday for a problem that is associated with an SLA that specifies a one-hour time-to-complete. Suppose also that the service window for this type of work issue is during normal business hours of 8 AM to 5 PM, Monday through Friday. Based on the service window defined for this SLA, the problem could be resolved on the following Monday morning by 8:30 AM and still be within the commitment.
In the preceding example, if Monday is listed as a holiday, and the Allow Work on Holidays? field is set to No, then the work could be resolved on Tuesday morning at 8:30 and still be within the commitment.
When Business Process Owners enter holidays, they specify the country and region for the holiday, so variations by site or region are taken into account. See Holiday Dates.
- Service Contract Code : Since SLAs are typically part of a service contract with an internal or external service provider, you can also specify the service contract from which the SLA derives. (The service contracts must have been previously entered into the system.) Choose a service contract from the Service Contract Code list. If you need a reminder of its details, select the Details button, which can show the vendor's name, expiration date, and a link to the actual contract document, if uploaded into the document management system by the Service Contract Manager.
- Notify Requestor? : If you want the requestor to receive notification about the request's status changes as it is routed through the system, set Notify Requestor? to Yes.
Define the Service Provider
You must specify how to handle requests of this SLA. You can select multiple options for the Service Provider.

You must choose at least one of the following "Assign" options. You can select any combination of options except "Assign Service Provider with Acceptance Step" ; if you choose this Assign option, the system clears other checkboxes you may have set.
| Option | Description |
|---|---|
|
Assign to Internal Service Provider (Employee) Internal Service Provider |
Automatically routes the request to the employee that you enter in the Internal Service Provider option. If this is the only selected option, then the activity_log record gets routed to that service provider. |
|
Assign to External Service Provider (Vendor) Vendor Code |
Automatically routes the request to the vendor that you enter in the Internal Vendor Code option. If this is the only selected option, then the activity_log record gets routed to that service provider. Note that you can select both an employee and a vendor because If an external service provider is chosen, there is not a way for someone internally to track and manage the request. Therefore, you can select both Assign to External Service Provider and Assign to Internal Service Provider. |
| Assign Service Provider with Acceptance Step |
Select this option if you wish to give the service provider the option of accepting or rejecting the job. This option instructs the system to forward the request to a service provider for acceptance. This ensures that the service provider is truly able to handle the work. If you set this option, the view presents a pop-up form for specifying the details of the acceptance including the employee or vendor. Therefore, if you select this checkbox as well as the Assign to Internal Service Provider or Assign to External Service provider checkboxes, the system clears your other selections as you will be specifying the employee and/or vendor in the pop-up form. For details of completing the pop-up form, see Including an Acceptance Step for Service Requests . |
|
Assign to an Archibus Application Application ID |
Set these options to have the Moves application handle to manage the request. Then, select the Moves application in Application ID. With this option, application-specific records are generated. If this is the only option selected, the activity_log record is generated but is not routed to anyone (activity_log.assigned_to is NULL) and the application-specific records are generated. If this option is selected along with one or both of the "Assign to Internal Service Provider" option, then the activity_log record is created, the activity_log record is routed to a service provider, and the application-specific record is created. |
| Notify Service Provider? | Set this option to notify by e-mail service providers assigned to executing this SLA. The text of the email message is defined by the system integrator using the tasks of the System Integrator role. |
Set Optional Workflow Steps
The bottom panel lists the possible service request statuses . For each request status, you can define one or more Notification, Approval, and Acceptance steps. For the Completed status, you can additionally define satisfaction surveys and verifications.
When defining these steps, you may have the choice to issue an email notification to the person responsible for completing a workflow step, such as the manager responsible for approving work. The exact text of the message is defined by the system integrator using the tasks of the System Integrator process.
With the buttons on the right of each panel, the following workflow steps can be created:
- Including an Edit and Approval Step for a Service Request status of Requested
- Including Approvals for a Service Request Status
- Including Notifications for a Service Request Status
- Including an Acceptance Step for Service Requests
- Including a Satisfaction Survey for Completed Service Requests
- Including a Verification for Completed Service Requests
Next
- After filling out all Optional Workflow Steps for the current priority, click on the Save button on top of the tab page.
- Complete request parameters and optional workflow steps for the other defined priorities and again click the Save button.
- Proceed to the last tab, Determine Ordering, to review or change the default SLA ordering.
Back
Back to Overview of Creating an SLA