Create a Gross Building Area Plan and Area Boundaries (Internal Chargeback)
Archibus Smart Client Extension for Revit
Create a Gross Building Area Plan and Area Boundaries (Internal Chargeback)
If you plan to perform internal chargeback to your departments or other internal entities, once a building has been designed, the first step is to create a Gross Building Area Plan and Area Boundaries. See Standards for Area Accuracy.
Step 1: Create a Gross Building Area Plan
- From the Revit Architecture ribbon, select Home/Area Plan. Area Plans will appear in their own “Area Plans (Gross Building)” section of the Revit Project Browser.
- In the New Area Plan dialog, select “Gross Building” from the top drop-down list, and then select the level that you want this Area Plan to be associated to.
Step 2: Create Area Boundaries
-
Create area boundary lines in either of the following ways:
- Automatically create boundary lines : Revit will offer to automatically place Area Boundary Lines along all exterior walls. This is often a good option to say “yes” to, but may not always provide desired results. For example, curtain walls might not have the Area Boundary Lines placed in the desired location, or Revit might incorrectly trace walls that are not on the exterior of the building. Should this happen, the incorrect Area Boundary Lines should be deleted and drawn manually.
- Manually draw an Area Boundary Line :
- Return to the Ribbon, select the Home/Area button and then pick the Area Boundary Line command.
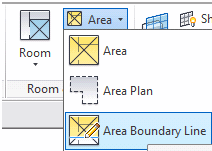
- When this command is active, you will see a Draw command panel on the right side of the ribbon.

From the Drawing command panel, you will be able to select options for drawing straight lines, rectangles, polygons, circles, arcs, and more.
- Using standard drawing practices and object snaps, sketch all necessary additional lines to fully outline the Gross Building area. A properly defined Area Boundary will form a closed loop with no open corners or edges.
During this process, Revit will create an Area object and place an Area Tag – the default Area Tag will show the Area name and square footage.
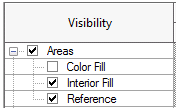
To make an Area easier to see, go to Visibility Graphics Overrides (type “VG” on the keyboard), and select the check boxes underneath the Areas entry for “Interior Fill” and “Reference.” Interior fill will provide a transparent solid fill across the area, and the Reference will turn on an “X” that spans across the Area object. This “X” makes the Area much easier to select and modify.
When in a Gross Area Plan, Revit will limit Area objects to be defined as either a Gross Building Area or as an Exterior Area using the following criteria:
- Where the Gross Building Area meets up with empty space or an Exterior Area, any Area Boundary Lines that were automatically generated by Revit or by the “pick lines” option in the Draw ribbon panel will be measured to the outside surface of the building.
-
Where an Exterior Area meets up with another Exterior Area, the Area Boundary is measured to the associated wall centerline.

Next Step
The next step is to prepare the room inventory that internal chargeback uses in its calculations.
See Preparing a Room Inventory for detailed instructions.