Allocation Events Tab
Real Property / Forecasting / Portfolio Forecasting / Portfolio Forecast Wizard
Allocation Events Tab
The Allocation Events tab presents the main view for allocating space by enabling you to:
- Review allocation events and add new events to the portfolio forecast. Allocation events enable you to allocate space to organization units for specific time periods to test out different ways of using the space. Allocation events are created when you import buildings using the Add Building action, or when you use the Copy Group Inventory action to copy an existing group inventory to a scenario. You can create additional allocation events manually using the Add Allocation Event action. See Adding Allocation Events .
- Review Lease Information records that are created when you use the Add Building action to add a building that has leased space. Adjust the lease's expiration date to test how extending or terminating the lease affects space allocation.
- View alerts for space that is over-allocated.
- Add the Employee Headcount to track the number of employees you anticipate will occupy the space for the allocation event. This field is used in summary analysis reports, and can also be used to calculate a Manual Area for the group if the floor does not have a CAD-derived area. See Employee Headcount.
- Use the % of Floor field to have the application calculate the group's area based on the percentage of the floor you want the group to occupy. This action is available only if the floor does not have a CAD-derived area.
- Edit allocation events, for example: you can change an allocation event's floor or department assignment. See Editing Allocation Events .
- Add multiple allocation events by splitting floors using a percentage you enter for each allocation event. See Adding Allocation Events by Splitting Floors.
- Add unavailable space to indicate time periods for which a space is not available. See Adding Unavailable Space .
Note: Unoccupied floors are included by default in the Stack Chart and Space Gap Chart, so there is no longer a need to enter empty groups.
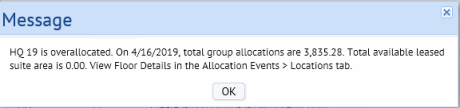
Alerts for over-allocation of floors
In the Allocation Events tab, events are marked with an alert icon if the floor is over-allocated.

The application uses the value for Floor Area, whether derived form the Suites table or the Floors table, to determine whether a floor has been over-allocated. Over-allocation means that the total for allocation events on any date exceeds the available floor space for that date. Clicking the icon gives the Message shown below that provides details about the allocated floor space. You can also view details by expanding the buildings shown in the Locations tab, and clicking Details in the row for the over-allocated floor.
Review allocation events by location, organizational unit, or date
The panel on the left of the Allocation Events tab includes the Locations, Organizations, and Event Dates tabs.
- Review allocations by location. From the Locations tab, drill down in the Sites, Buildings, and Floors hierarchy, and click Select for a building or floor to see just the allocations for that location.
- Review area details . Review details for the areas used for the floor allocation by clicking Details in the row for a floor. If suite areas are used instead of floor area, the total available suite area is shown on the Leased Suites tab of the Floor Details form.
- Review allocations by organizational unit . Click the Organizations tab, and drill down to see allocation events for the business unit, division, or department. Click on a level to see allocation events for just that level.
- Review by date . Review allocations in sequence by start date by clicking the Event Dates tab. The allocations are listed in order by Start Date with the earliest Start Date listed first in the list.

Employee Headcount
The Employee Headcount field provides a way of tracking the number of employees you anticipate will occupy the space for that allocation event. You can add this number when you add or edit an allocation event. The number you enter for this field is used to summarize data for reports, such as the Portfolio Forecast Department Analysis, Cost Forecast Department Analysis, and the Headcount Projection reports. See Portfolio Forecasts Reports and Charts . This field can be entered for any allocation.
Calculate area based on headcount
You can also use the headcount field to calculate the area for allocations, as long as the allocation is not for a group that you copied from your group inventory, and that has a CAD-derived value for its area. To calculate the area for all other allocation events, you can enter the number of employees you anticipate for the allocation event in the Employee Headcount field. You then click the Calculate Area button to multiply this number by a standard average area per employee stored in the ab-alloc-list-group.axvw file. This calculation provides an estimated area that the system enters in the Manual Area field, and also fills in the % of Floor field for the allocation.
You can edit the Standard Area Per Employee from the Floor Details form.
Note: The Standard Area Per Employee field is not available for leased space based on suites.
You can also edit the ab-alloc-list-group.axvw file with a program like Notepad to change the default standard average areas. Shown below is a change from the default 200 sq.ft. to 400 sq.ft.
<message name="area_per_employee_Imperial">400</message>
<message name="area_per_employee_Metric">20</message>
Add allocation events
You can add an allocation event from either the Stack Chart or the Allocation Events tab.
The application automatically creates new group allocation events for the scenario when you run the Copy from Group Inventory action or the Add Building action. The Add Allocation Event action is a way for you to create an allocation from scratch in addition to the events that the application has created.
To add an allocation event:
- Select the Portfolio Forecast Wizard task, and then do one of the following:
- From the Stack Chart, select a date in the Events by Date tab, and then select Add > Allocation Event. This will pre-fill the Edit Allocation form with the selected date.
- From the Allocation Events tab, select a location in the Locations tab, and then select Add > Allocation Event. This will pre-fill the Edit Allocation form with the location information.
The Edit Allocation Event form shows the values for any pre-selected items.
- If needed, select the Building Code / Floor Code for the allocation event. You can select from the locations you have added to this scenario. If a location does not exist in the selection list, you can add it using the Add Building or Copy Group Inventory actions.
- Enter the following required data:
New or Existing Group Name : Enter a name to identify the new allocation event. For example, enter the department the allocation is for. Alternately, use the Select Value button to select from a list of existing groups (allocation events) for the scenario. These are allocation events that you have already defined.
Note : The application lets you select an existing group for the new allocation, and lets you create the allocation for any date range. However, be aware that if you create the allocation for the same time as an existing allocation, the space allocated to the group will be the sum of the two allocations, if they start on the same date and occur on the same building and floor. In general, you should not create multiple records for the same bl-fl-group combination occurring at the same time.
Event Description : Describe the scenario for this allocation event. This description provides any notes to help identify the circumstances behind this scenario.
Date Start / Date End: : Enter the projected start and end date that describes the time frame when the organizational unit will occupy the space. The Date Start is required, but the Date End is optional.
-
Enter the following organizational data as needed:
Division Code / Department Code: Select the department that will occupy the space. When you select the department, the division the department is associated with is also selected.
Business Unit Code : If needed, select the business unit for the allocation
- Enter the area for the group in one of the following ways. When you add an allocation event, it is saved as a group allocation record with a Manual Area.
- Manual Area : You can enter an area directly into the Manual Area field.
- % of Floor : Enter the percentage of the floor that you anticipate the new group will occupy in the % of Floor field. You can then click the Calculate Area button to have the program calculate the group allocation's Manual Area from the floor's CAD-derived or manual area whichever is available.
- Employee Headcount : Enter the number of employees that you anticipate for the new group and then click Calculate Area. The program calculates the area needed based on the floor's CAD-derived or manual area whichever is available, and fills in the % of Floor and Manual Area field with the results. This number is also used in reports, such as the Portfolio Forecast Department Analysis and the Headcount Projection reports. See the Employee Headcount section of this topic for information on calculating area based on employee headcount.
- Click Save.
If the area you enter causes an overallocation, a message at the top of the Edit Allocation form alerts you to this.
The system will generate the Group Code for this group when you click Save. The Group Code is the unique identifier for this allocation event.
Add allocation events by splitting floors
You can allocate area to different organizational groups on a floor at once by using the Split Floor action. Using this action, you can enter multiple departments and the % of Floor field for each allocation. The Manual Area of each allocation will be set based on the % of Floor value and the Floor Usable or Floor Manual Area. The Floor Usable area is used if it is available; otherwise the Floor Manual Area is used.
To add groups by splitting a floor:
- From the Allocation Events tab, expand the buildings to show its floors.
- Click Select for the floor you want to split.
- The Split floor action now appears at the top of the Allocation Events list.
Note :If the floor already has some groups assigned to it, you will need to consider the areas for these groups when assigning percentages. Ensure that the percentages for all groups for the floor do not exceed 100%. To review the existing allocations, click the allocation event in the list. The Edit Allocation form gives the % of floor allocated for this event. You can adjust this if needed. If you do over-allocate space, the Alerts icon will inform you of this.
- Click Split Floor.
The Split Floor into Groups form appears filled in with the Building Code and Floor Code you selected. The Select Dates tab is active.
- Enter the projected Date Start and Date End that describes the time frame when the group will occupy the space.
- Click Next.
The Create Groups tab appears.
- To review the floor Usable Area or the floor Manual Area for the selected floor, click Floor Details. If needed, you can change the Standard Area Per Employee from this form. Click Save to save the changes to the forecast.
- Enter the following to add areas for each group:
Division Code
Department Code
% of Floor.
- Click Save.
Edit or delete allocation events
When you import locations into the scenario using the Add Building action, the application creates allocation events for the division and departments associated with the floor. The area allocated for these events is stored as a Manual Area, even if the floor area the allocation is based on is a CAD-derived measurement. In contrast, groups that are created using the Forecasting / Background Data / Define Portfolio Scenarios / Copy from Group Inventory action will have defined CAD Area values for the allocation event if the floor area is based on groups drawn in CAD. In his case, the Manual Area field and Calculate Area action buttons are hidden in the edit form, and the Percent Floor field is read-only. For these allocations, you can edit only the Employee Headcount.
Tip : Alternately, you can edit an allocation event from the Stack Chart or Space Gap Chart. Expand the Events by Date pane to show the event, and click the event to access the Edit Allocation Event form. From this form, you can also delete the allocation event.
To edit an allocation event:
- From the Allocation Events tab, click on the allocation in the Allocation Events list to access the edit form.
- From the Edit Allocation Event form, for all allocations except those imported for CAD-derived group areas, you can edit any information for the allocation except the system-generated Group Code.
For example, you can move an allocation from one floor to another floor, reassign an allocation to another department, or change the projected start and end dates. You can also edit the Manual Area for the group allocation, either by directly editing this value, or by entering the Employee Headcount or the % of Floor for the allocation and clicking Calculate.
- Employee Headcount . For any allocation (even those based on CAD-derived Group areas) you can edit the employee headcount to track the number of employees you anticipate will occupy the space.
- Click Save.
To delete allocations
To delete a single allocation event, click Delete in the Edit Allocation Event form to delete the allocation.
To delete multiple allocation events, select the check boxes for the allocation events from the Allocation Events list, and click Delete.
Review and adjust the date start for an allocation event for leased space
To adjust the date start for an allocation event for a leased space:
- On the Allocation Events tab, under the Lease Information section, click on a record for a lease allocation.
The Edit Lease form appears.
Note : From the Edit Lease form, you edit information for the lease information record created for this lease. You are not editing the lease record.
- Make changes as necessary. For example, you can change the Date Start or Date End to test out different scenarios. You can change the Description to describe what the changes are based on.
- Click Save.
Review floor area used for the allocation
You might want to see the floor area that the allocation event is based on, and to ensure that all your floor areas have values entered.
To review floor area for allocation events:
- Expand the Locations by Event pane to show the floors for a building.
- Click Details for the floor.
The Floor Area or the Leased Suites tab of the Floor Details form appears.
- Cad inventory : If the floor area is based on a CAD inventory, then the Usable area is shown and is read-only.
- Manual Entry : If the floor area is based on a manual entry, you can edit the Manual Area in the Floor Area form. If the Manual Area is zero, you can enter the estimated area in this field.
- Suites: If the floor is based on suite areas, the Leased Suites tab appears. For leased floors, the total Available Leased Suite Area is used instead of the floor's Usable Area. If the Suite Usable Area is 0, then the Suite Manual Area is used.
- Standard Area Per Employee . For all areas from the Floors table, (so this would exclude suites), you can edit the Standard Area Per Employee.
- If the floor area that the allocation is based on is a manual area, the application uses the Standard Area Per Employee value when you adjust the allocated area for events by entering the Employee Headcount and clicking Calculate. It can also be used to calculate area when you add an allocation event using the Add Allocation Event action.
- If the floor area is CAD-derived, the application can use the Standard Area Per Employee value when you use the Add Allocation Event action to add an allocation event from scratch.
See Calculate area based on headcount and Adding Allocation events .
- Click Save.