
Edit a Neighborhood
Eptura Workplace and Eptura platform services
Level: Administrator
Neighborhoods let you update details, which is useful if you need to adjust their highlight color in the Color By and additionally you can complete the Allocation (to the Organization Unit), People (or User Group) allocation, and Spaces allocation.
- Access the Spaces Floor Plan Viewer.
- Depending on where you are:
- If you have recently, added a neighborhood, then the Neighborhood panel displays.
- If recently opened the Spaces Floor Plan Viewer, then from the left toolbar, click the Neighborhood
 icon and the Neighborhood panel displays.
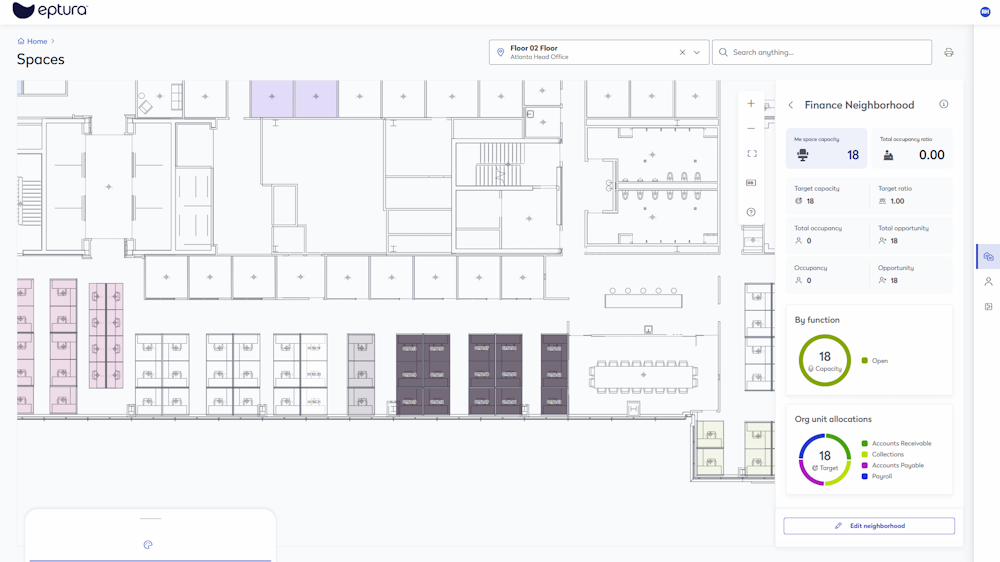
- Click the neighborhood to display the statistics.

- Click the Edit neighborhood button and the Edit neighborhood panel displays with the following tabs:
- About tab - Update the details and adjust the neighborhood highlight color.
- Allocate tab - Allocate organization units to the neighborhood and complete the allocation percentage.
- People tab - Add or remove people or user groups.
- Spaces tab - Add or remove spaces from the neighborhood.
About tab
When you edit a neighborhood, you will see the same fields as the add neighborhood form.
Expand to see the About tab
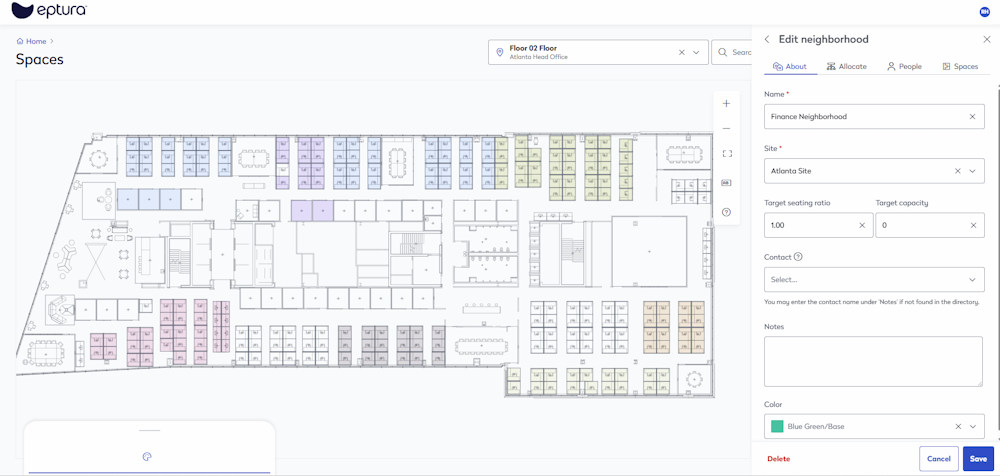
- In the Name field, enter the name of the neighborhood.
- From the Site drop-down, either use the default site or select the site.
- In the Target seating ratio, enter the ratio and this determines the seats to people. From the target ratio and the seats (spaces) allocated to the neighborhood and people allocated to the neighborhood, this will calculate the Target Capacity. See the following examples:
- Finance Neighborhood Example - Target Ratio 1.0
- Sales Neighborhood Example - Target Ratio 1.5
- Call Center Neighborhood Example - Target Ratio 3.0
- From the Contact drop-down, search for and select the primary contact.
- If the primary contact can't be found, then enter their name in the Notes field.
- From the Color picker, select either a preset color or you can enter the HEX, RGB, or HSL codes.
- After the color is chosen, click the Save button.
- When you have finished updating the neighborhood, click the Save button.
Allocate tab
This lets you allocate the neighborhood to the Organization Units.
Expand to see the Allocate tab

- Click the Add allocation button.
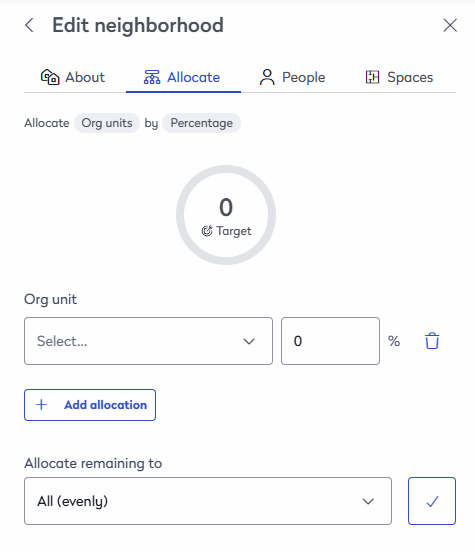
- From the Org unit drop-down, select the organization unit.
- In the percentage field, enter the percentage this is allocated to this organizational unit.
- If you want to add another organization unit, then complete steps 2 - 3.
- Additionally, you can:
- If you want, you can select the remaining allocation to a selected organization unit.
- Or you can keep the All (evenly) selected and then click the Tick icon and in the example below you can see the allocation percentage is evenly entered as 25%.

- When you have finished updating the neighborhood, click the Save button.
People tab
When you are on the People tab, this is where you can add the people or a user group to the neighborhood.
Expand to see the People tab

- In the Search field, search for the person's name or the user group and then select them.

- When you have finished updating the neighborhood, click the Save button.
Spaces tab
When you are on the Spaces tab, this will display the spaces allocated to the neighborhood.
Newly added neighborhood
- If this neighborhood is newly added, then this will display blank; see below to learn how to add spaces.
Existing neighborhood
- If needed, you can add or remove spaces in the neighborhood; see below to learn how.
Expand to see the Spaces tab

Add space to a neighborhood
- If you have made any updates to the neighborhood in the previous tabs, make sure you click the Save button.
- On the floor plan, select the spaces you want to add to the neighborhood. The Edit Spaces form displays.

- From the Neighborhood drop-down, select the neighborhood.
- Click the Save button and the spaces are added to the neighborhood and the statistics are updated.

Remove spaces from a neighborhood
Using the Floor Plan
- On the floor plan, select the spaces you want to remove from the neighborhood. The Edit Spaces form displays.
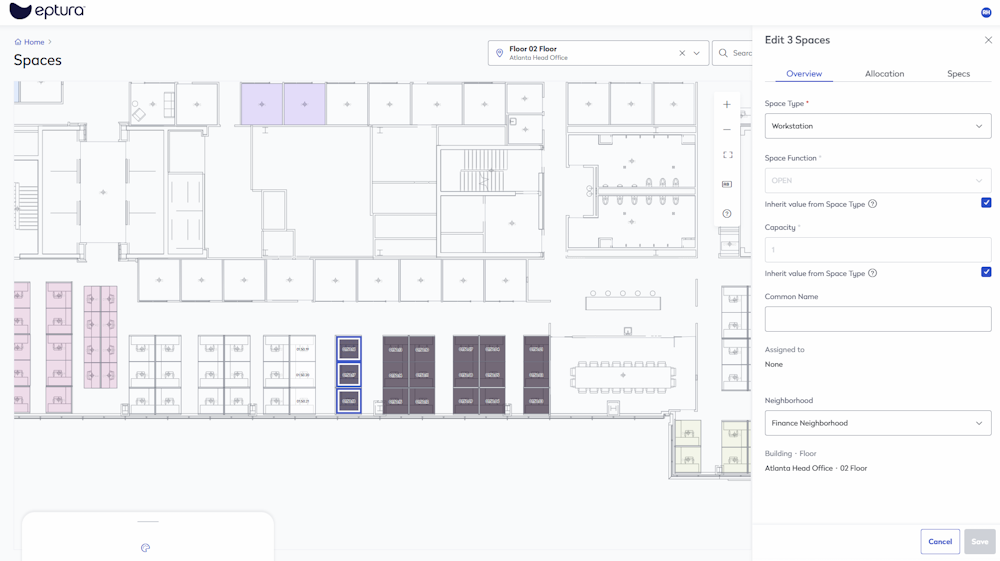
- From the Neighborhood drop-down, select the None.
- Click the Save button and the spaces are removed from the neighborhood and the statistics are updated.
Using the Neighborhood Edit Form
- Click the Edit neighborhood button and the Edit neighborhood panel displays.
- Click the Spaces tab.
- In the list, hover over the space and it will highlight on the floor plan.

- Click the Remove icon and the space is removed and the Undo icon displays.

- Repeat the above step to remove additional spaces.
- When you are finished, click the Save button and the neighborhood statistics are updated.