Understand Request to Work Order Workflow
When your organization has Eptura Workplace and Eptura Asset connected, then your employees can submit their maintenance requests into Eptura Workplace and then seamlessly the tickets will be synchronized into Eptura Asset. Then your technicians can action the tickets and get your facilities or equipment fixed, plugged, running, etc.

This process consists of the following:
- Eptura Workplace - Submit a Service Request
- Eptura Asset - New Work Order
- Eptura Asset- Complete the task
- Eptura Asset - Change Work Order status to completed
- Eptura Workplace - Find the Archived Service Request
The following contains the details of each part of the process.
1. Eptura Workplace - Submit a Service Request
- Navigate to Service Request > Submit Request. The Service Request screen displays.
- Select whether the request is for (A) me, another person, or a specific asset.
- If you create a ticket for yourself, your (B) location is selected by default. If a location is not defined automatically or differs from the default selection, then enter the correct location.
- In the Request Type section, select a request type from either the Most Common, Recent, or View All tabs. Also, some request types contain (C) sub-categories that you can select from.

When you select the request type, then you can complete the details.
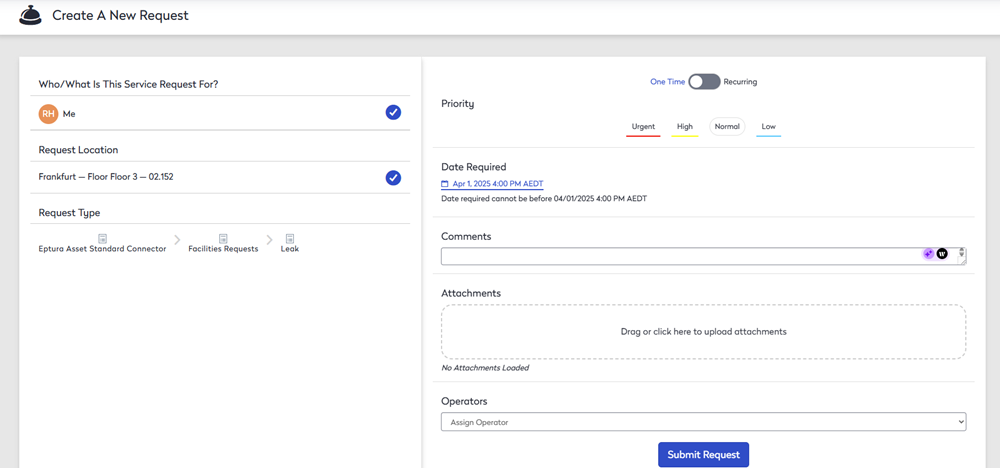
- Click the Priority level, either Urgent, High, Normal, or Low.
- Click the Date Required picker and then select the date and time.
- In the Comments field, enter any comments.
- If you need an upload an attachment, then either drag and drop an attachment to the field or click the attachment field and then select the file to upload.
- Click the Submit Request button.
A message displays the service request ticket number and you will receive an email notification.
Behind the scenes, a new work order is created in Eptura Asset and the work order number is added to the service request. When you open the Service Request, you will see the Work Order number has been added to the comments.

2. Eptura Asset - New Work Order
- Navigate to Work Orders and the Work Order Management screen displays.
- From the list, click the work order to open it.

- From the Assigned drop-down, select a technician.
- If needed, from the Asset field, search and select an asset.
- If needed, in the Customer field, search and select a customer.
- Click the Save button to save any updates.
3. Eptura Asset- Complete the task
As the technician completes the task(s), they can update the Work Order with the Service Tasks, Labor, Parts, Notes, Attachments, and Other Costs. Also, if needed, they can take the asset down while they work on it. Learn more in Edit a Work Order.
Behind the scenes, any updates made to the work order will be sent to Eptura Workplace's service request.
4. Eptura Asset - Change Work Order status to completed
When the technician has completed the tasks, then they can change the work order status to completed and this status is sent to Eptura Workplace and the service request status is updated.
Behind the scenes, the status to Completed is sent to Eptura Workplace's service request.
5. Eptura Workplace - Find the Archived Service Request
When Eptura Workplace receives the Complete status, then this is updated in the Service Request and then the request is archived. You will find the archived requests in the Search History.
- Navigate to Service Request > Search History.
- From the Center drop-down, select the Service Request Center, that you want to search in.

- In the Request Number field, enter the number.
- Click the Submit button and the results display.

- For the request you want to see, click the View button.

Learn about the Employee Request to Work Order Integration.