Manage Calendar Accounts V3
Level: Administrator
In your company there will be spaces that are for meeting rooms, conference rooms, etc that can be booked via a Calendar Integration, such as Microsoft Outlook/Exchange. Administrators can manage the room's resource calendar. This lets the Administrator add or remove a resource calendar and if needed, re-authenticate.
In the example, below, the Microsoft 365 account contains the resource calendars for the meeting rooms called Orchard, Sentosa, and Marina Bay.

This article covers:
Access the Calendar Integrations
- From menu, click Admin > Calendar Integrations. The Calendar Integrations screen displays.

This screen consists of the following:
- (A) - Add Calendar Account - This lets you add a service account for Office365 or Google Calendar.
- (B) - Email Account - This lists the service account's email address for your calendar integration.
- (C) - More Actions icon - This contains the following menu items:
- Manage Calendars - This lets you manage the resource calendar's email addresses.
- Re-Authenticate - This lets you re-authenticate the service account.
- Remove Account - This lets you remove the service account.
Add a Calendar Account

- Click the Add Calendar Account button and the Tenant ID dialog displays.
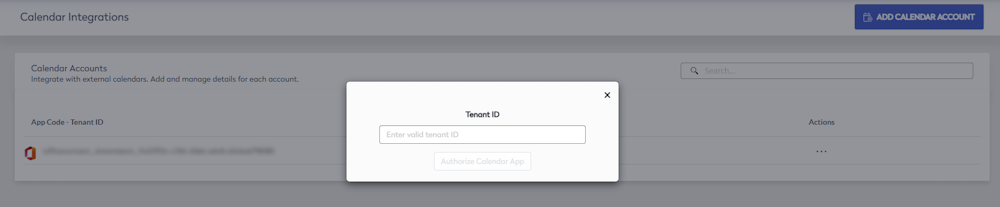
- In Tenant ID field, enter the customer’s O365 tenant ID.
- Click Authorize V3 Calendar Service button and after a brief pause, you will be redirected to a Microsoft hosted URL that will begin the approval process.
- Log in using your Exchange calendar service account username and password.
- You will be prompted to log in with the Exchange Admin account.
- Click the Accept button to accept the requested permissions.
At the time of writing the “Eptura Workplace Calendar Service” is being verified by Microsoft.
You will then be returned to the Calendar Integrations screen and you will see that the authorization of the Workplace Calendar Service has been successfully completed with an ‘Account Verified' indicator.
Manage Email Addresses for Rooms
The Manage Calendars screen is where you can add or remove calendar resources, map to a space or unlink from a space, and if you have a calendar resource that you no longer use, then it can be removed.
- For the Tenant ID you want to manage, click the More Actions
 icon.
icon. - Click Manage Calendars.

The Manage Calendars screen displays.

This screen consists of the following:
- (A) - Add Calendar Individually
- (B) - Add Calendars in Bulk
- (C) - Connect Calendars - Click to connect calendars to your service account.
- (D) - Sync Events - Click to sync existing reservations to newly-created events in the service.
- (E) - Migration Tools - This contains the following menu items:
- Fetch Existing Calendars - Map and authorize existing calendars to your service account.
- Link Spaces - Link known email addresses to existing spaces.
- (F) - More Actions icon - This contains the following menu items:
- Unlink from space
- Remove calendar
- (G) Link to space
Add a Calendar Individually
- In the email address field, enter the calendar resource's email address.
- Click the Add button and the calendar is added.
- Click Connect Calendars and then wait until the connection initiates on its own within 15 minutes.
- You will need to refresh the browser to view the new calendar in the screen.
Add Calendars in Bulk
If you have many calendars to add, then this can be done in bulk.
- In the Options for Adding Room panel, click the .CSV template to download the spreadsheet.
- Open the csvTemplate.csv file.
- Complete the following columns:
- email column - Enter the calendar resource's email address.
- roomID column - Enter the space number.

- Save the file.
- Click the Upload CSV button.
- Select the file and open it to upload it.
- Click Connect Calendars and then wait until the connection starts on its own within 15 minutes.
- You will need to refresh the browser to view the new calendar in the screen.
Map Calendar to a Space
You can link a calendar to a space.
- For the calendar you want to link, click Link to space.

The search displays.

- In the Space Search field, enter the space number or you can click the Browse button and then browse to the space.

- Select the space number and the space is linked.
Unlink Calendar from Space
- For the calendar, you want to unlink, click the More Actions
 icon.
icon. - Select Unlink from space and the calendar is removed from the space.
Remove Calendar
You can review the list and if there is calendar resources that you no longer want to use, then these can be removed.
- For the calendar, you want to unlink, click the More Actions icon.
- Select Remove Calendar and the calendar is removed.