Add or Edit Item Categories
Level: Site Administrator
Item categories used to group the item orders in your Copy Job request. A standard list is provided by default, such as Paper Size, Print Type, Binding, or Covers. If you require you can add more item categories.
Access Item Categories
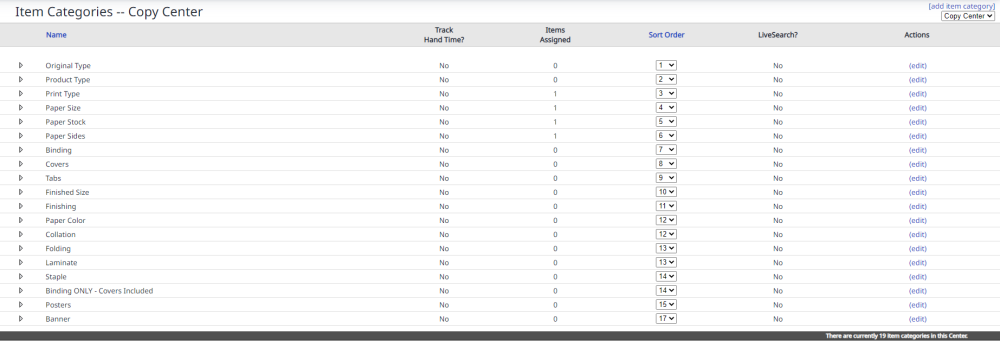
- Navigate to Admin > Copy > Item Categories. The Item Categories screen displays.
- From the top-right corner, select the relevant center.

The following columns display:
- Name - The name of the item category.
- Track Hand Time? - Indicates if you are tracking the hand time.
- Items Assigned - Indicates if you can assign items to an item category.
- Sort Order - You can update the sort order that your item categories are displayed.
- LiveSearch? - Indicates if item category uses the LiveSearch.
- Actions - This field allows you to edit a specific order item.
Add Item Category
You can add an item category. Complete the following:
-
Click the add item category link.

The Add Item Category screen displays.

- In the Name field, enter the name name of your item category.
- From the Track Hand Time drop-down, select Yes or No.
- From the LiveSearch? drop-down, select Yes or No.
- From the Tied to Sets drop-down, select Yes or No. This indicates if the item category will be tied to sets.
- From the Is Form drop-down, select Yes or No. This indicates if the item category is a form or not.
- Click the Add button.
Edit an Item Category
You can edit an Item Category, complete the following:
- For the item category you want to edit, click the edit link. The Edit Item Category screen displays.
- Complete your edits.
- Click the Update button. Your item category is updated.
