ServiceNow Integration
Level: Eptura Implementation team / Client IT team
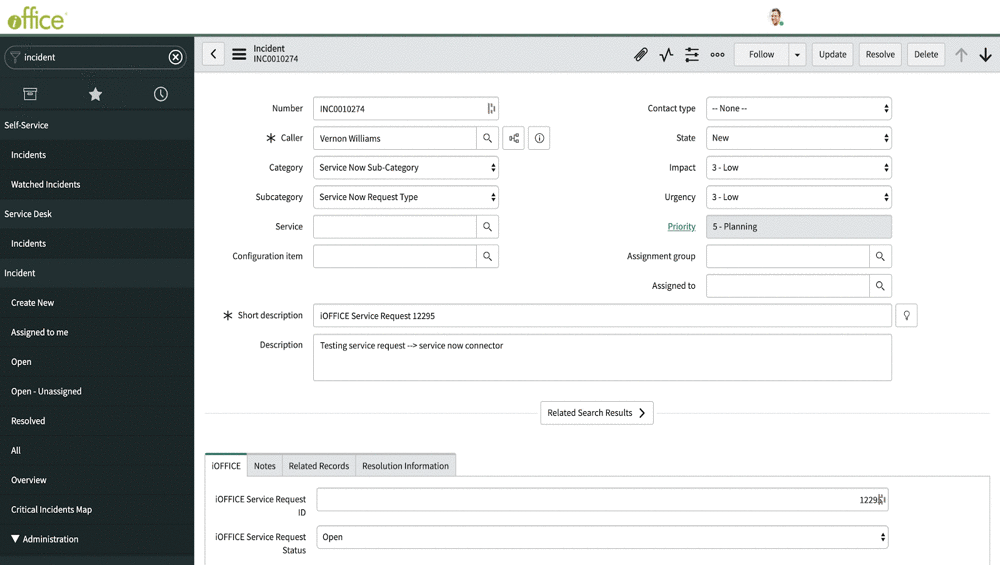
Eptura Workplace's ServiceNow Integration uses the iOffice name in the UI and code.
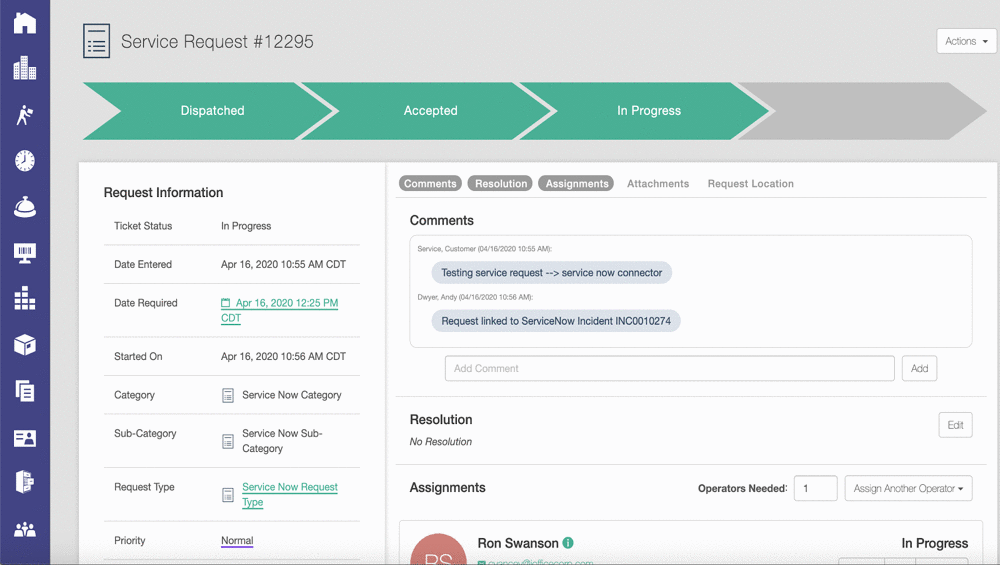
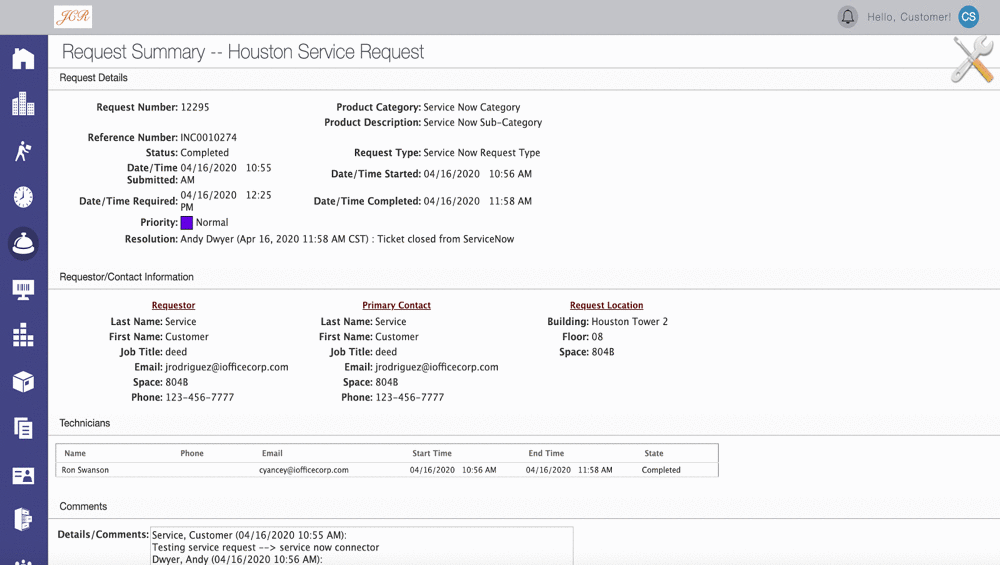
iOfficenow has the ability to pass data between iOfficeand ServiceNow using a connector. The connector allows for iOfficeand ServiceNow to communicate with one another creating an easy workflow process. This makes working in both systems an easy and efficient process. Below is what the process looks like:
- Service Requests created in iOfficeare created in ServiceNow through the connector.
- When the ticket is closed in ServiceNow, the ticket will be completed in iOFFICE.
- Updates take approximately 1 minute to travel from one system to the other.
Contents
- Data Mapping
- Prerequisites
- ServiceNow Configuration - Customer to Configure
- iOfficeConfiguration - iOfficeto Configure
- Test the ServiceNOW Setup
- Frequently Asked Questions
Data Mapping
|
iOffice(Service Request) |
ServiceNow (Incident) |
|---|---|
|
Requester (First and Last Name) - User who created the Service Request Ticket |
Caller - Mandatory. Person who created the incident, equivalent to the iOfficeRequestor. |
|
SubCategory (Name) |
Category |
|
Request Type (Name) - third layer in a request catalog hierarchy (Category -> Subcategory -> Request Type) |
Subcategory - equivalent to the iOffice Request Type. Second layer in a two part hierarchy of (Category -> Subcategory) |
|
Nothing displayed on iOffice side |
Short Description - Mandatory. A short description of the incident created. (Text: “iOffice Service Request <ticket id>” ) |
|
First comment upon creation of ticket |
Description |
|
Reference Number - a field to hold the ServiceNow incident #. It is recommended to disable allowing requester from updating this field (preference to turn off) |
Number - Numerical value unique to ServiceNow, equivalent to an iOffice Request ID. |
|
Request Id - Numerical value unique within iOFFICE, which can be used to find a specific service request ticket |
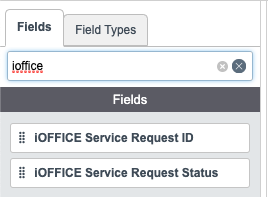
iOffice Service Request ID (field displayed in custom iOffice tab) |
|
Nothing displayed on iOffice side (ServiceNow ticket status sets to “open” when an iOffice a ticket is first created. iOffice ticket is "completed" and "archived" and “completed” when a ticket is closed in ServiceNow.) |
iOffice Service Request Status (field displayed in custom iOffice tab- the values are either open or closed and are set upon ticket creation/archiving) |
|
|
|
State - The state moves and tracks incidents through several stages of resolution. Default states are New, In Progress, On Hold, Resolved, Closed, Canceled. Currently, we do not manipulate theirs states with ours, except for New (create event) and Closed (archive event) |
Prerequisites
-
ServiceNow account and a client’s System Admin or anyone with access to it.
-
ServiceNow admin user credentials (to create tickets).
-
System admin iOffice user credentials (to update/complete tickets).
-
ServiceNow Category/Subcategory that map to iOffice SubCategory/RequestType by name.
-
A ServiceNow user who acts as the default caller for linked ServiceNow incidents if iOffice requester does not exist in ServiceNow.
-
Default iOffice user who acts as the default operator for linked iOffice tickets if one is not assigned at time of creation.
-
A list of iOffice Service Request Type IDs enabled for the ServiceNow connector.
-
Reference Number field in iOffice should be hidden to avoid breaking ServiceNow iOffice links. To hide the reference number field, go to Admin > Service Request > Preferences. Uncheck “Enable Reference Number”.
ServiceNow Configuration - Customer to Configure
This work is performed by the customer.
The steps below will walk you through how to add custom fields in ServiceNow with column names u_ioffice_maintenance_request_id and u_ioffice_maintenance_request_status (open, closed). These will be used for the data that is sent to ServiceNow from iOffice upon ticket creation. These should be accessible for all ServiceNow incidents in the default view tied to iOffice requests.
- Login to ServiceNow
- Navigate to the Dictionary by typing Dictionary in the search bar.
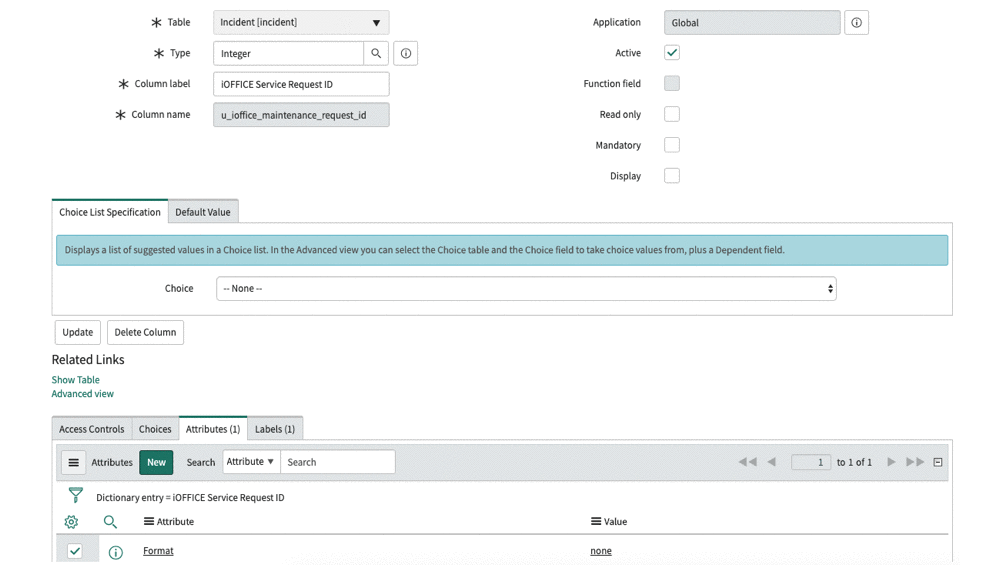
- Create new field entry u_ioffice_maintenance_request_id.

- Create new field entry u_ioffice_maintenance_request_status.
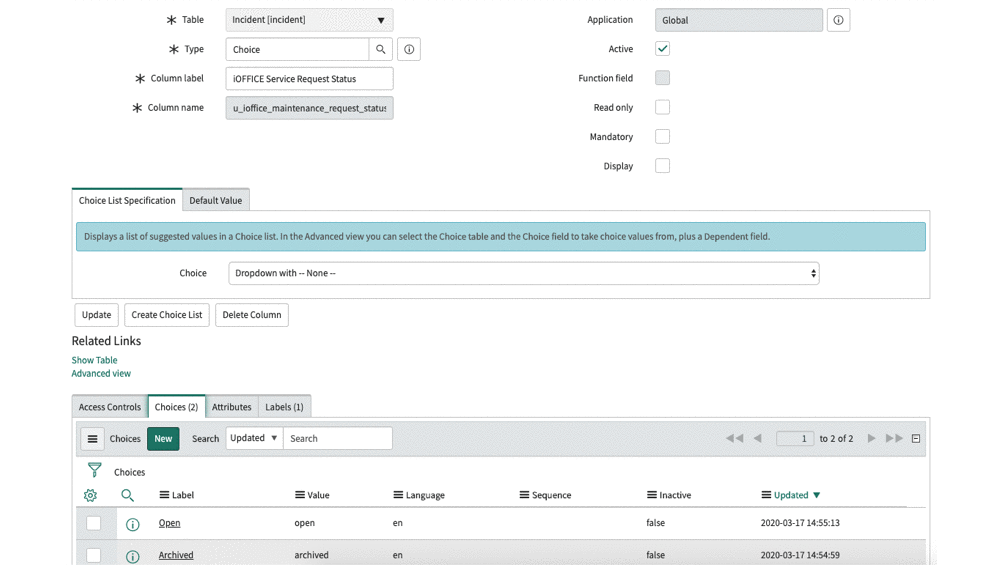
Table of required fields and values to enter as reference.
|
* Column Name |
* Table |
* Type |
* Column Label |
Attributes |
|---|---|---|---|---|
|
u_ioffice_maintenance_request_id |
Incident |
Integer |
Anything the customer would like to enter, as long as its clear its service request id |
Format none |
|
u_ioffice_maintenance_request_status |
Incident |
Choice |
Anything the customer would like to enter, as long as its clear its a service request status |
Format none |
- Enable new field entries for all incidents in the default view.
- Open any incident via the search bar and filter by default view.
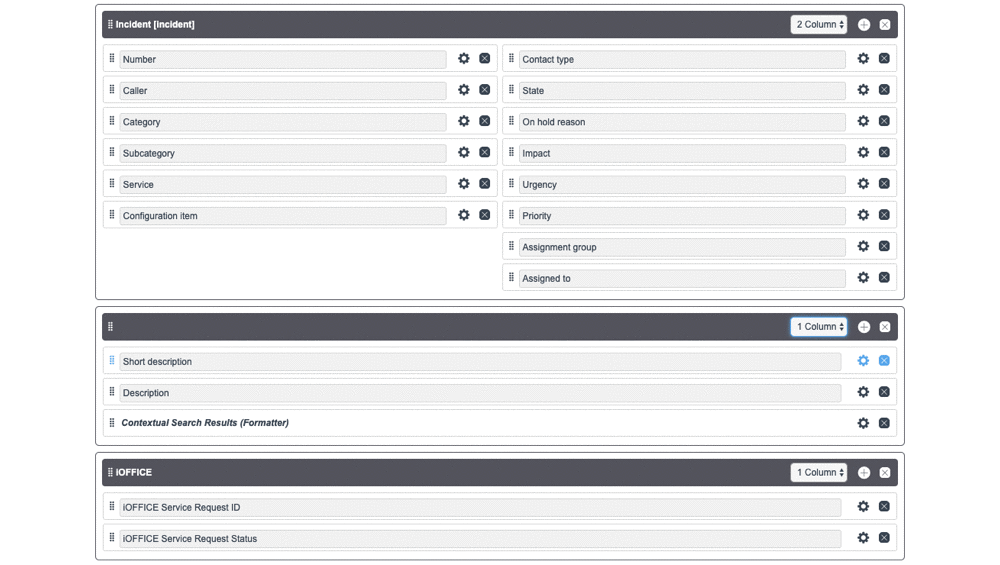
- In incident view, click the triple bar icon on the top left Configure > Form Design.
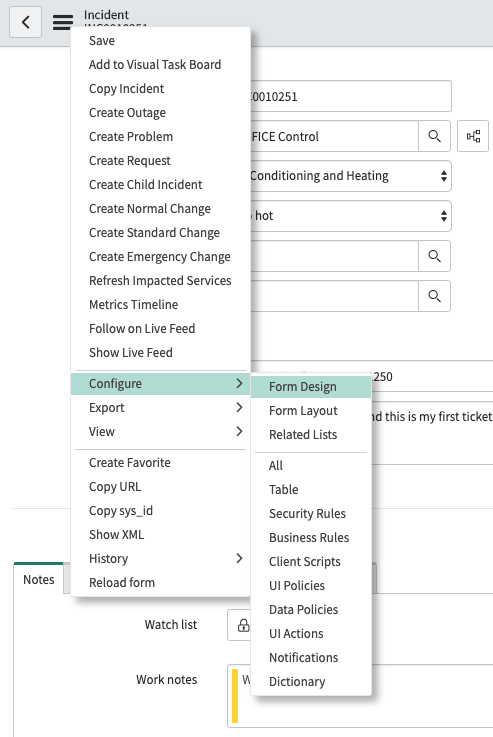
- Find the two iOffice fields by searching custom label names.
- Add the fields anywhere in the ServiceNow Incident. In the example below, a new selection has been added.
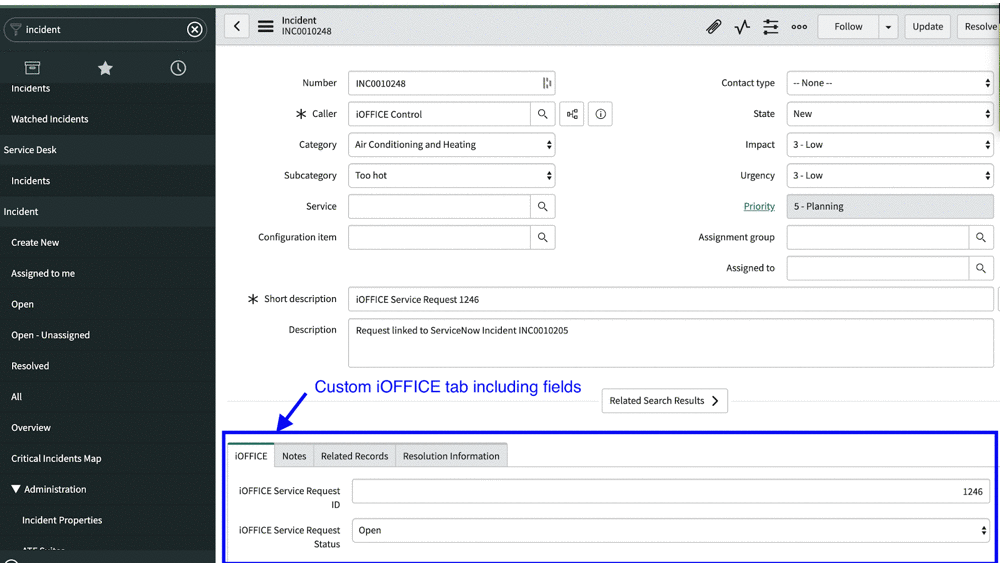
10. Check the incident to verify the fields display as you expect.
iOffice Configuration - iOffice to Configure
After the customer has completed the ServiceNow configuration, the iOffice Implementation team will complete these steps to configure and test the connector.
Enable iOffice Service Request to ServiceNow connector
- As an iOffice site admin sign into the instance (need access to internal screenshot default iOffice tools).
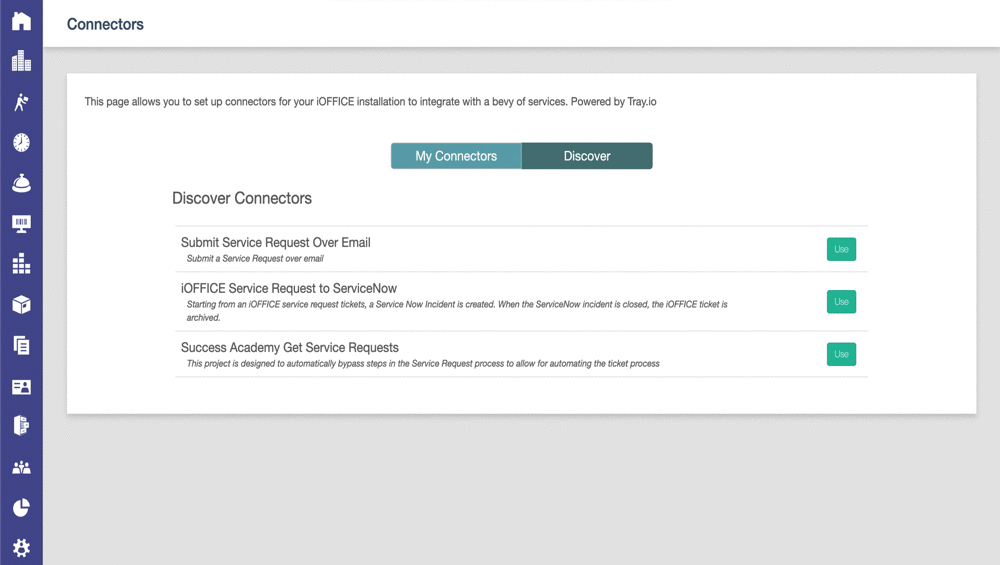
- Navigate to iOffice Tools > Connectors > Discover.
- For the iOffice Service Request to ServiceNow, click the Use button.
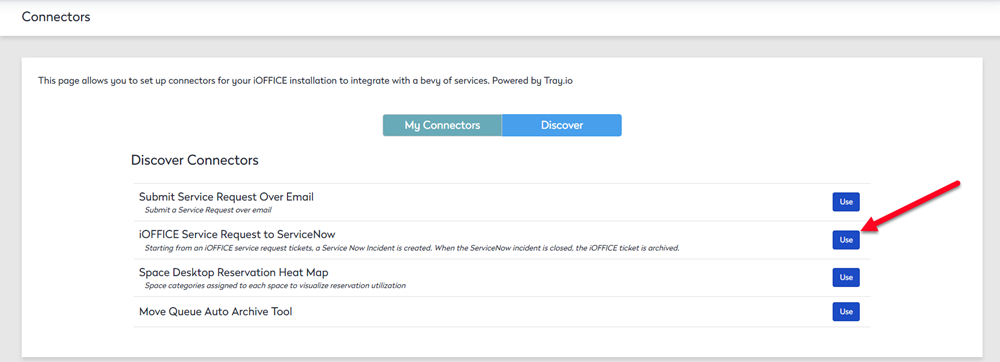
The ServiceNow Setup wizard displays. Each screen represents a step guiding you to complete the configuration. You can click the Previous button if you need to go back and fix any step.
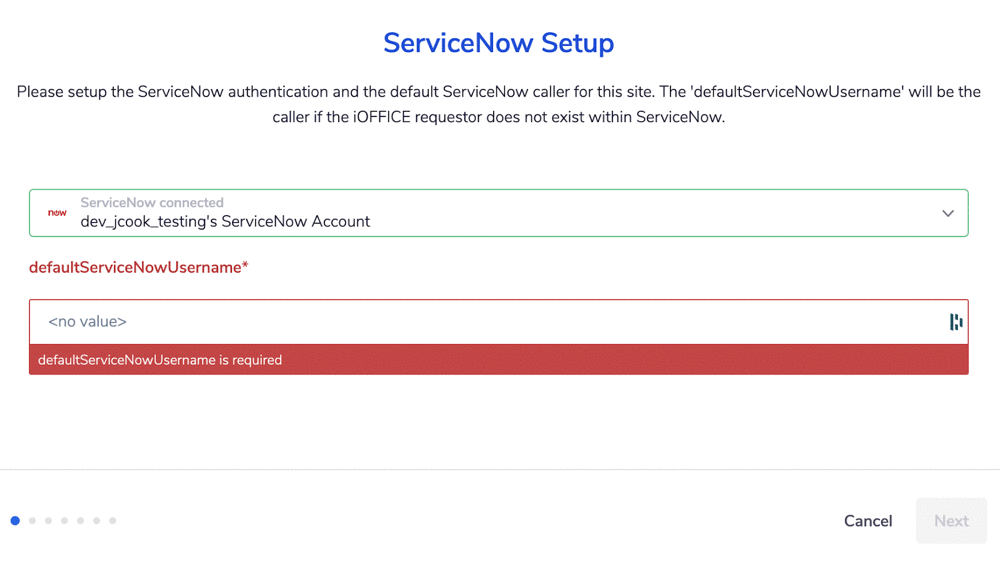
4. In the defaultServiceNowUsername field, enter the api user/password & default caller.5.
5. Click the Next button. The iOffice Setup displays.
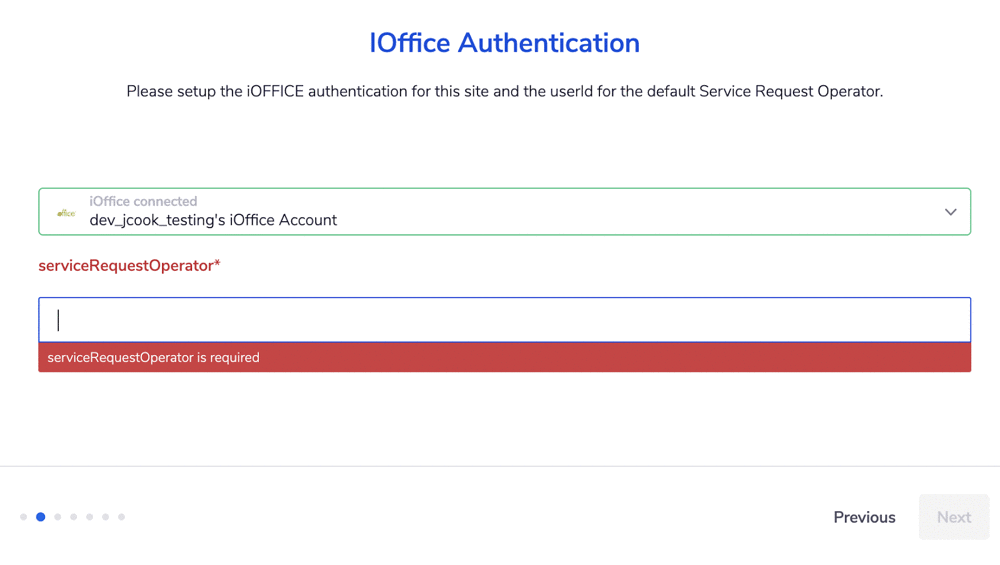
6. In the servcieRequestOperator field, enter the API user/password and default request operator.
7. Click the Next button. The Service Request Types displays.

8. In the requestTypeIDList field, enter comma-delimited list of iOffice Service Request Types.
Create a report in Insights to get a list of the Service Request IDs.
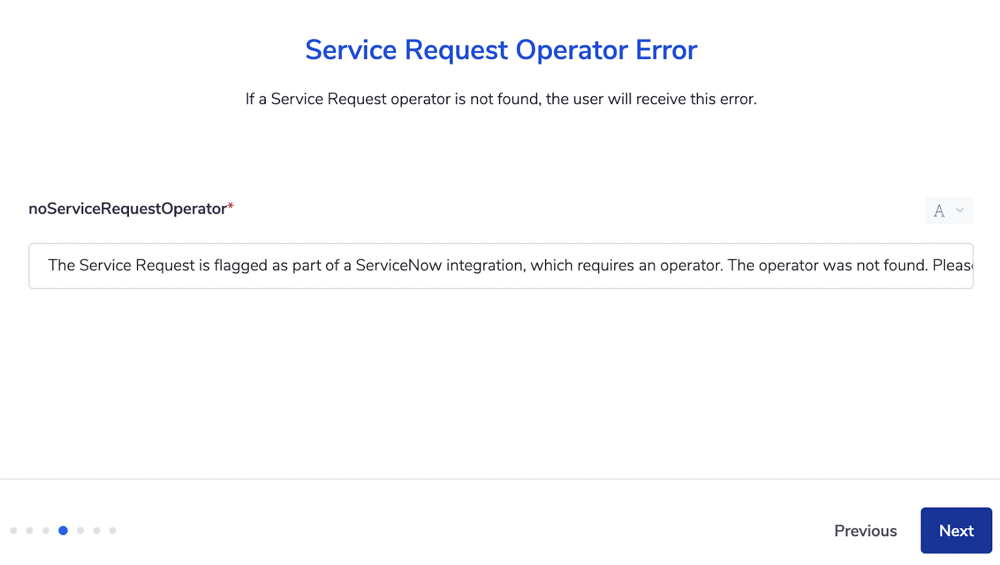
9. Click the Next button or update the default error message that will be displayed an iOffice service request ticket’s comments indicating an operator was missing.
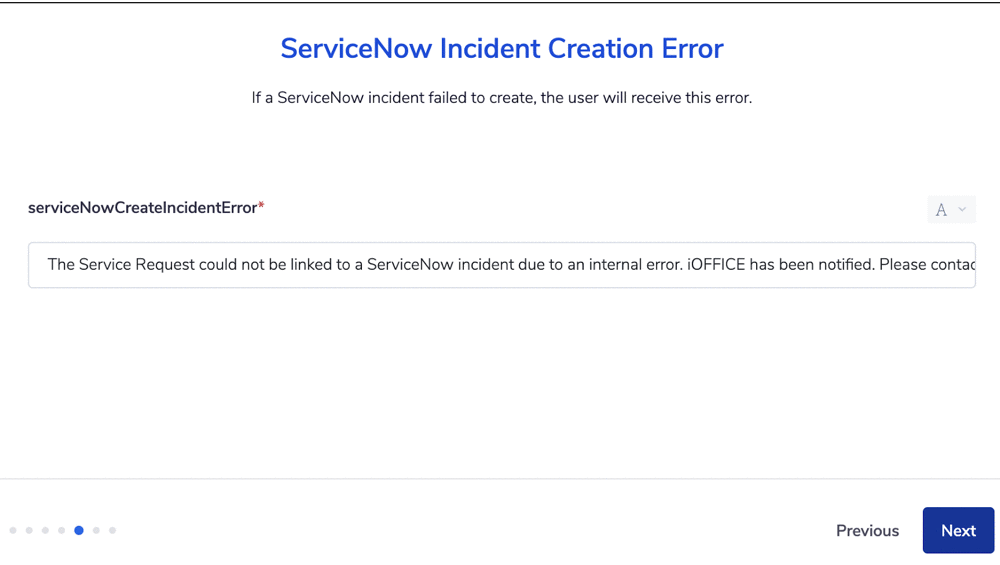
9. Click the Next button or update the default error message that will be displayed in an iOffice Service Request ticket’s comments indicating an unanticipated problem occurred while attempting to create a ServiceNow incident.
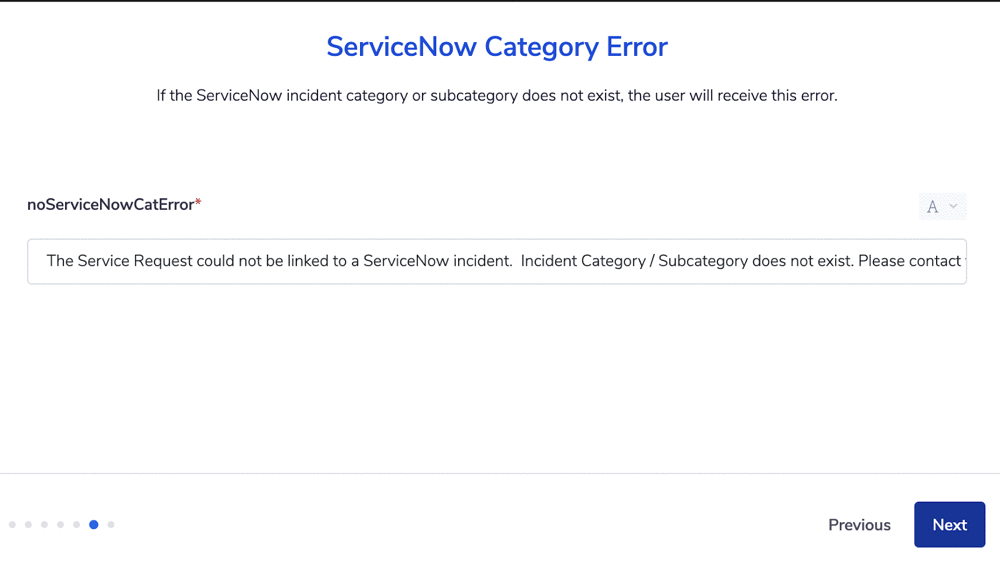
10. Click the Next button or update the default error message that will be displayed in an iOffice service request ticket’s comments indicating a ServiceNow Category or SubCategory could not be found based on the ticket’s SubCategory/RequestType.
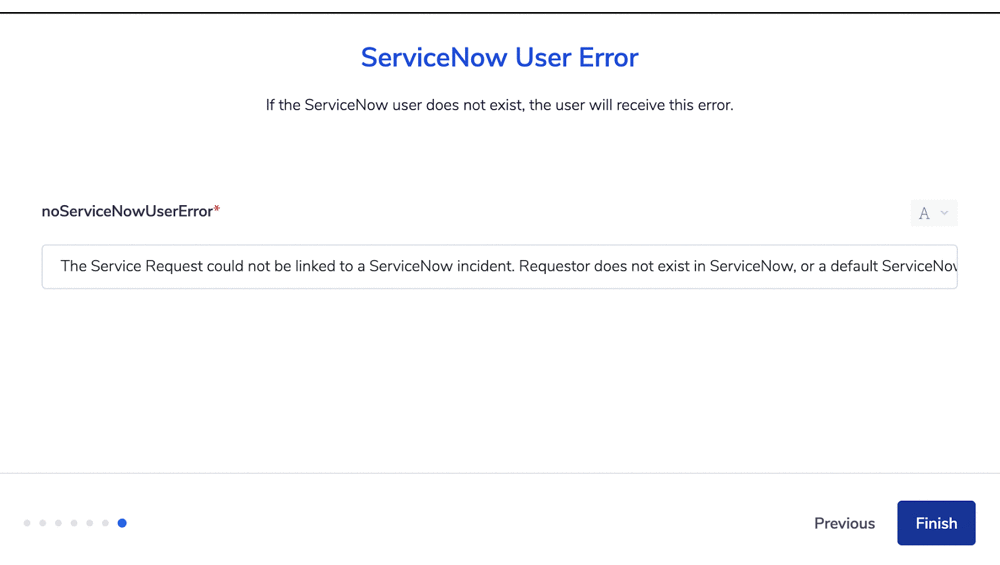
11. Click the Next button or update the default error message that will be displayed in an iOffice service request ticket’s comments indicating the requestor or default caller could not be found in ServiceNow while attempting to create a ServiceNow incident.
12. Click the Finish button to save changes, you should see a green window indicating the connector was enabled.
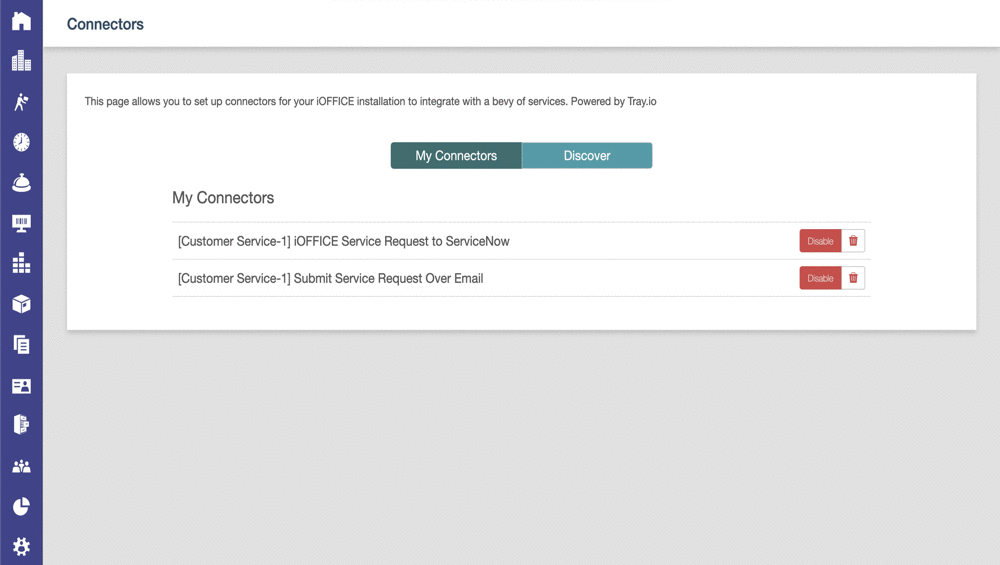
13. Verify Connector is enabled by clicking on My Connectors tab.
Test the ServiceNOW Setup
1. Create an iOffice Service Request Ticket for any request type.

-
Wait 1 minute. Then, verify ServiceNow incident is created with relevant iOffice data (Caller, Category, Subcategory, Short Description, Description, iOffice tab).
-
Verify iOffice Service Request ticket’s comments indicate ServiceNow is linked, In Progress, and the default operator was assigned if none was assigned originally.
-
In ServiceNow, resolve and close the incident
-
Wait 1 minute. Then, verify the iOffice Service Request ticket is completed and archived.
Frequently Asked Questions
Q. Are tickets in both systems kept in sync bi-directionally?
No, tickets in both systems are not kept in sync bi-directionally. The sync only occurs with two actions:
-
Create iOffice ticket ⇒ Create ServiceNow ticket.
-
Close ServiceNow ticket ⇒ Is Completed and Archived iOffice ticket.
Q. Are updates instantaneous?
No, 1-minute polling occurs. It could take up to 1-minute for the connector to recognize the action and trigger the sync.
Q. What data can be shared between the systems?
This is defined here. If additional data must be shared, this would be a custom integration and will be an additional fee.
Q. Where can I access more information on ServiceNow incidents?
ServiceNow product documentation can be accessed here.
Q. Where can I access more information on iOffice Service Requests?
iOffice Service Request product documentation can be accessed here.
Q. Why do my tickets submitted from iOffice to ServiceNow not provide any location data.
This can be resolved by sending over the raw location data for Building Name, Floor Name, and Space Name in the description raw text along with the previously sent first comment that is provided in the description.
Example of Raw Input
Building: HQ
Floor: 01
Space: 01-205
Comment: This is the first comment on a service request
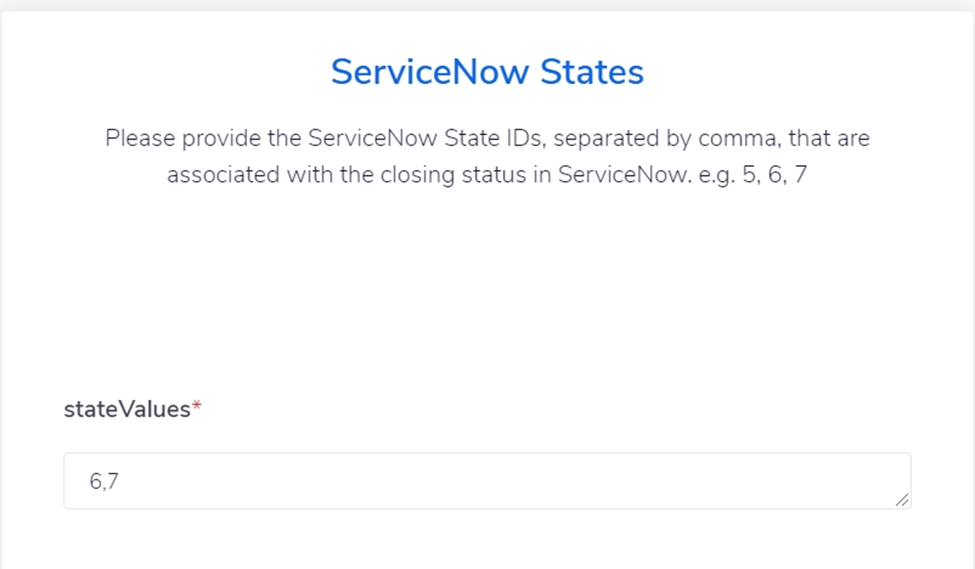
Q. Is there a way to have more than one option to notify iOffice for an archived ticket event?
We have added a new configuration to the setup of the integration so that the client can provide a list of state values they would like to trigger and archive the event and close the incident.
Note that the new configuration will require any new integrations to add a list of state values. Any previous integrations that have been configured have been updated and set to only include a state of "7". The list of any state values should be used for an archive event, and at least one state is required.
Example of raw input:
6,7