Reserve a Desk
You can quickly find and reserve a desk from either the Floor Plan View or Calendar View.
Watch the Video
Audio: Sound Video Length: 2:33 minutes
Watch the video in ...
French (FR)
Spanish (ES)
Disclaimer: These videos are translated from English using an AI tool; you might notice the speech is slightly out of sync with the recording.
Find and Reserve a Desk from the Floor Plan View
Let's find and reserve a desk from the floor plan view.
- Navigate to Reservations > Space Availability and the Space Availability screen displays.
- If you see the calendar view, then click Calendar View and change this to the Floor Plan View.

- To change the date and time, click the Calendar picker.
- From the Duration drop-down, select either:
- Part-Day Event - When this is selected, you can select the Start Time and the End Time.
- All-Day Event - When this is selected, the Start Time and End Time display as the Center's hours of operation.
- Multi-Day Event - When this is selected, you can select the Start and End dates for the event.
- Click the Select Date & Time button.

- On the floor plan, hover over the meeting space and then click the Reserve Space button.

The Reservation Details screen displays.
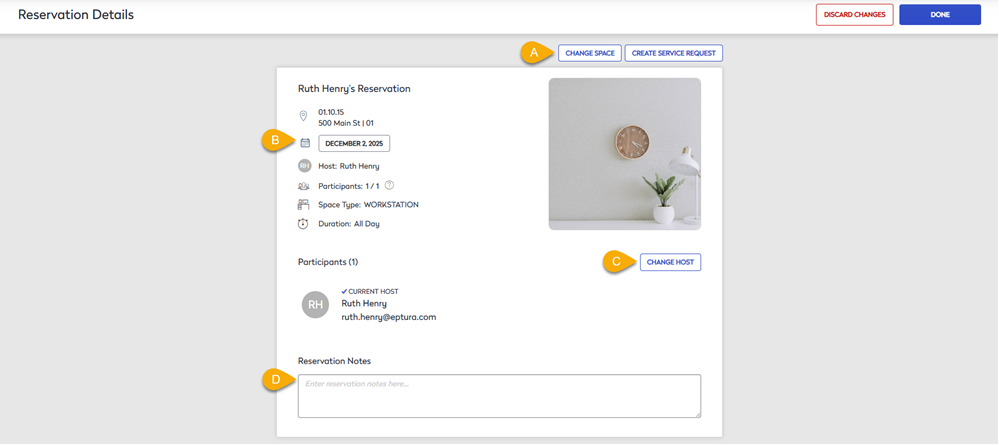
- This gives you the choice to:
- (A) You an change the space.
- (B) You can change the date and time of the reservation.
- (C) If you see on the screen the Change Host button, then this lets you create a reservation for someone else. This will only display if you have the Operator, Administrator, or Site Administrator role.
- (D) Enter reservations notes.
- When you are ready, click the Done button and the meeting space is reserved.
After a reservation is created, you can view your reservation from the My Reservations.
Find and Reserve a Desk from the Calendar View
Let's change the view and reserve a desk from the calendar view.
- Navigate to Reservations > Space Availability and the Space Availability screen displays.
- If you see the floor plan view, then click Floor Plan View and change this to the Calendar View and the view displays.
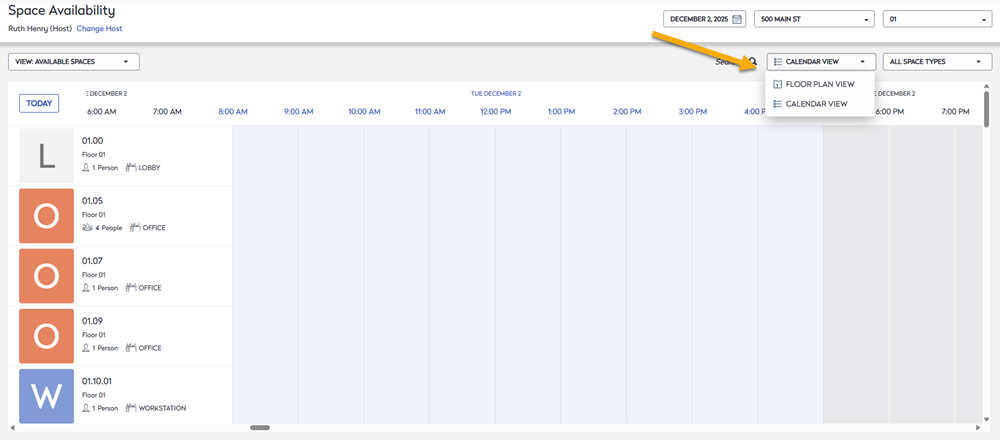
- Click the Calendar picker and the Calendar displays.
- From the Duration drop-down, select either:
- Part-Day Event - When this is selected, you can select the Start Time and the End Time.
- All-Day Event - When this is selected, the Start Time and End Time display as the Center's hours of operation.
- Multi-Day Event - When this is selected, then you can select the Start Date and End Date for the event.
- Click the Select Date & Time button.

- If you know the desk (workstation) number, you browse the listing and additionally you can change the Space Type to narrow the listing.
- From the listing, click the desk you want to reserve.

The Reservation Details screen displays.
- This gives you the choice to:
- (A) You an change the space.
- (B) You can change the date and time of the reservation.
- (C) If you see on the screen the Change Host button, then this lets you create a reservation for someone else. This will only display if you have the Operator, Administrator, or Site Administrator role.
- (D) Enter reservations notes.
- When you are ready, click the Done button and the meeting space is reserved.
After a reservation is created, you can view your reservation from the My Reservations.