Set up the Visitor App (iPad)
Learn how to access the Settings menu on the iPad device, how to set up the Guided Access, and our recommendations on how to improve the iPad Performance.
Contents
- Visitor App Settings
- General Tab
- Background Tab
- Label Printer Tab
- Disable Fields Tab
- Guided Access Mode on your iPad - Learn how to lock your iPad device to the Visitor App
- iPad Performance Tips
Visitor App Settings
- Open the Visitor app and tap the badge 5 times.

- The menu displays, tap Settings.

The Settings screen displays and the following tabs are available:
- General
- Background
- Label Printer
- Disable Fields
General Tab
This tab displays the Device Name, the Center Name, and you can tap the Check for Updates button to make sure the device has the latest version of the app.
If you tap the Information  icon, this will display the App Version number.

Background Tab
The settings for the background are now found in Eptura Workplace.
Label Printer Tab
When you want to set up a label printer, see Set up your Badge Printer.
Disable Fields Tab
The settings for the background are now found in Eptura Workplace.
Guided Access Mode on your iPad
Using the Guided Access mode on the iPad, you can secure the iPad using a passcode and prevent users from accessing different apps. This mode increases security by preventing unauthorized access to your network through the device. Additionally, if the Visitor app experiences an issue and crashes while this mode is activated, the app will reboot itself automatically.
If you need additional information on Guided Access mode, see Lock iPad to one app with Guided Access | Apple Support
Enable Guided Access Mode
Before you activate Guided Access mode, you must open the Visitor app and walk through the Check-In process. This will allow you to grant access to the necessary permissions, such as access rights to the camera, before locking down the device.
Use the following procedure to activate Guided Access mode on your iPad.
- On your iPad, tap the Settings button. The settings menu displays.
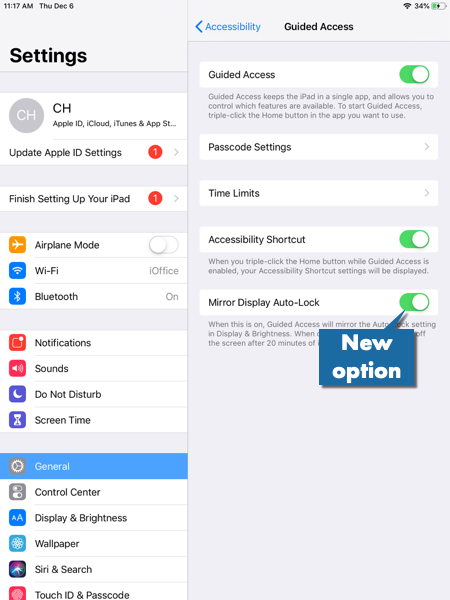
- In the Settings menu, tap the Accessibility and then Guided Access.
- Tap the Guided Access toggle to ON.

- Tap the Display Auto-Lock and change it to Never. This sets how long it takes your iPad to automatically lock during a Guided Access session.
Tap the Mirror Display Auto-Lock toggle to ON and this setting is required to prevent the display from automatically locking after 20 minutes for devices running iOS 12 or later.
- Tap the Passcode Settings and then define a passcode for the Guided Access Mode. This passcode is used to unlock the Guided Access option, and the Administrator responsible for the iPad device must keep a record of the passcode.
Activate or Deactivate Guided Access Mode
After the settings have been defined to allow for Guided Access mode, the Administrator can activate and deactivate this mode using the passcode.
Activate Guided Access Mode
- Open the Visitor app and sign in to your site.
- After the Home screen is displayed, tap the Home button (or this is the Start button, which is the physical button on the iPad) three times.
- The Guided Access screen displays and you can tap Start.
Now the Visitor app is locked and users can't access the other apps.

Deactivate Guided Access Mode
If you need to turn off the Guided Access mode to access additional features on the iPad.
- Tap the Home button (or this is the Start button, which is the physical button on the iPad) three times.
- You are prompted to enter the passcode and this will unlock the screen.

- Tap End to deactivate the Guided Access mode.

iPad Performance Tips
For optimal performance, we recommend that you configure your iPad device with the following additional settings.
| Setting | Description |
|---|---|
|
Display & Brightness |
This setting will prevent the display from turning off and locking your visitors out.
|
|
Wi-Fi |
When the iPad is set up on the intended Wi-Fi network, this option is not necessary and needs to be deactivated to conserve battery and resources.
|
|
iCloud, Messages, and FaceTime |
Make sure these apps and services are disabled as this will reduce the potential for unwanted notifications on the iPad, which can interrupt visitors during check-in. iCloud For iCloud we recommend you disable the access to the services for: iCloud Drive, Photos, Mail, Reminders, Safari, Backup, and Find My iPad.
Message Apss Any message apps and FaceTime app, we recommend that these are not signed into and these are disabled. |
|
iOS Version |
The Visitor app is optimized for the latest operating system version; devices must be checked periodically and the iOS must be running the latest version. |