Change Column and Header Labels for a Table
You can edit a column or header label and you are able to change the size and space between columns to more efficiently manage the appearance of your table.
Edit a Column or Header Label
-
On the Reports view panel, right-click the column or group header you want to rename.
-
Select Edit Label from the context menu. The Edit Label window opens.
-
In the text entry box, delete the existing name and enter the new name.
-
Click Submit.
If space is at a premium, you may remove labels from the view. When you delete a label, it still appears when you look at the view in the Reports Editor, but does not appear when you run the report.
Delete a Column or Header Label
-
On the Reports view, right-click the column or header label you want to remove.
-
Select the Delete Label from the context menu.
Reapply a Label
-
Right-click the column or header label you want to replace.
-
Select Add Label from the context menu. The Edit Label window opens.
-
Enter the label name, if needed.
-
Click Submit.
Resize a Column
In the Reports View panel, click to select the column you want to resize.
-
Select the columns you want to adjust and the selected column highlights,.
-
You are able to increase or decrease the size by dragging the column to the left or right.
-
When you are done modifying your columns, select the DONE button.
Change the Spacing Between Columns
In the Data Source Selection panel, in the Measures section, click Spacer.
-
Drag the spacer into the Columns box in the Layout Band between the names of the two columns you want to move apart.
A spacer column, labeled  , appears in the table.
-
Repeat this action to add space between each of the columns.
-
To remove a spacer, right-click the spacer column and select Remove from Table.
Use Spacers to create Table Margins
-
In the Data Source Selection panel, click to select Spacer.
-
Drag the spacer into the Columns box in the Layout Band.
-
Repeat as needed until the margins are as wide as necessary.
-
Repeat the steps above, adding the spacer to the right edge of the table.
Reorder Columns
You can move columns to the right or left to reorder data in your table.
-
In the Reports View panel, right-click the column you want to move.
-
Select Move Right or Move Left from the context menu.
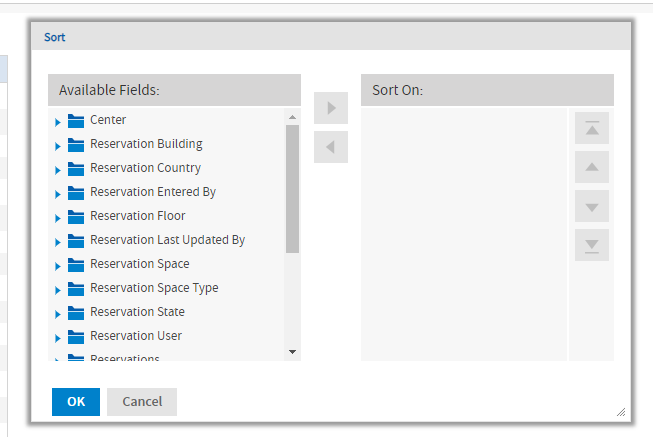
Sort Tables
-
Click the Set the sort order
icon. The Sort dialog displays and if the table is already sorted, the window shows the fields that are used.
-
From the Available Fields column, select one or more fields to sort by. You can also use CTRL-click to select multiple fields.
-
Click the Add
icon.
-
To arrange the sorting precedence of the fields, from the Sort On column select a field and then click either:
-
Move to top
-
Move up
-
Move down
-
Move to bottom
-
-
To remove a field, select it and click the Remove
icon.
-
Click the OK button. The table updates to display the rows sorted by the selected fields.
You can also sort a table using the following methods:
-
Right-click a field in the Fields section of the Data Source Selection panel, and select Use for Sorting from the context menu. In this case, the table is sorted by a field that is not in the table; you may want to note the sorting fields in the title.
-
Right-click a column header on the Canvas of the Reports View panel, and select Use for Sorting from the context menu.
If a column is already being sorted and you want to stop using it or change the sorting, right-click the column and select Change Sorting from the context menu.
Add a Title
-
Above the table, click the text Click to add a title.
-
Enter the new table title in the text entry box.
Change the Data Format for a Column
You can change the formatting for columns containing numeric data, such as dates and monetary amounts.
-
In the Reports view, right-click the column for which you want to change the data format.
-
Select Change Data Format from the context menu.
-
Select the format you want to use. These options vary, depending on the type of numeric data contained in the column.
The data in the column now appears in the new format.
Hide Detail Rows in a Table
-
Place the cursor over
.
-
Select Hide Detail Rows to show only the summarized total for each group.
The Reports Editor applies a summary to each field depending on its data type.
Show Detail Rows in a Table
-
Place the cursor over
.
-
Select Show Detail Rows to display the detailed information for each group
The Reports Editor displays the complete information in each row.
Set Output Scale
You can determine the display size for any report by using the report scaling options, located in the Report Viewer toolbar.
-
Click + to zoom in on the report.
-
Click - to zoom out on the report.
-
Click the size field to open the Zoom Options drop-down menu, and select the percentage by which you want to increase or decrease the size of the displayed report.
Bookmarks Panel
When working with a report that contains bookmarks, they are displayed in a floating panel. Using this panel, you can jump to designated sections of the report.