Complete a Cycle Count
Your open cycle counts are ready for you to complete. When you complete a cycle count, it will move through the different statuses:
- Not Started
- Started
- Recount Required
- Closed
Watch the Video
Audio: Sound Length: 04:52 mins
Learn more
When you are working on an Open Cycle Counts you can complete the following:
- Start the Cycle Count - Add the part counts and correct any costs.
- Add Parts - If you realize that you need to add more parts.
- Import and Export Parts - Use this when you want to export the parts list, complete the count, and then import the parts list back into the cycle count.
- Assign the Cycle Count to a Contact
- View the Cycle Count Details
- Print the Cycle Cycle
- Add a Comment
- Delete Cycle Count - If you no longer need a cycle count, this can be deleted.
Open Cycle Counts
NOT STARTED - Status
The beginning status is NOT STARTED.
STARTED - Status
- From the main Cycle Counts screen, click on the cycle count to display the Cycle Count Number. For example, Cycle Count #53.
- For each inventory item, complete the following:
- In the Bin Location column, enter the part's bin location, if the listed bin location is incorrect.
- In the Current Count column, enter the part's count.
- In the Part Cost column, enter the part's cost, if the listed cost is incorrect.
- At any time, go to the bottom of the screen and click Post Count. This will change the cycle count status from NOT STARTED to STARTED.
- The look at the Notices Column to see the following:
 Recount Accepted - If your count matches current inventory levels or the recount is accepted, then this icon displays.
|
|
If the part is successfully counted and shows a discrepancy, the Current Count number will appear in red as shown below: 15 of 72 states that 15 is the new quantity showing in inventory, against the 72 that were showing previously. A discrepancy of -57. |
 Recount Rejected - If the count doesn't match the inventory level, then this icon displays. Additionally, the status will change to RECOUNT REQUIRED.
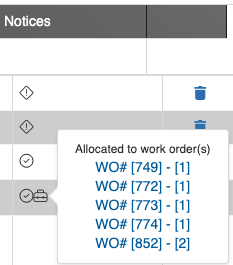
 Allocated to Work Orders - When you hover over this icon, the work order numbers display, and the number of parts allocated to it.

RECOUNT REQUIRED - Status
When the status changes to Recount Required, then you will need to complete the following:
- In the Current Count column, enter the count.
- In the Part Cost column, enter the cost, if the listed cost is incorrect.
- Click the Post Count button.
- Complete steps 1 to 3, until there are 2 consecutive entries that match.
CLOSED - Status
After all the parts are counted, the cycle count will automatically change the status to CLOSED.
Add Parts
When you have a cycle count open and realize that you need to count more parts, then you can manually add more part(s).
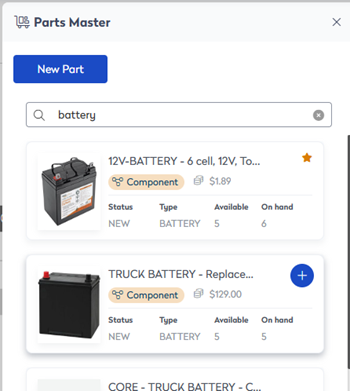
Click the Add Part button and the Parts Master form displays.

New Part
- If the part is a new part, then click the New Part button.

- Then complete the part's details, learn more in Create a New Part and Create a New Tire Record.
- The part is added to the cycle count.
Existing Part
- If the part is an existing part, then in the Search parts master field, enter the name of the part.
- Hover over the part and then click the Add
 icon.
icon.

The part is added to the cycle count.
Assign the Cycle Count to a Contact
- From the Assigned drop-down, select the contact's name.

- If you need additional contacts, then click the Assign Others link and the Assign Additional Contacts displays.
- Select the contacts.
- Click the OK button and the contacts are added.
- Click the Save button.
Print the Cycle Count
- Click the Print
 icon.
icon.

- The cycle count report displays and you can either download or print the report.

Add a Comment
- In the comment field, enter a short comment about the cycle count.
- Click the Save button.
View the Cycle Count Details
- Click the Details
 icon.
icon.

The Cycle Count Details form displays. It is important to remember that the details can't be modified.

Closed Cycle Counts
If you need to view a closed cycle count, then these can be displayed.
- From the view drop-down, click the Closed Cycle Counts.
- Click the closed cycle count that you want to view.

Delete Cycle Count
If you don't want to continue with a count cycle, then this can be deleted.
- Select the cycle count(s) you want to delete.
- From the Actions drop-down, click Delete and the cycle count is deleted.


