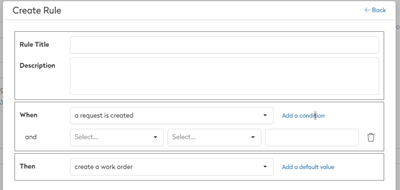
Create a Rule to route the Request
Level: Administrator
You can use this to automate requests to become work requests.
- Navigate to Settings.
- Under the Tools and Support heading, click the Portal icon. The Portal screen displays.

- Click the Request Routing button. The Rules dialog displays.

- Click the + icon.

- In the Rule Title field, enter the name of the rule.
- In the Description field, enter the description of the rule.
When
- The When drop-down, defaults to a request is created.
- Click Add a condition.

- Select either: Request Purpose, Site, Priority, Asset Category, Asset Class, or Issue Description.
- Select either: equals, does not equal, is one of, or is not one of.
- Then, depending on your selection, either enter the value OR select a value.
- If you want to add another condition, you can repeat steps 8 to 11. Note that this adds another AND condition, so this means both conditions must be met.
Then
- The Then drop-down, defaults to create a work order.
- Click Add a default value.

- From the set drop-down, select either: Work Type, Priority, Due Date (# of days), or Trigger down time event.
- Then, depending on your selection, either enter the value OR select a value.
- If you want to add another condition, you can repeat steps 13 to 16.
- Click the Create Rule button.
The rules is saved.
If you no longer need a rule, then click the Delete icon.
