Set up Employee Contacts and Labor Codes
Level: Administrator
This is where you set up the Contact Settings for your Employees, so you can define the Departments, Teams, Labor Codes, and any custom fields:
Access Employee Contact Settings
- Navigate to Settings > Module Settings > Contact > Employee. The employee tab displays under contact settings.
The Employee Tab in contact settings is where Departments, Teams, and Custom Fields are defined. Use these fields when creating new employees for a better organization, making them easier to find and filter.
Departments and Teams
The Departments and Teams organize employees by their appropriate designation through the Employee Management screen.
Add Department
- Click the department + button.

- In the Name field, enter in the department's name.
- Click off the field and it is saved.
Edit Department
You can view or manage which employees are associated with a department.
- Click on the existing department name and the department form displays.

- If you want to edit the name, then click the Edit
 icon and then edit the department name. Click off the field to save.
 - If you want to add employees to the department, then click the Add employees button and the Add Items dialog displays.
- From the list, click the employee names.
- Click the OK button and the employees are added and saved.
- Click the X icon to close the form.
If you need to remove any employees from the department, click the X icon next to the employee's name.
Add a Team
- Click the team + button.

- In the Name field, enter in the department's name.
- Click off the field and it is saved.
Edit a Team
You can view or manage which employees are associated with a team.
- Click on the existing team name and the team form displays.

- If you want to edit the name, then click the Edit
 icon and then edit the team name. Click off the field to save.
 - If you want to add employees to the team, then click the Add employees button and the Add Employees dialog displays.

- From the list, click the employee names.
- Click the OK button and the employees are added and saved.
- Click the X icon to close the form.
If you need to remove any employees from the department, click the X icon next to the employee's name.
Labor Codes
If you don't see Labor Codes in this screen, then this means the Labor Codes is not enabled in Marketplace.
This is where you can manage your company's default labor codes, and if you want to set up default labor codes for your sites or employees, then see Configure Labor Codes.
Add Labor Code
- Click the team + button.

- In the Name field, enter in the labor code's name.
- Click off the field and it is saved.
Edit Labor Code
You can edit the labor code's settings and labor rate.
- Click on the existing labor code and the pop-up displays.

- If you want to rename the labor code, then complete the following:
- Click the Rename button.
- Edit the labor code name.
- Click the Rename
 icon to save.
- By default, the Active Rate toggle is ON and if you want to de-activate this code, then click the toggle to turn it OFF. This sets the labor rate globally, and this can be the default rate.
- In the Rate field, enter the amount.
- Click the Default check box if you want this labor code to be the default.
Delete Labor Code
If you need to delete the labor code, click the Delete button. If the labor code is in use, then the system will not let you delete the labor code.
Custom Fields
You can add extra custom fields to the Employee Contact and these will display in the Employee form.
Add Custom Fields
- Click the custom fields + button and the Custom Fields dialog displays.

- From the list select a custom field. If you need to create a new custom field, then see Create or Edit Custom Fields.
- Click the Add button and the custom field is added.
Make a Custom Field mandatory or optional
- To make the field mandatory, click the Not Required
 icon and change it to Required
  or vice versa.
Delete a Custom Field from the Employee Settings
- Click the X icon, next to the custom field's name.
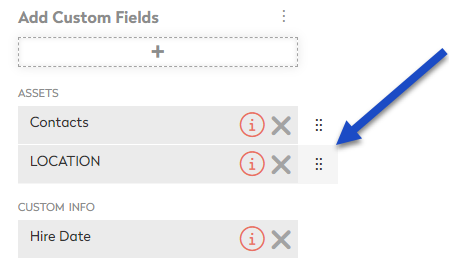
Reorder the Custom Fields
- Hover over the custom field.
- Click the double ellipsis icon and then drag and drop the custom field up or down to change the order.

See the Employee Contact Settings in Action
When you have set up the employee contact settings for departments, teams, and custom fields, then you will see these fields in the Employee's Contact Profile form.
- Navigate to Settings.
- Under the Administration heading click Employees & Users and the Employee Management screen displays.
- Click an employee's name and the Conact Profile form displays.
Here you can see the (A) employee's department is selected, the (B) employee's team is selected, and (C) Custom Info contains the custom fields.
Learn more about how to add new employees or edit employees in the Administrative area called Employees and Users.

