Set up General Settings for Inventory
The Inventory General settings contain the default settings used when creating a new part, such as:
- Inventory Defaults - Set the defaults for a new part:
- Method
- Base Unit of Measure
- Part Type
- Part Status
- Barcode Labels
- List Setup - The following drop-downs contain lists and you can modify these lists:
- (A) Part Type
- (B) Part Status
- (C) Units of Measure
- Custom Fields - If you need extra fields, then these can be defined.

Early Access - Part Criticality and Cycle Counts
Additionally, it contains the default settings used when you edit a part:
- (C) Part Criticality - This lets you specify that the part is critical and the level, such as High, Medium, and Low; if the field is left blank, then the part is not a critical part. Your Administrator can add or edit these labels. This field is used when you create Cycle Counts to let you count the critical parts.

Access Inventory Settings
- Navigate to Settings > Module Settings > Inventory. The General tab from the Inventory Settings screen displays.
Inventory Defaults
Inventory defaults are used automatically when creating a new part, see Create a New Part.

- From the Method drop-down, select either:
- FIFO - First in, first out
- LIFO - Last in, last out
- From the Base Unit of Measure drop-down, select the default unit of measure for which the parts are consumed. This list is populated from the List Setup's Units of Measure.
- From the Type drop-down, select the default part type. This list is populated from the List Setup's Part Type.
- From the Status drop-down, select the default part status. This list is populated from the List Setup's Part Status.
The changes are saved automatically.
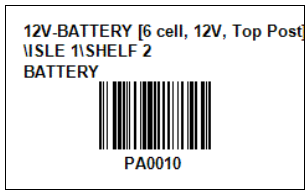
Barcode Labels
Barcodes for parts include up to four text lines to describe the associated part. The information that populates in the barcode is configured in the general inventory settings under barcode labels.
- To access the Barcode Labels form, click the Barcode Labels
 icon.
icon.

- For the Text Lines, select the field you want to display in the barcode.

If you want to remove a text line, then click the Remove  icon.
icon.
List Setup
List Setup is where the drop-down options for Part Status, Part Type, Units of Measure, and Parts Criticality are defined and more can be added.

Add a List Item
- Click the + icon.
- In the field, enter the name.
- Click off the name and it is saved to the list.

- Click the list item.
- If the item needs decimal places, enter the number.
Rename a List Item
- Click the list item.
- Click the Rename button.
- In the Name field, enter the new name.
- Click the Pencil
 icon to save the name.
Delete a list item
- Click the list item.
- Click the Delete button and the item is deleted.
Custom Fields
Custom Fields are available for any information needed that is not within the default fields. Learn more in Custom Fields.
