Edit an Employee
Level: Administrator
You can edit an employee to include additional information, and when the employee leaves your company, they can be made inactive.
- Navigate to Settings.
- Under the Administration heading, click Employees & Users and the Employee Management screen displays.
- Browse or search the list for the employee.
- Click the employee's name and the Contact Profile form displays with tabs.
Employee Details Tab
The Employee Details Tab contains the following expandable tabs.
Configuration expand tab (click to see instructions)

- From the Department drop-down, select the department.
- In the Teams field, enter the team(s).
- In the Barcode/Tag field, enter the employee's badge number.
- Either use the default or uncheck the Can be assigned to work check box if they will not be assigned work orders.
The employee's department and team are set up in Set up Employee Contacts.
Contact Details expand tab (click to see instructions)
- Click the Contact Details expand
 icon.
icon.
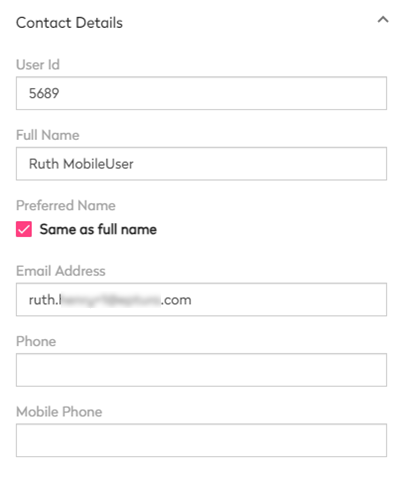
- In the User Id field, enter the unique identifier of the employee.
- In the Full Name field, enter the full name of the employee.
- Uncheck the Same as full name check box and then enter the employee's preferred name.
- In the Email Address field, enter the email address of the employee.
- In the Phone field, enter the phone number of the employee.
- In the Mobile Phone field, enter the mobile phone number of the employee.
Address Details expand tab (click to see instructions)
- Click the Address Details expand icon.
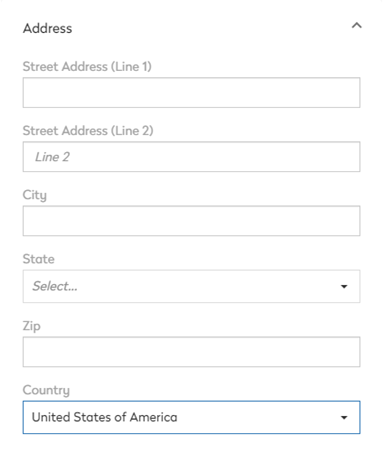
- In the Street Address field, enter the address of the employee.
- In the City field, enter city of the employee.
- From the State drop-down, select the state.
- In the Zip field, enter the zip code or postal code.
- From the Country drop-down, select the country.
Custom Info expand tab (click to see instructions)
- Click the Custom Info expand icon.

- Complete any custom fields.
- When you have finished making edits, click the Save button.
The employee's custom fields are set up in Set up Employee Contacts.
Security Roles and Labor Codes Tab
Security Roles for Sites tab (click to see instructions)
- Click the Role icon and the Security Roles tab displays.
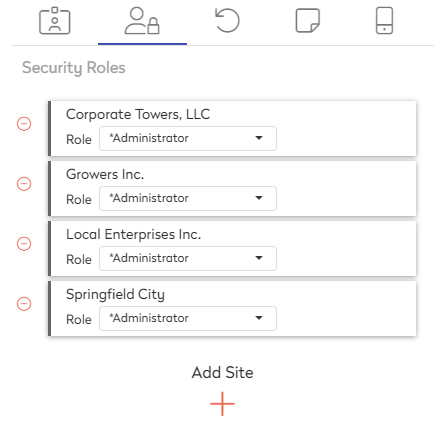
Security Roles for Sites
- Click the Add
 icon.
icon. - From the Site drop-down, select the site and then the site displays.
- From the Role drop-down, select either: Administrator, Full User, Read-Only, and No Access. Learn more about the roles, in Security Roles and Roles Management.
Labor Codes
- For the Site, click the Expand icon to see the labor codes.

- Click the Add + icon and the Add Labor Codes dialog displays.

- Select the labor code.
- Click the OK button.

- Click the Rate Override check box.
- For the labor rate, enter the amount.
- Repeat the steps 2 to 10 to add all the required sites and labor codes for this employee.
- When you have finished making edits, click the Save button.
Timeline Tab
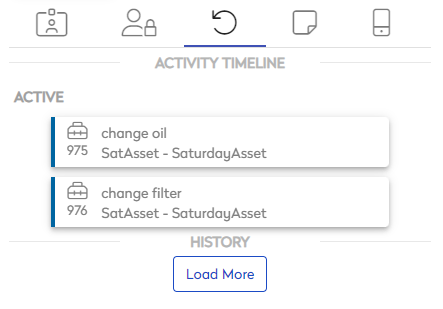
Timeline tab (click to see instructions)
- Click the Timeline icon to display the employee activity.
- Click on an item to display the history details.
- When you have finished making edits, click the Save button.
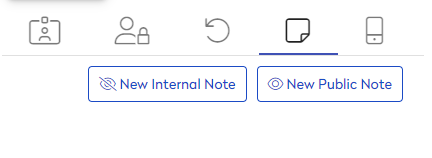
Notes Tab
Notes tab (click to see instructions)
- Click the Note icon.
- Click either New Internal Note or New Public Note to enter notes about the employee.
- When you have finished making edits, click the Save button.
Devices Tab
Devices tab (click to see instructions)
- Click the Device tab.
- In the Name field, enter the device's name.
- If you need to remove a device, click the Delete
 icon and if needed check the When removing a device, deactivate on next sync check box.

Certifications tab
Certifications tab (click to see instructions)
- Scroll the tabs list, to display the Certifications tab.
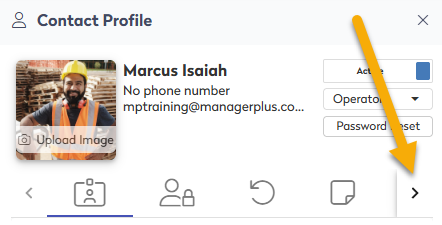
- Click the Certifications tab.
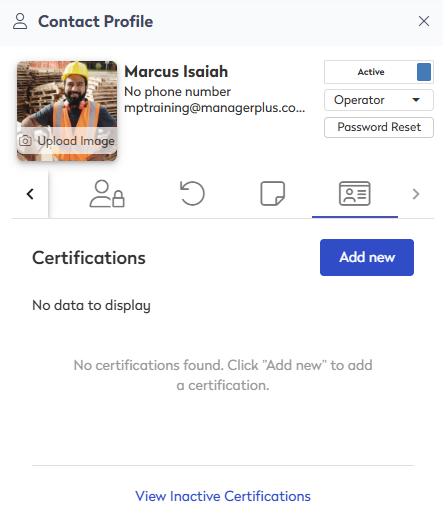
Add a New Certification
- Click the Add new button and the Add New Certification dialog displays.

- From the Certification Type drop-down, select the certification type. Note: The certification types are set up by your Administrator, see Set up Certificate Types.
- From the Issuer drop-down, select the issuer.
- From the Issuer drop-down, select the status. Note: The statuses are set up by your Administrator, see Set up General Settings for Certification.
- From the Issuance date picker, select the date the certificate was issued.
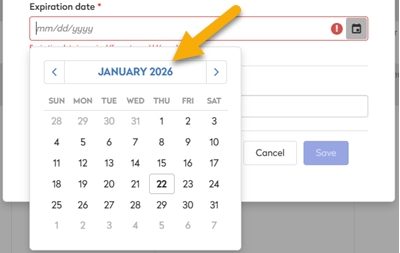
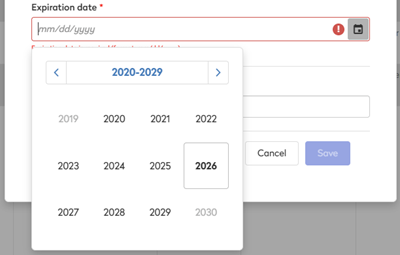
- From the Expiration date picker, select the date the certificate will expire.
If you have an expiration date that's a year or more in advance, you can quickly select the date. In the calendar picker you can click the MONTH YEAR and then the YEAR to display the year selection.
- In the Additional Contact, enter the contact's name.
- Click the Save button.
Edit a Certification
- From the list, expand the certification.
- Click the More Actions icon the sub-menu displays.

- The options displays:
- Edit - Select the Edit option and the Edit Certification displays.
- Delete - Select the Delete option and the message "Deleting a certification is permanent and cannot be undone." Click the Yes, delete certification button.
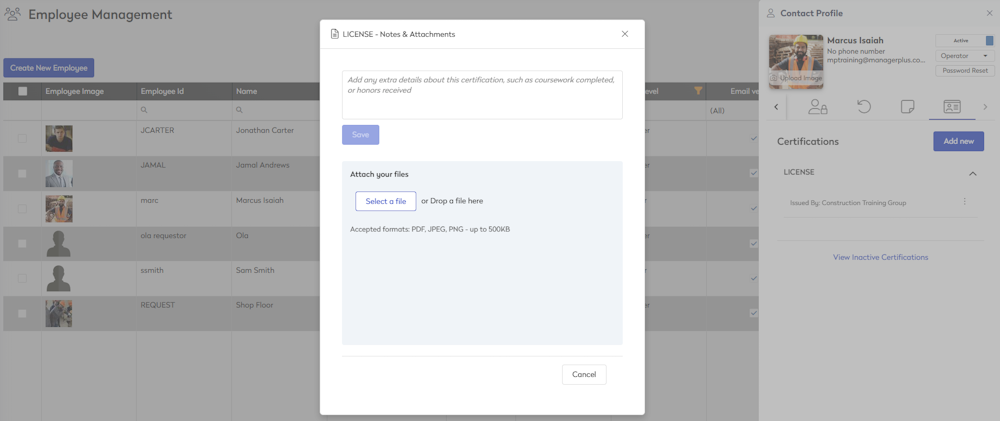
- Notes & Attachments - Select the Notes & Attachments open and the dialog displays. You can either enter in extra details about the certification and attach files in the format PDF, JPEG, or PNG (up to 500KB in size).
When you have finished making edits, click the Save button.