Set up Brands and Models Settings for Inventory
The Brands and Models tab is where part's (A) brands and (B) models are added to use when creating a new part. This allows for uniformity when searching and filtering for a part by brand or model.

Access the Brands and Models Tab
- Navigate to Settings > Module Settings > Inventory > Brands and Models
Brands
Create a Brand
- In the Brand drop-down, enter the name of the brand.
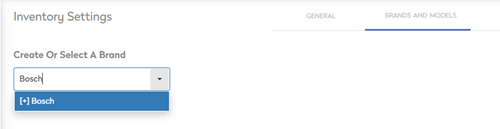
2. Click the + brand name and the brand is created.

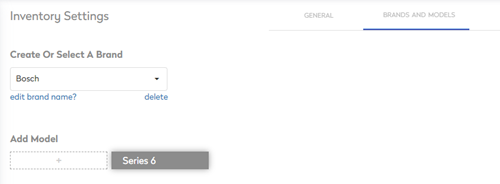
Edit a Brand
- From the Brand drop-down, select an existing brand name.
- Click the edit brand name link.
- Change the Brand's name.
- Change the name.
- Click off the name and it is saved.
Delete a Brand
- From the Brand drop-down, select an existing brand name.
- Click the delete link and the name is deleted.
Models
Create a Model
- From the Brand drop-down, select an existing brand name or create a new brand name.
- From the Add Model area, click the + icon.
- In the Model field, enter the name of the model.

- Click off the name and it is saved.
Rename the Model
- Hover over the Model's Name.
- Click the Model's name.
- Change the name.
- Click off the name and it is saved.
Delete the Model
- Hover over the Model's Name.
- Click the X icon and the name is deleted.