When you want to complete a count, stocktake, or audit of your inventory parts, you can easily create a cycle count.
Watch the Video
Audio: Sound Length: 04:28 mins
Watch the video in ...
Disclaimer: This video is translated from English using an AI tool; you may notice that the length of the speech may be slightly out-of-sync with the user interface recording.
Learn more
Step 1. Select the Cycle Count Type
- From the menu, navigate Inventory > Cycle Counts.
- Click the New Cycle Count button.
The New Cycle Count form displays.

- From the form, select a type either:
- Bin Location Only - Create a Cycle Count using only Bin Locations and no additional filters.
- High Cost Per Item - Create a count list for high-cost parts by setting a minimum part cost.
- Inventory Shortages - Count parts with quantities below their minimum stocking level.
- Not Recently Counted - Count parts that have not been counted since a selected date.
- Part Type - Count parts based on a specific Part Type.
- I want to pick specific parts on the cycle count itself
It is important to remember that when you set the Require Recount toggle, this can't be changed after you have created the cycle count.
Step 2. Criteria & Step 3. Create
Depending on the type of cycle count selected, different criteria fields display.
Bin Location Only
|

|
Type
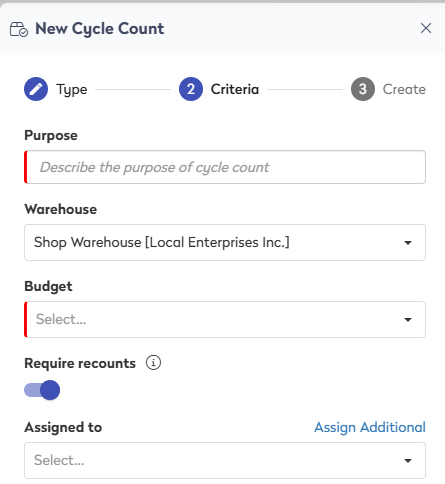
- In the Purpose field, enter the purpose.
- From the Warehouse drop-down, select a warehouse. Remember that Cycle Counts can only be performed on one warehouse at a time.
- From the Budget drop-down, select the budget.
- By default, the Require recounts toggle is ON, where the recount is accepted when two consecutive counts match. If you don't need the recount, then click the toggle to turn this OFF.
- From the
- From the Assigned drop-down, select a person.
- If you need additional people, then:
- Click the Assign Additional link and the Assign Additional Contacts displays.
- Select the contacts.
- Click the OK button.
- When you have completed the type, click the Next button.
Criteria & Save
- Either click Select All or click the Bin Location(s).
- Click the Create icon and your Cycle Count displays.
|
High Cost Per Item
|

|
Type
- In the Purpose field, enter the purpose.
- From the Warehouse drop-down, select a warehouse. Remember that Cycle Counts can only be performed on one warehouse at a time.
- From the Budget drop-down, select the budget.
- By default, the Require recounts toggle is ON, where the recount is accepted when two consecutive counts match. If you don't need the recount, then click the toggle to turn this OFF.
- From the
- From the Assigned drop-down, select a person.
- If you need additional people, then:
- Click the Assign Additional link and the Assign Additional Contacts displays.
- Select the contacts.
- Click the OK button.
- In the Select minimum cost field, enter the cost.
- When you have completed the type, click the Next button.
Criteria & Save
- In the Select minimum cost field, enter the cost.
- Either click Select All or click the Bin Location(s).
- Click on the Create icon and your Cycle Count displays.
|
Inventory Shortages
|

|
Type
- In the Purpose field, enter the purpose.
- From the Warehouse drop-down, select a warehouse. Remember that Cycle Counts can only be performed on one warehouse at a time.
- From the Budget drop-down, select the budget.
- By default, the Require recounts toggle is ON, where the recount is accepted when two consecutive counts match. If you don't need the recount, then click the toggle to turn this OFF.
- From the
- From the Assigned drop-down, select a person.
- If you need additional people, then:
- Click the Assign Additional link and the Assign Additional Contacts displays.
- Select the contacts.
- Click the OK button.
- When you have completed the type, click the Next button.
Criteria & Save
- Either click Select All or click the Bin Location(s).
- Click the Create icon and your Cycle Count displays.
|
Not Recently Counted
|

|
Type
- In the Purpose field, enter the purpose.
- From the Warehouse drop-down, select a warehouse. Remember that Cycle Counts can only be performed on one warehouse at a time.
- From the Budget drop-down, select the budget.
- By default, the Require recounts toggle is ON, where the recount is accepted when two consecutive counts match. If you don't need the recount, then click the toggle to turn this OFF.
- From the
- From the Assigned drop-down, select a person.
- If you need additional people, then:
- Click the Assign Additional link and the Assign Additional Contacts displays.
- Select the contacts.
- Click the OK button.
- From the Not counted since (date) calendar picker, select a date.
- When you have completed the type, click the Next button.
Criteria & Save
- From the Not counted since (date) calendar picker, select a date.
- Either click Select All or click the Bin Location(s).
- Click the Create icon and your Cycle Count displays.
|
Part Type
|

|
Type
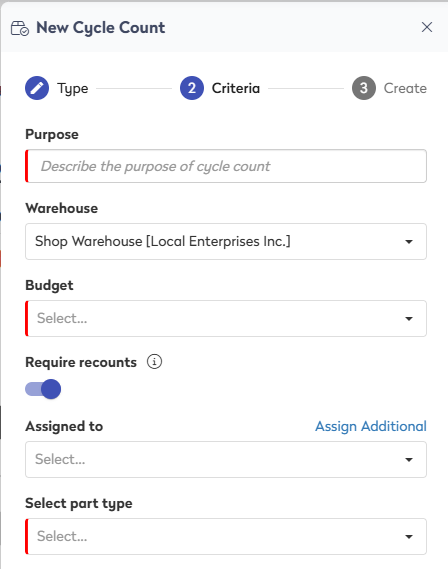
- In the Purpose field, enter the purpose.
- From the Warehouse drop-down, select a warehouse. Remember that Cycle Counts can only be performed on one warehouse at a time.
- From the Budget drop-down, select the budget.
- By default, the Require recounts toggle is ON, where the recount is accepted when two consecutive counts match. If you don't need the recount, then click the toggle to turn this OFF.
- From the
- From the Assigned drop-down, select a person.
- If you need additional people, then:
- Click the Assign Additional link and the Assign Additional Contacts displays.
- Select the contacts.
- Click the OK button.
- From the Select part type drop-down, select a part type.
- When you have completed the type, click the Next button.
Criteria & Save
- From the Select part type drop-down, select a part type.
- From the Not counted since (date) calendar picker, select a date.
- Click the Create icon and your Cycle Count displays.
|
I want to pick specific parts on the cycle count itself
|

|
Type
- In the Purpose field, enter the purpose.
- From the Warehouse drop-down, select a warehouse. Remember that Cycle Counts can only be performed on one warehouse at a time.
- From the Budget drop-down, select the budget.
- By default, the Require recounts toggle is ON, where the recount is accepted when two consecutive counts match. If you don't need the recount, then click the toggle to turn this OFF.
- From the
- From the Assigned drop-down, select a person.
- If you need additional people, then:
- Click the Assign Additional link and the Assign Additional Contacts displays.
- Select the contacts.
- Click the OK button.
- When you have completed the type, click the Next button.
Criteria & Save
No criteria displays and the cycle count is created.
|


