Customer Module Overview
The Customer module is where you can manage all your customer details, notes, price points, and quickly look up work orders and invoices. Keeping customer records is essential for maintaining strong relationships with your customers.
- Contact Details - Accurate and up-to-date contact information helps to ensure timely follow-ups.
- Work Requests - Your customers can be set up to log into Eptura Asset and submit work requests. This reduces your overhead and offers your customers the convenience of submitting requests at any time, without the need to wait for business hours or make phone calls. It also allows for easy logging and tracking of customer interactions.
- Price Points - You can assign customers to specific sites, where you can have custom price points applied for each site and each customer.
- Activity Timeline - Each customer record contains an activity timeline where you can quickly look up your customer's work order and invoice history.
More details can be found below:
Watch the Video
Language: English (US) Length: 3:43 minutes
Watch the video in ...
Disclaimer: This video is translated from English using an AI tool; you may notice that the length of the speech may be slightly out-of-sync with the user interface recording.
Learn more
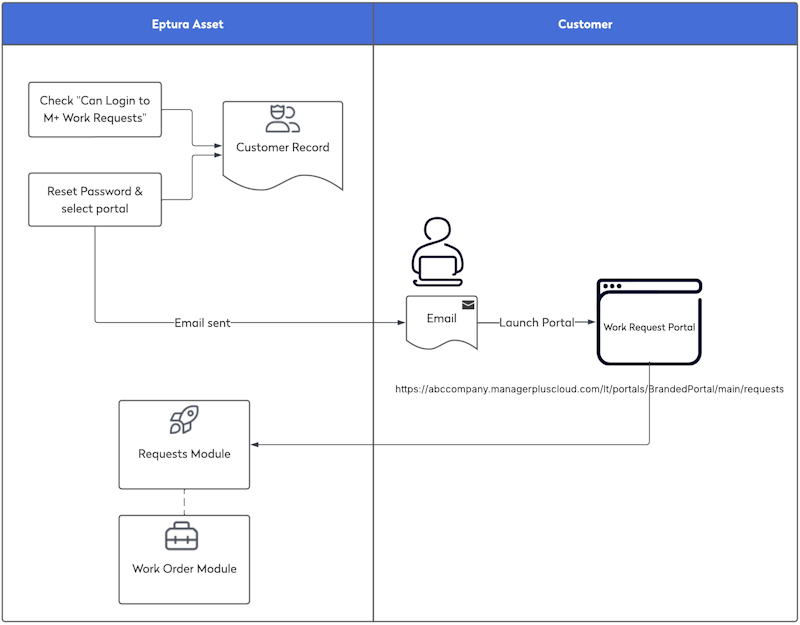
Customer's Work Requests Process

When you create a new customer record, there is a toggle called (A) Can Login to M+ Work Requests, and this is also available when you open an existing customer record. When you enable this, it gives the customer permission to log into Eptura Asset's Work Request portal.

After this is enabled, click (B) the Password Reset button to display the Select a Portal dialog.
Select the portal you want your customer to use and then click the Save button.

Next, Eptura Asset will send an email to the customer with a link to access the Work Request Portal. Your customer can open the Work Request Portal and set up their password; now they are ready to submit work requests.
The requests will appear in the Request module, where you can add assets, internal or public notes, and resolve the request and also, a work order is created in the Work Order module.
Assign Sites and Price Points
When you want to assign a customer to certain sites, from the customer list, click the customer's name.
In the customer record, click the Sites  tab.
tab.

By default, the customer will be assigned to all the sites selected in your preferences.
Remove Sites
If you want to remove sites, then click the Delete  icon next to the sites, leaving only the sites relevant to that customer.
Add Sites
- Click the Add customer to new site button.
- From the Select drop-down, select the site you want to assign them to.
- After the site is added, you can select a price point for the customer or leave it blank to use the default price point.
Remember, your Administrator sets up the Price Points.
Activity Timeline
If you want to see a customer's activity, then from the customer list, click the customer's name to open the customer record.
Click the Timeline  tab and you can see a list of the customer's most recent Work Orders and Invoices.

Click the Work Order and/or the Invoice buttons to toggle them on and off so you can view one or the other, or both.
In the list, you can click a Work Order to open it, view the details, or make changes.
