Working on a Request
After the work request is created, then you can update the details, status, add attachments or URL links, and notes.
- Navigate to Requests. The Request Management screen displays.
- From the list, click a request to view the work request screen displays.

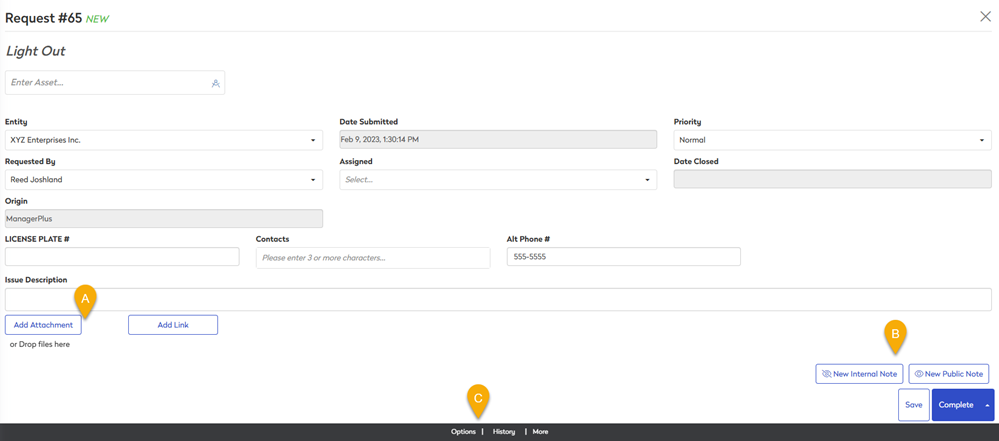
- (A) Add an Attachment or Link to a Work Request - This lets you add an attachment or link to an attachment.
- (B) Add Notes to a Work Request - This lets you add a internal note or public note.
- (C) Work Request Footer - This is a quick menu to the following:
- Options - this displays the menu items, Create new and Delete.
- History - this displays the Asset Details and Contact Details.
- More - this displays the menu item, View Work Order.
Attachment
You can quickly add attachments to your work request.
- You can add an attachment by using either:
- Click the Add Attachment button, then navigate and select the file. Then the attachment is uploaded.
- Find the attachment on your file system and then drag and drop the file to area. Then the attachment is uploaded.
- Click the Save button and this will save the attachment to your Work Order Request.
Internal or Public Note
You can add notes to your work request, and these can be:
- Internal Note - this note will stay internal and a notification will be sent to the individuals assigned to the work request.
- Public Note - this note will be public and a notification will be sent to all individuals involved, including the work requester.
- To add a note, click either:
- the New New Internal Note button and the New Internal Note dialog displays.
- the New Public Note button and the New Public Note dialog displays.
- In the description field, enter the note.
- Click the Add Note button and the note is added.
- Click the Save button and this will save the note at the end of the work request.
For the note you want to delete, click the Delete icon.
History
When you are working on a work request, you may need to look back on the history of the request.
- From the work request footer, click History > Asset Details. The Asset Details dialog displays and this contains the history of the work orders and you can quickly see the type, ID number, purpose, creation date, completion date, and status.
- If you want to view the work order, then click on a line and the work order displays.
- After you have finished with the work order then click the X icon to close the screen and return to the history.
