Using the Vendor Portal
Much of your maintenance responsibilities may be performed by outside contractors or vendors. The Vendor Portal allows contractors to easily report back to you the work they performed and to list costs and expenses incurred while maintaining your assets and equipment. You'll enjoy greater ease in tracking and communicating with your vendor on a project, through the Vendor Portal.
Vendor Portal benefits include:
- No vendor license or login is required for the vendor to interact with your work order.
- Formatted to display on a mobile device or desktop application.
- Easy communication between the application and the vendor.
- Vendors can add in their before and after photos and their invoice.
Before you can use the Vendor Portal, make sure the following is completed:
- Vendor Record - You need to make sure your Vendor record has the "Can Be Assigned To Work" setting checked on; see Update Vendor's Details.
- Vendor Portal - In the Work Order Settings is where you can adjust what a vendor can see on the work order; see Set up the Vendor's Work Orders.
Watch the Video
Audio: Sound Length: 03:22 mins
Watch the video in ...
Disclaimer: This video is translated from English using an AI tool; you may notice that the length of the speech may be slightly out-of-sync with the user interface recording.
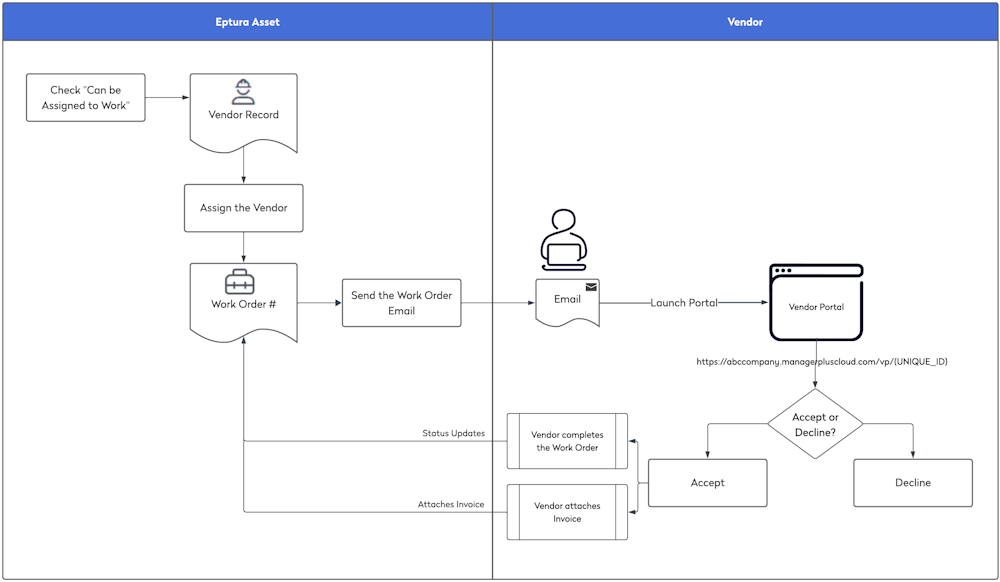
Vendor Portal Process
Let's go through the Vendor Portal process and this includes:
- Assign the Vendor to the Work Order
- Send the Work Order Email to the Vendor
- Vendor receives the Work Order Email - they can Decline or Accept the work order.
- Accept and Complete the Work Order - the vendor completes the work and when the work is done, then your Vendor can attach and submit their invoice.
- Work Order updates with the Vendor Status - as the work is completed, the Vendor status updates appear on the Work Order.

Assign the Vendor to the Work Order
- From the menu, navigate to Work Orders.
- From the list, click the work order you want to edit.
- In the Assign Vendor field, either enter the vendor's name or click the Vendor
 icon to display the Vendor Work Order Assignment.

- Search or browse the list for the vendor.
- Select the vendor and they are assigned.
- Click the Save button.
Send the Work Order Email to the Vendor
- Click the Email
 icon and the Email Who? dialog displays.

- Click the Email Vendor option.

- Click the Send button and the email is sent.

Vendor receives the Work Order Email
Your vendor will receive the email.
- Open the email and your vendor will see a button with the WO (work order) number.

- Click the WO # button and the work order displays in the Vendor Portal.

- Either click the Decline button or Accept button.
Accept and Complete the Work Order
When you accept the work order, the work order details display.

- Complete the following fields:
| Field | Description |
|---|---|
| Notes |
|
| Photos |
|
| Customer Signature |
|
| Laborer Name |
|
- When the vendor's work is done, then click the Complete Work button.

- Click the Attach Invoice PDF button and upload the invoice.

Work Order updates with the Vendor Status
As the vendor works on the work order, the status will flow back into the work order.

Invoice
Click the Attachments tab and then you can view and download the invoice.
Signatures
To view the signatures (customer signature and laborer name), click the Information  icon and the Portal Records dialog displays.
